
Introduction
This is the chapter web page to support the content in Chapter 13 of the book: Exploring BeagleBone – Tools and Techniques for Building with Embedded Linux. The summary introduction to the chapter is as follows:
In this chapter you are introduced to rich user interface (UI) architectures and application development on the Beagle Board platform. Rich UIs allow for a depth of interaction with an application that is not possible with command-line interfaces (CLIs)—in particular, the addition of graphical display elements can result in easier-to-use applications. Also introduced are different Beagle board architectures that can support rich UIs, such as general-purpose computing, touch screen display modules, and virtual network computing (VNC). Different software application frameworks are examined for rich UI development, such as GTK+ and Qt. The Qt framework is the focus of the discussion, largely due to its comprehensive libraries of code. An example rich UI application is developed for a Beagle board that uses the TMP36 temperature sensor. Finally, a feature-rich remote fat-client application framework is developed, and two example applications are described—one that uses the TMP36 sensor and a second that uses the ADXL345 accelerometer.
Learning Outcomes
After completing this chapter, you should be able to:
- Configure the Beagle board as a general-purpose computing device and use Bluetooth peripherals to control it.
- Acquire hardware for LCD touch screen display applications.
- Use virtual network computing (VNC) to remotely execute graphical user interface (GUI) applications on a Beagle board.
- Build rich user interface (UI) applications that execute directly on a Beagle board using the GTK+ and Qt frameworks.
- Build Qt applications with advanced interfaces that interface to hardware sensors on a Beagle board.
- Build fat-client remote Qt applications that communicate using TCP sockets to a server that is executing on a Beagle board.
- Enhance TCP server code to be multi-threaded, in order to allow multiple simultaneous connections from TCP client applications.
- Build remote Qt GUI server applications that communicate, using TCP sockets and XML, to a client application on a Beagle board
Installing Qt Creator on a Desktop Computer
Step 1. Install Qt Creator
You can download and install the latest version of Qt Creator directly from the address: http://download.qt.io/snapshots/qtcreator/
In my case, I am installing Qt Creator 3.3.x for Linux (on my 64-bit Debian image) as this allows for cross-compilation support. Currently I am downloading a binary with the name: qt-creator-opensource-linux-x86_64-master.run, which is approximately 84MB in size. Once downloaded, this binary can be installed on the desktop computer:
molloyd@debian:~$ cd ~/Downloads/
molloyd@debian:~/Downloads$ ls -l
total 85796
-rw-r----- 1 molloyd molloyd 87845567 Jan 11 23:20 qt-creator-opensource-linux-x86_64-master.run
molloyd@debian:~/Downloads$ chmod ugo+x qt-creator*
molloyd@debian:~/Downloads$ ./qt-creator-opensource-linux-x86_64-master.run
This installs Qt Creator 3.3.x — in my case I installed it in the user directory ~/qtcreator-3.3.81/. This step installs the Qt Creator integrated development environment (IDE) — it does not install Qt itself.
Step 2. Installing Qt (4.8.x)
The next step is to install Qt. Qt is the libraries and tools (e.g. qmake) that you need to build with Qt. You can install multiple versions of Qt at the same time and together with C++ compilers each version is called a kit. The easiest way to install the version of Qt that is currently required for working with the BeagleBone is to use apt-get:
molloyd@debian:~$ sudo apt-get install qt4-dev-tools
molloyd@debian:~$ qmake -v
QMake version 2.01a
Using Qt version 4.8.2 in /usr/lib/x86_64-linux-gnu
It is also possible to build Qt from source. You can do this by going to http://download.qt.io/archive/qt/ and downloading the exact version that you require.
Step 3. Configuring a Qt Creator Kit
You can then start Qt Creator as follows:
molloyd@debian:~$ cd qtcreator-3.3.81/bin/
molloyd@debian:~/qtcreator-3.3.81/bin$ ./qtcreator
- The Qt Creator start-up screen should present you with the option to create a new project using a button or by using File → New File or Project → Choose Application and “Qt Widgets Application”. Press “Choose”.
- Give the project a name and location (e.g., QtTest in /home/molloyd/)
- The next option is Kits (Kit Selection). It should state that “No valid kits found”. Press on options and you should see a dialog as in Figure 1 below.
- Click on the “Qt Versions” tab and click on “Add…” and browse to /usr/bin/ where you should see the qmake and qmake-qt4 entries. Click on qmake and then click Open. You should then see that a manual Qt version has appeared as in Figure 2 below.
- The compiler should have been auto-detected. If not add it by browsing to the location of gcc/mingw (e.g., /usr/bin/g++).
- Click on the “Kits” tab again and click on “Add…” Give the kit a name (e.g., Qt for Desktop) and the entries should appear as in Figure 3 below. Press OK and then a kit should appear in the dialog. Press Next. Press Next again. Press Finish.
- All going well, you can now click on the green play button on the bottom left of the IDE and the output will appear as in Figure 4.
At any stage you can return to these options using Tools → Options.
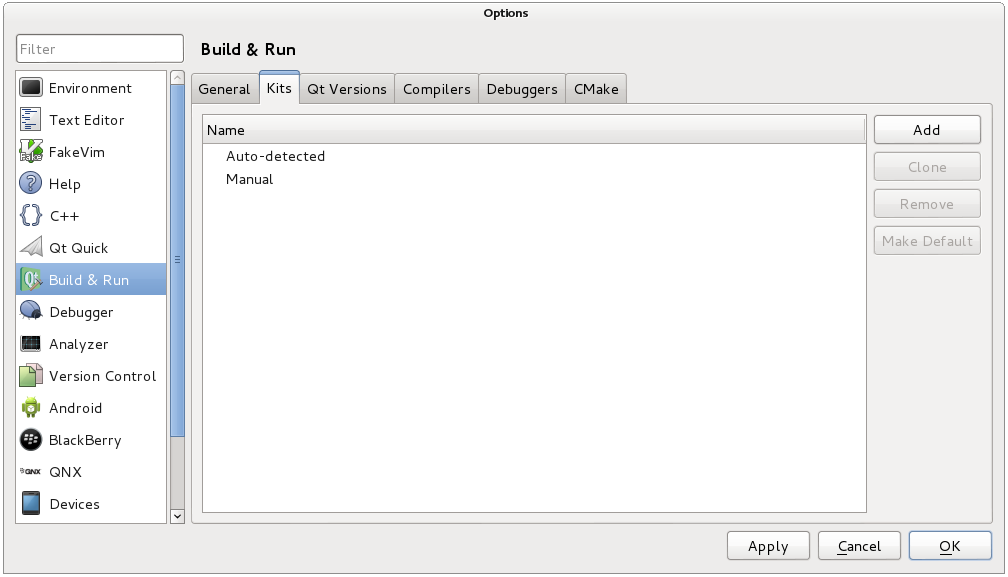 Figure 1. Qt Kits
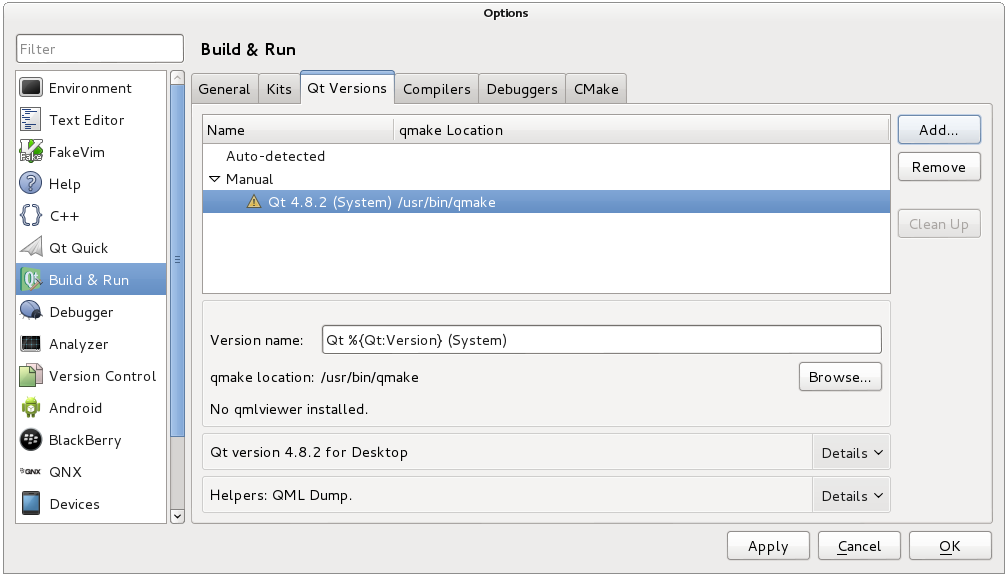 Figure 2. Qt Version
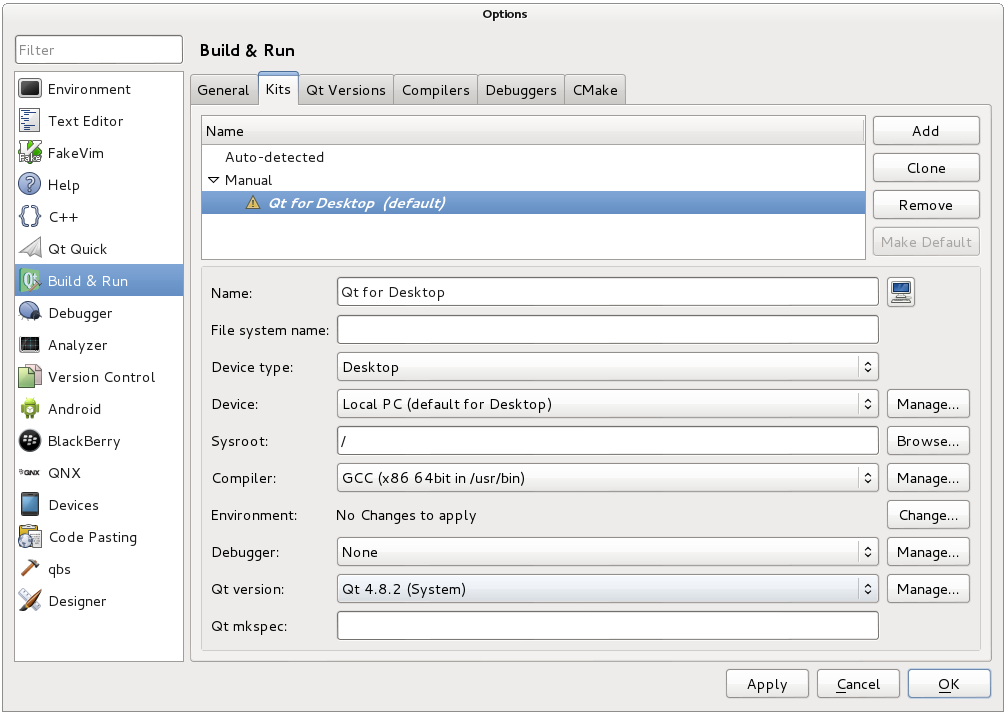 Figure 3. Qt Kit options
 Figure 4. Qt Project
Digital Media Resources


External Resources
Important Documents
External Web Sites
The AM335x Technical Reference Manual (TRM)
The BeagleBone Black System Reference Manual (SRM)
- Core documentation on GTK+2.0: tiny.cc/ebb1103
- Qt Signals and Slots: tiny.cc/ebb1104
Loc 12344: In the “Fat-Client Qt GUI Application,” I couldn’t get the IP dialog GUI utility to work correctly Derek. Put simply, the getIPAddress() method in the serversettingsdialog.cpp file was returning a value like this “3232237314” (for the default 192.168.7.2 URL), but that didn’t seem to have any positive effect when I changed the IP address using your dialog utility. So I researched the available QAbstractSocket::connectToHost() methods and found an overloaded one that took an IP string…and changed the code accordingly. So now it seems to work correctly for me–and I am able to change the IP address just fine from the GUI. Note that the PORT number was getting changed alright–but it just seemed that the quint32 value being returned by your version of the getIPAddress() method, didn’t seem to do what it was supposed to. Anyway, here are the changes I made with comments showing where they were made posted in two perpetual (and private) links. I also changed the headers serversettingsdialog.h file of course, but that’s not shown in these two links:
*************************************************
serversettingsdialog.cpp: http://paste.debian.net/hidden/2794fca6/
mainwindow.cpp: http://paste.debian.net/hidden/390c47e4/
*************************************************
I can’t yet explain why your version of the code didn’t work for me. I haven’t researched how that 32-bit integer value is supposed to represent the URL address, but it looked somewhat strange to me. I’ll do more research on it tomorrow, but your text didn’t really talk about the meaning of the value–only that the getIPAddress() method returned the quint32 value.
I’ll look into that issue as to why the value was not changing, but just to explain why I have treated an IP address as an unsigned 32-bit integer (quint32). An IP address is made up of four 8-bit numbers (bytes), so it has the range 0.0.0.0 to 255.255.255.255 (i.e., each byte can contain 0-255, or 0-FF in Hexadecimal). That means that an IPv4 address can be stored within a 32-bit data container. If you look at the address 192.168.7.2 = C0.A8.07.02 = C0A80702 (hexadecimal) = 3232237314 (decimal).
If I remember correctly, I did this because I wanted to have four boxes in which to enter the IP address, which meant that I had to “assemble” the IP address value from the four 0-255 values that are entered. I did this by shifting left the numbers by 24, 16, 8 and 0 places for 192, 168, 7 and 2 respectively in that example. It may seem slightly complex, but I couldn’t find a better way to do it effectively.
Yeah, I understand why you did it. But I simply read in each of those spin-box values as a string, and then concatenated them all–and then fed them to that overloaded connectToHost() method. I completely understand the 32-bit nature of the IPv4 address, and I am not at all saying that the way you did it was wrong…only that the 32-bit unsigned integer that returns didn’t work for me to change the IP address using your little dialog box. But since there’s an overloaded connectTohost() method that takes a string, I just used that. Now it seems to work as expected. Using the strings seemed simpler to me, but I wasn’t sure if there was some other reason you used the 32-bit unsigned integer. So I thought I would mention the problems I ran into, and ask if there was something I was missing.
Forgot to mention–the 32-bit value WAS in fact changing when I used your dialog box to change the IP I wanted to use. The debugger showed it changing. However it seemed to have no effect in terms of letting me connect to my Beaglebone. I had to hard code the IP address I needed into the constructor…and then it worked. However I couldn’t get it to work in terms of letting me connect to my BB.
A question regarding Qt Creator: it doesn’t appear to install using sudo apt-get install qt4-dev-tools.
I get: Qt4 Designer, Qt4 Assistant, and Qt4 Linguist.
This remained true even after a successful build from source. The version 4 Qt installers come from:
http://download.qt.io/archive/qt/4.8/4.8.6/
I’m using Ubuntu 14.04 desktop, and used the Ubuntu Software Center to install Qt Creator.
I’m baffled as to where the generic Qt Creator installer or source code can be obtained.
I found one comment that if you sudo apt-get install qtcreator you will get version 5.
I’m assuming a compatibility problem, so I did not do that.
I think Ubuntu’s repositories are still using Qt4, and haven’t yet gone to Qt5. At least that’s the case with 12.04LTS. I also think (as I recall) that you indeed have to install Qt Creator separately–it shows up that way in the Software Center. I typically install it by downloading it from the Qt site, and just putting the whole directory structure in my file tree someplace. The I run the installer from there, and it puts a Qt icon in my ~/.local/share/applications directory. I just drag that to the dock and I’m good to go. When you install it from the Software Center, the executable goes into /usr/bin. In terms of the source code, you don’t get that with the normal download–you have to get the Qt source code from the download site somewhere. You don’t need it though, to my knowledge. I’ve built Qt before, and it wasn’t what I would call “fun” by any stretch of the imagination. It took some time, and there were hardships along the way…
OK, after reading your comments I decided to poke around some more. Qt Creator is indeed a separate install from the rest of Qt. I traversed the hierarchy upwards and found this:
http://download.qt.io/archive/
There are separate folders for qt and qtcreator.
If you descend into the qtcreator archive folder, you can see the highest version is 2.5.
So what did I get with the Ubuntu Software Installer? At the command line, you can type qtcreator -version and find out.
What I have, using Ubuntu 14.04:
Qt Creator 3.0.1 based on Qt 5.2.1
So now I have qt 4.8.6 and qtcreator 5.2.1.
But this successfully runs the simpleQt example from Chapter 11! So there is at least some measure of backwards compatibility. If this combination doesn’t work out with cross-compiling, I will uninstall Qt Creator 5.2.1 and install 2.5 from the archive.
Sounds like you have both a Qt4-based and a Qt5-based installation. That should be no problem, as I’m doing basically the same thing. If you want to chat more about it and are on Facebook, send me a join request for the Embedded Fun group, and I’ll add you to the group. Then we can basically chat in real-time. Although that certainly is up to you, it might make things easier.
Just sent join request, I didn’t know about the group. Thanks!
Hi Greg, I have just added a guide to the chapter web page on installing Qt Creator for Linux. Can you please have a look and see if it addresses the issues that you faced (and the others that follow will face)? Thanks. Derek.
Nice tutorial Derek. You probably should mention that it’s Qt 4.8.x folks are getting on that way–in terms of the cross-compilation toolchain. So if they go get the latest version of Qt from the Qt website, it WON’T be Qt4-based. It will be Qt5-based, which will confuse some folks. So for the purposes of following along in your book, I think the installation you’ve laid out in the above is the way to go. I had to build a Qt5-based toolchain for installing on my Beaglebone units on my own, and at the end of the day I think I would recommend that people simply do it as you’ve laid out. I think it’s MUCH easier that way, and (as far as I can tell) you really don’t gain a whole bunch of functionality with the Qt5-based framework–at least not for our purposes here. I wish someone had pointed this out to me a few weeks back, because I’ve spent a whole bunch of time messing with it–only to realize that it’s pretty much no different than the Qt4-based stuff…lol.
Live and learn, I guess.
Thanks Tom. I have added that clarification in a few different places in the guide. I agree — Qt5 really isn’t worth the extra trouble at the moment. I’ll update the guide if the standard BBB distribution is updated to include Qt5 in the future. Thanks again, Derek.
I stepped through it and all went well. I installed on an older laptop with Ubuntu 14.04 and an AMD quad-core. I didn’t have to do anything to build the default “Kit” for the X86 64 bit architecture. It appeared without doing anything. It seems it was set up correctly, as the default project code built and ran.
The dialog behavior is a bit odd if you want to add or change a kit. You have to hover the mouse over the existing default kit (In the “Kit Selection” dialog), and a “Manage…” button appears. This seems like a UI design flaw, as you would never see the button unless you happened to hover the mouse in that area by chance.
So I have a valid set-up now, with a version of Qt that will work with the Beaglebone, combined with the latest-and-greatest Qt Creator. Thank you!
Thanks Greg! Yes, I have found it a little buggy too and I have had to shutdown and restart Qt Creator in order to apply changes before. Once it works it is quite solid though. Derek.
Loc 12737: In the section on setting up the Qt project .pro file, there’s a slight punctuation issue. It should maybe be something like:
************************************************
INSTALLS +=target
Chooseing the menu options…
************************************************
Just something to separate the “target” from the next sentence there, starting with “Choosing.” No big deal, but I had to scratch my head for a couple seconds before I figured it out.
My electronic (PDF/eBook) version has the same spacing that you suggested, so something must have happened in post-production. I can’t wait to get my hands on the printed version so that I can see the ‘funnies’ that have been introduced!
Very interesting. I’ve tried several different zoom levels–and the result is the same. So I can’t explain why things are different in your version. I first noticed the problem in the Kindle Cloud reader, but checking my iPad version now…it’s the same thing. So something definitely appears to have changed.
Loc 12763: A minimal point…and you should just delete this comment after you read it. But in your note 2 text, you say that the MOC-generated file is “moc-X.cpp.” On my system, the MOC-generated file would be “moc_X.cpp” for what it’s worth.
Hi, Thx for the book, I’m trying to compile QT for cross compilation ( using your book ).
My problems is when I’m trying to configure the compilation ( ./configure ….. ), I got those error :
arm-linux-gnueabihf-g++: error: unrecognized command line option ‘-mmmx’
make: *** [mmx.o] Error 1
mmx disabled.
3dnow auto-detection… ()
arm-linux-gnueabihf-g++ -c -pipe -m3dnow -O2 -Wall -W -I../../../mkspecs/qws/linux-arm-gnueabi-g++ -I. -o 3dnow.o 3dnow.cpp
arm-linux-gnueabihf-g++: error: unrecognized command line option ‘-m3dnow’
make: *** [3dnow.o] Error 1
3dnow disabled.
sse auto-detection… ()
arm-linux-gnueabihf-g++ -c -pipe -msse -O2 -Wall -W -I../../../mkspecs/qws/linux-arm-gnueabi-g++ -I. -o sse.o sse.cpp
arm-linux-gnueabihf-g++: error: unrecognized command line option ‘-msse’
make: *** [sse.o] Error 1
sse disabled.
sse2 auto-detection… ()
arm-linux-gnueabihf-g++ -c -pipe -msse2 -O2 -Wall -W -I../../../mkspecs/qws/linux-arm-gnueabi-g++ -I. -o sse2.o sse2.cpp
arm-linux-gnueabihf-g++: error: unrecognized command line option ‘-msse2’
make: *** [sse2.o] Error 1
sse2 disabled.
neon auto-detection… ()
arm-linux-gnueabihf-g++ -c -pipe -mfpu=neon -O2 -Wall -W -I../../../mkspecs/qws/linux-arm-gnueabi-g++ -I. -o neon.o neon.cpp
arm-linux-gnueabihf-g++ -Wl,-O1 -Wl,-rpath,/usr/local/qt4.8.6-armhf/lib -o neon neon.o -mfpu=neon
neon enabled.
ipc_sysv auto-detection… ()
arm-linux-gnueabihf-g++ -c -pipe -O2 -Wall -W -I../../../mkspecs/qws/linux-arm-gnueabi-g++ -I. -o ipc.o ipc.cpp
arm-linux-gnueabihf-g++ -Wl,-O1 -Wl,-rpath,/usr/local/qt4.8.6-armhf/lib -o ipc_sysv ipc.o
ipc_sysv enabled.
zlib auto-detection… ()
arm-linux-gnueabihf-g++ -c -pipe -O2 -Wall -W -I../../../mkspecs/qws/linux-arm-gnueabi-g++ -I. -o zlib.o zlib.cpp
zlib.cpp:42:18: fatal error: zlib.h: No such file or directory
And I’m not using the change root ,
about the mkspecs, I didn’t know how to create it, so i modified the file : mkspecs/qws/linux-arm-gnueabi-g++/qmake.conf
with :
# modifications to g++.conf
QMAKE_CC = arm-linux-gnueabihf-gcc
QMAKE_CXX = arm-linux-gnueabihf-g++
QMAKE_LINK = arm-linux-gnueabihf-g++
QMAKE_LINK_SHLIB = arm-linux-gnueabihf-g++
# modifications to linux.conf
QMAKE_AR = arm-linux-gnueabihf-ar cqs
QMAKE_OBJCOPY = arm-linux-gnueabihf-objcopy
QMAKE_STRIP = arm-linux-gnueabihf-strip
Hi Micha, I will provide a full set of build steps on this page when I get an hour or two to check that it is all working. I have to fix an issue with IoT applications first. Yes, I modified the same file qws/arm-linux-gnueabi-g++ but I did not see the errors that you see. It looks like your errors are related to 3D graphics extensions. Also try adding the missing libraries — for example the zlib error can be fixed with something like: sudo apt-get install zlib1g-dev. Did you see the binary distribution guide above? That is the easiest way of getting 4.8.x on your desktop machine. Kind regards, Derek.
Hi Derek,
What is the path and the name of the debug file to configure the Build & Run Options on the QT?
Tip: Make a video showing step by step to configure QT for cross-compiler BBB.
Thank You.
Hi Paulo, check out the youtube video in this page above “Beaglebone Qt Creator for ARM C++ Embedded…” (the 2nd video on this page). Approximately 28 minutes into the video the path to the debug file is shown. It has a name ending in gdb. There will be differences in the path depending on precisely which toolchain is used. I’m using a new version of Qt Creator, however, the configuration process is essentially the same.
How to set the embedded linux (Debian) to run a Qt application, starting in full screen on the BBB?
Hi Paulo, you can use the QDesktopWidget class to discover information about the screen geometry and use those values to resize the application. Derek.
Hey Derek,
I downloaded your book the other day. Great stuff!
I’m interested in trying to get OpenglES working on the beaglebone but I’m having trouble! In your book you say it is complicated but I just wondered if you have actually managed to get the opengles working at all?
I’m working my way through http://processors.wiki.ti.com/index.php/Building_Qt_with_OpenGL_ES_accelerated_by_SGX
but I’m not sure if I’m on the right track.
Any pointers would be much appreciated.
Hi James, Thanks for the feedback. Yes, complicated but you are definitely on the right track there — I would appreciate it if you could let me know how you get on. The Debian guys are working hard to get full 3D graphics support too! Derek.
I tried, using procedures reported in the position 12005 -12013 of the exploringBBB book, compile the dialcontrol example program, but did not work. What can I do to run this Qt example (Qt Creator 2.5.0) on the BBB?
Hi Paulo, I haven’t run the graphical user interface on the BeagleBone itself as it is intended to be a client/server example, but what type of errors are you receiving? Derek.
Thank You Derek.
Not had any problems yet with the examples contained in the book (Exploring BBB). As I am wanting to develop more interactive graphical user interfaces, I need to know if it is possible and how can I configure the BBB to run graphical interfaces containing figures and animation, as some examples available in Qt.
Specifically, I tried to run the sample dialcontrol (available in QtCreator) basically using the procedures, obtaining the results below:
ebian@beaglebone:~$ qmake -version
QMake version 2.01a
Using Qt version 4.8.2 in /usr/lib/arm-linux-gnueabihf
debian@beaglebone:~$ ls
bin Desktop
debian@beaglebone:~$ cd Desktop
debian@beaglebone:~/Desktop$ ls
addressbook dialcontrol QtTemperature
debian@beaglebone:~/Desktop$ cd dialcontrol
debian@beaglebone:~/Desktop/dialcontrol$ ls
dialcontrol dialcontrol.pro.user main.cpp
dialcontrol.png dialcontrol.qmlproject qml
dialcontrol.pro dialcontrol.svg qmlapplicationviewer
debian@beaglebone:~/Desktop/dialcontrol$ qmake -project
debian@beaglebone:~/Desktop/dialcontrol$ more dialcontrol.pro
######################################################################
# Automatically generated by qmake (2.01a) Thu May 15 02:33:29 2014
######################################################################
TEMPLATE = app
TARGET =
DEPENDPATH += . qmlapplicationviewer
INCLUDEPATH += . qmlapplicationviewer
# Input
HEADERS += qmlapplicationviewer/qmlapplicationviewer.h
SOURCES += main.cpp qmlapplicationviewer/qmlapplicationviewer.cpp
debian@beaglebone:~/Desktop/dialcontrol$ qmake
debian@beaglebone:~/Desktop/dialcontrol$ make
make: Warning: File `dialcontrol’ has modification time 2.3e+07 s in the future
g++ -c -pipe -O2 -Wall -W -D_REENTRANT -DQT_WEBKIT -DQT_NO_DEBUG -DQT_GUI_LIB -DQT_CORE_LIB -DQT_SHARED -I/usr/share/qt4/mkspecs/linux-g++ -I. -I/usr/include/qt4/QtCore -I/usr/include/qt4/QtGui -I/usr/include/qt4 -I. -Iqmlapplicationviewer -I. -o main.o main.cpp
g++ -c -pipe -O2 -Wall -W -D_REENTRANT -DQT_WEBKIT -DQT_NO_DEBUG -DQT_GUI_LIB -DQT_CORE_LIB -DQT_SHARED -I/usr/share/qt4/mkspecs/linux-g++ -I. -I/usr/include/qt4/QtCore -I/usr/include/qt4/QtGui -I/usr/include/qt4 -I. -Iqmlapplicationviewer -I. -o qmlapplicationviewer.o qmlapplicationviewer/qmlapplicationviewer.cpp
/usr/bin/moc-qt4 -DQT_WEBKIT -DQT_NO_DEBUG -DQT_GUI_LIB -DQT_CORE_LIB -DQT_SHARED -I/usr/share/qt4/mkspecs/linux-g++ -I. -I/usr/include/qt4/QtCore -I/usr/include/qt4/QtGui -I/usr/include/qt4 -I. -Iqmlapplicationviewer -I. qmlapplicationviewer/qmlapplicationviewer.h -o moc_qmlapplicationviewer.cpp
g++ -c -pipe -O2 -Wall -W -D_REENTRANT -DQT_WEBKIT -DQT_NO_DEBUG -DQT_GUI_LIB -DQT_CORE_LIB -DQT_SHARED -I/usr/share/qt4/mkspecs/linux-g++ -I. -I/usr/include/qt4/QtCore -I/usr/include/qt4/QtGui -I/usr/include/qt4 -I. -Iqmlapplicationviewer -I. -o moc_qmlapplicationviewer.o moc_qmlapplicationviewer.cpp
make: warning: Clock skew detected. Your build may be incomplete.
debian@beaglebone:~/Desktop/dialcontrol$ ./dialcontrol
bash: ./dialcontrol: cannot execute binary file
debian@beaglebone:~/Desktop/dialcontrol$
Hi Paulo, I’m afraid you are going well beyond the content in the chapter there — I have never used QML-based applications on the BeagleBone. My understanding is that the performance is not great for this type of animation example without 3D graphics support. You may have to seek support for this topic on the Qt message boards, as it is quite specific to Qt development. Kind regards, Derek.
Hi Derek,
First, great book. I do have a question though. I’m new to embedded Linux and trying to set up cross-compile with Qt Creator. I have Ubuntu running on both my Desktop and the BBB. Your book says “The exact steps for building the Qt libraries from source are available on the chapter webpage…”. I found a toolchain that seems to work from linaro, but I can’t figure out how to get the proper Qt version loaded to do a cross compile.
Am I looking in the wrong place for this information? Am I just missing something simple because I am new?
Thanks for any help you can provide.
Thanks Ralph. Yes, I have written the guide but I need to go through it once more before making it public to verify the steps. Do you definitely need to build Qt from scratch? It is quite difficult and prone to error. For most people the steps above (Installing Qt Creator) are sufficient to install the correct 4.8.x libraries on your desktop machine. You can then use the cross-compiler settings that are described on Page 468 to build the executable code. Kind regards, Derek.
Hi Derek, Love your book and all your videos and guides, they are extremely helpfull for a newbie like me. Keep up the excellent work.
I am having a problem with my qtConsole app that you have listed on page 470 not running on the BBB and hoping you can give me some pointers. I get the following error on the BBB when trying to run the program from QT.
stdin: is not a tty
bash: /home/qtConsoleTest: cannot execute binary file
Application finished with exit code 126.
When I compile the application without using QT using arm-linux-gnueabihf-g++ testARM.cpp -o testARM and sftp it to the BBB is works fine (instructions on page 255. I think I am having a problem with the way I have QT setup.
I installed qtcreator and qt4-dev-tools using the instructions that you listed above.
Seems I have an error an error (red X) on my BBB kit. When i mouse over it is says:
Error: The Complier “GCC – armhf” (arm-linux-generic-elf-64bit) cannot produce code for the QT Version “QT-4.8.6 (qt4)” x86-linux-generic-elf-64bit.
Under the compilers tab, I have the compiler bath selected as /usr/bin/arm-linux-gnueabihf-g++. One thing i did notice was that the ABI selected is arm-linux-generic-elf-64bit and I am not able to change it to arm-linux-gnueabihf-g++.
Not sure what to try next. I am assuming when you sudo apt-get install qt4-dev-tools that you do not need to run the -configure command with make and make install. Is this correct?
On my BBB i have:
root@beaglebone:/usr/bin# ./arm-linux-gnueabihf-g++ –version
arm-linux-gnueabihf-g++ (Debian 4.6.3-14) 4.6.3
On my laptop i have:
john@debian:/usr/bin$ ./arm-linux-gnueabihf-g++ –version
arm-linux-gnueabihf-g++ (Debian 4.9.1-19) 4.9.1
Do these different version of debian make a difference.
I do have to run both of these commands from the /usr/bin/ directory or they will not work. Do they need to be added to the path?
I have the Debian Jesse version installed and followed the instruction to set that up. Your 2nd QT video talks about setting the /environment-setup but this video was geared more towards angstrom. Does this need to be done for debian and would the same steps apply for debian?
Kind regards and thank you,
John
Hi John, I would be concerned with the error you are getting on your desktop machine, as it appears that your environment is not generating armhf code, rather 64-bit code. Do your settings look like those in Figure 11-17? The G++ ArmHF entry is setup as in the notes below that figure. Kind regards, Derek.
Hello again.
I am trying to get Qt to cooperate on 2 different BBB’s, since neither one is working.
First, is a Rev B running Angstrom 3.8.13. It doesn’t have apt or apt-get, only opkg. Opkg does not find Qt ANYTHING, even on the rare occasions when the Angstrom computers are up. It can compile and run a simple hello_world.c program.
Second, is a Rev C that came with debian 3.8.13. It can compile the simpleQt.cpp program but when run, I get:
test: cannot connect to X server
error. Such fun.
Any advice?
Another question if I may. The Angstrom servers came back online yesterday so I did an opkg update and upgrade on the Rev B. Now, the a) I2C hardware clock and the b) minicom reading a serial interface no longer work. I suppose I must rebuild the device tree or device tree overlay but am unsure how to proceed, even after rereading that chapter in your book. Any advice there? Or do I need to ask that in the Chapter 6 section?
Thank you!
Hi there. If possible you should stick to the Debian image. It has much better support at the moment, particularly for USB devices that you might connect to your BBB. The video on Qt that is on this page uses Angstrom and should help you, but I would stick to Debian regardless.
The error “Cannot connect to X server” should be resolvable. It is occurring for one of two reasons: 1) You have a SSH connection and have not set up an X server on your desktop computer (See pages 432-434). 2) You have a screen attached to the BBB and do not have correct permissions to open an X window (typically from root). This can be resolved by using visudo and adding the line “Defaults env_keep=”DISPLAY XAUTHORITY” to the end of the file. Alternatively you can type xhost local:root and then execute the program using something like sudo DISPLAY=$DISPLAY ./simpleQt.
On the third issue. I’m at a loss as to what is going on. My worry is that the opkg upgrade filled up your file system and if that is the case then bad things happen. If it was me I would probably re-flash this BBB to have a Debian image too unless you had a very good reason for using Angstrom.
Hope that helps, Derek.
Third issue: For the Rev B, I stayed with Angstrom so long because of the hardware concern of that very issue, that the device tree would change and my peripherals would no longer work. File system is not full because it is run completely off a 32 Gb SD card, EMMC not involved even in boot. The Rev B machine also has a 7 inch LCD and hardware from WaveShare, none of which work after the opkg upgrade. . I connect to the Rev B through a Windows 7 machine AND through a separate standalone Linux machine.
Second issue: loaded x11-apps (I missed that step before.) simpleQt test worked fine as a display popped up on the Linux desktop. Thanks!
Regarding VNC viewer, it is driving me mad!!! I can easily ssh to the BBB and get a text terminal but cannot get an terminal of any breed to do graphical interface to the BBB from the Linux desktop on the BBB Rev C.
Hi there, yes it can be frustrating when things keep changing — you might be as well off going back again. It’s possible that the upgrade changed something (e.g., driver) that was specific to that display. Maybe check with them for their recommended image. Great on the X11-apps. My preference for an X display is XMing (http://sourceforge.net/projects/xming/). If you are behind a firewall then you just run the Xming server on your local PC and then ssh into the BBB (Just make sure that you enable the X11 forwarding in PuTTY as on pg. 433). Alternatively, if you have set up a VirtualBox Linux image then you can just use that to display the windows — just connect using ssh -XC molloyd@192.168.7.2 from the Linux VM. Kind regards, Derek.
Kind regards, Derek.
Linux: ssh -XC seems to work, but when I get logged in, then call up xterm, a new x window does pop up but it only shows small text in a window with white background. The logfile shows several X errors during initialization. Am I asking too much to get a windowed environment from a BBB?
Windows: Same thing happens with putty even using Xming. Same window with white background and similar X error messages in the logfile.
Some great news, though! After more dissection on the Rev B, I discovered the device tree was ok, but “opkg upgrade” had wiped out my init script that “turns on” the relevant slots! Example line for interfacing with the serial GPS is:
#!/bin/sh
echo DVK531-UART2-01 > /sys/devices/bone_capemgr.9/slots
After running it manually and it working, I can run minicom and see the GPS again. Woohoo. Studying now how to put it *back* into the startup script, along with setting the system clock from the hardware clock that’s on the I2C bus.
The Rev B BBB (with Angstrom) worked fine, with windowing, when I connected mouse and keyboard via USB and HDMI monitor directly to the BBB. Can’t find that HDMI adapter cable for over a week now or I would have done that to get the system back up. Is it just me or does these chained problems happen to everyone? I’m starting to get a complex! 🙂
If I had the HDMI monitor cable I would not need Xwindows windows on other boxes.
Have a great time, y’all!
Hi there, I get a similar outcome (even warnings/errors on startup) with the exception that the black text is the shell prompt and I can use it to open other windows (gedit etc.). Maybe it is a font size problem (maybe try xterm -fa ‘Monospace’ -fs 14). Great on the Rev B problem! Kind regards, Derek.
Hi Derek,
Thanks for this fantastic learning resource, it has been a huge help to me learning about embedded linux.
I have been working through your video on cross compiling using qt creator.
My setup is slightly different, I am using Debian on the BBB rev c with an LCD4 cape.
I have been able to build and run the example demos using the touch screen and debug from qt creator and all works well but I had a lot of trouble calibrating the touch screen. Eventually I had to load Angstrom onto an ssd card, perform a touch calibration, copy the /etc/pointercal file to host PC, reboot debian on the BBB and copy the pointercal file over to get the touch panel working properly.
Do you have any pointers on a more direct way to calibrate when using debian and qt creator applications?
Also have two error s on the Application Output in qt creator that don’t seem to affect anything so far.
1. Unable to load library icuil8n “Cannot load library”.
2.Cannot open input device ‘/dev/tty0’: Permission denied.
Thanks, Andy
Hi Andy, Thanks! I’m not sure — the solution under Angstrom took me a while to work out. Your solution is clever. There must be an easier way but it probably involves a recompilation of Qt for the BBB. From memory, the icuil8n error is a known issue, but I think the second error is due to the absence of a keyboard. I think that you can fix this by setting the QWS_KEYBOARD environment variable to point to an actual keyboard device. Kind regards, Derek.
Thanks, QWS_KEYBOARD environment fixed it!
I first tried QWS_KEYBOARD=LinuxInput:/dev/input/event3 but this caused the cursor to bleed through from log-in prompt if I pressed the keyboard.
Setting QWS_KEYBOARD=”” worked.
My solution included configuring and building tslib and qt-everywhere but the angstrom work-around was the only way that worked so far.
here are my steps so far.
My setup
Host: Debian 8 x86_64 with toolchain installed.
BBB Rev C Debian 7 on eMMC.
Circuitco LCD4 cape.
Angstrom on SSD card.
Step 1 configure build & install tslib on host.
The tslib copy used was from debian.org and required an edit to config.h file.
$ sudo apt-get install autoconf
$ sudo apt-get install libtool
Download tslib-1.0
$ cd tslib-1.0
$ ./autogen.sh
$ ./configure –prefix+$HOME/tslib_arm –host=arm-linux-gneabihf
sudo nano config.h
commented out the line near end of file like so:
/*#define malloc rpl_malloc*/
$ make
$ sudo make install
Step 2 download and install qt-creator-opensource-linux-x86_64-3.3.2.run.
Step 3 install qt-everwhere-opensource-src-4.8.6
Downloads$ cd qt-everwhere-opensource-src-4.8.6
Edited the qmake.conf file.
sudo nano mkspecs/qws/linux-arm-g++/qmake.conf
Added these two lines at the end of # modifications to linux.conf section.
QMAKE_INCDIR += /home//tslib_arm/include
QMAKE_LIBDIR += /home//tslib_arm/lib
Configured qt everwhere libraries for BBB.
./configure -v -opensource -confirm-license -xplatform qws/linux-arm-gnueabi-g++ -embedded arm -little-endian -host-little-endian -prefix /usr/local/qt4.8.6-armhf -depths 16,24,32 -no-mmx -no-3dnow -no-sse -no-sse2 -no-glib -no-cups -no-largefile -no-accessibility -no-openssl -no-gtkstyle -qt-mouse-pc -qt-mouse-linuxtp -qt-mouse-linuxinput -qt-mouse-tslib -plugin-mouse-tslib -plugin-mouse-linuxtp -plugin-mouse-pc -fast -no-pch -no-sql-ibase -no-sql-mysql -no-sql-odbc -no-sql-psql -no-sql-sqlite -no-sql-sqlite2 -no-webkit -no-qt3support -R /home//tslib_arm/lib/ -nomake examples -nomake demos -nomake docs -nomake translations
$ make
$ sudo make install
Step 4 copied qt-everywhere files to BBB.
$ cd /usr/local
$ scp -r qt4.8.6-armhf root@192.168.1.108:”/usr/local/”
Step 5 ssh to BBB and disable auto login and flashing cursor.
On BBB edit the uEnv.txt file.
$ cd /boot
$ sudo nano uEnv.txt
Added the following lines to uEnv.txt above the last entry.
##disable lightdm and stop cursor flashing
optargs=text vt.global_cursor_default=0
Then reboot BBB.
Step 6 ssh to BBB and set read/write acess to touch panel.
$chmod a+rw /dev/input/event1
For touch screen $ export QWS_MOUSE_PROTO=LinuxInput:/dev/input/event1
For keyboard $ export QWS_KEYBOARD=LinuxInput:/dev/input/event3
For USB mouse $ export QWS_MOUSE_PROTO=LinuxInput:/dev/input/event4
$ export DISPLAY=:0.0
Step 7 on host I ran qt creator and setup bbb kit as outlined in Exploring BeagleBone book location 12693.
build and deploy a test application to BBB.
I found on my setup as soon as I touched the screen on the BBB lcd the mouse pointer vanished.
The touch panel works as I can see the scrolling touch point data in qt creator application output but I am unable to calibrate the touch panel.
Step 8
I tried to scp lslib files to BBB but I got fragmentation errors in qt creator application output.
The only way I found to calibrate the touch panel was to boot the BBB to Angstrom on the ssd, perform a calibration then scp the pointercal file to host.
From host $ scp @192.168.1.108:/etc/pointercal /home/
After that reboot BBB Debian and scp pointercal file to the device.
$ scp /home//pointercal root@192.168.1.108:”/etc/”
Run qt creator again and deploy test application and now the touch panel is calibrated.
Have not figured out the fragmentation errors yet.
Regards, Andy
Hi Derek,
Thank you for your informative book and videos.
I’m very new on embedded linux and I’m reading your book and I’m trying to install QT cross compiler on BBB. As I started with your book I’m using debian on my BBB and my VM.
For installing QT on my VM I started with your guid in this page but I have this problems:
1-In the link you provided “http://download.qt.io/snapshots/qtcreator/master/” I just see the file with dmg(Mac ver) file.
I downloaded this instead:
qt-creator-opensource-linux-x86_64-3.4.0.run
after that when I tried to download qt by this command : sudo apt-get install qt4-dev-tools
I getting this error :
the following packages have unmet dependencies:
libcairo2 : Breaks: libwebkitgtk-1.0-0 (<2.4.5-2~) but 1.8.1-3.4 is to be installed
E:Error, pkgProblemResolver::Resolve generated breaks, this may be caused by held packages
I just move on and use online run version "qt-opensource-linux-x64-1.6.0-8online.run"
and it seems QT Creator IDE install successfully and qt 5.4.1 installed .
but in kit i have (red X) on my BBB kit. When i mouse over it is says:
Error: The Complier “GCC – armhf” (arm-linux-generic-elf-32bit) cannot produce code for the QT Version “QT-5.4.1 x86-linux-generic-elf-64bit.
I was follow your tutorial in chapter 7 for installing all the arm toolchain I don't know how can i install 64 bit arm-linux toolchain
please help me to find my problem
Thank you
Iman
Hi
I downloaded qt 4.8.6 from archive of qt and I run “./configure …”
firs of all i get an error :
arm-none-linux-gnueabi-g++
and after configure is finish when i run make i get this error:
make[1]: arm-none-linux-gnueabi-g++: Command not found
Makefile:7031: recipe for target ‘.obj/release-shared-emb-arm/qabstractanimation.o’ failed
make[1]: *** [.obj/release-shared-emb-arm/qabstractanimation.o] Error 127
make[1]: Leaving directory ‘/home/iman/qt-everywhere-opensource-src-4.8.6/src/corelib’
Makefile:200: recipe for target ‘sub-corelib-make_default-ordered’ failed
make: *** [sub-corelib-make_default-ordered] Error 2
I searching for that and i found i have to add something in qmake.conf
and I edited as i saw in pag 5 of this pdf:http://nickguthrie.com/embedd_gui/doc/doc/Getting%20Started%20with%20Qt.pdf
but after that I still get the same error please tell me what is the wrong.
Thank you
Iman
Hi Iman, do you have to build Qt? It is not straightforward — you must have fully working cross-compilation in place. The Qt libraries are on the default distribution of the BeagleBone already have qt 4.8 libraries installed and the guide at the top of this page explains how to install Qt 4.8 the easy way. Kind regards, Derek.
Hi Derek,
Thank you for your fast response.
Before I tried your book instruction I was tried the guid in top of this page but unfortunately I got this errors.
the following packages have unmet dependencies:
libcairo2 : Breaks: libwebkitgtk-1.0-0 (<2.4.5-2~) but 1.8.1-3.4 is to be installed
E:Error, pkgProblemResolver::Resolve generated breaks, this may be caused by held packages
and the other hand I'm not sure about the version of QT Creator which you pointed :
http://download.qt.io/snapshots/qtcreator/master/
because on this page you can just find the dmg version and not run version.
the only thing I need is to have QT creator in my debian on PC which can connect to my BBB(debian) and write code on it and execute on BBB. like what you did in your videos.
Please help me to fix my problem.
Thank you
Iman
Hi there. Please use: http://download.qt.io/snapshots/qtcreator/3.4.0/latest/ instead. Kind regards, Derek.
Hi
thank you for your reply.
first I don’t have problem with downloading QTCreator 3.4.0.(In like you were mentioned only 32bit run file available I found it somewhere else for 64 bit)
But my problem is when I execute:
molloyd@debian:~$ sudo apt-get install qt4-dev-tools
this error shows up:
the following packages have unmet dependencies:
libcairo2 : Breaks: libwebkitgtk-1.0-0 (<2.4.5-2~) but 1.8.1-3.4 is to be installed
E:Error, pkgProblemResolver::Resolve generated breaks, this may be caused by held packages
what is this error for
Thank you
Iman
Hi Derek,
Thank you for your reply but I don’t have any problem for installing QT Creator 3.4.0
I downloaded this:
qt-creator-opensource-linux-x86_64-3.4.0.run
After that when I execute this: sudo apt-get install qt4-dev-tools
I get this error :
the following packages have unmet dependencies:
libcairo2 : Breaks: libwebkitgtk-1.0-0 (<2.4.5-2~) but 1.8.1-3.4 is to be installed
E:Error, pkgProblemResolver::Resolve generated breaks, this may be caused by held packages
I execute these commands:
sudo apt-get clean
sudo apt-get -f install
and after that I re install all again
but the error still persist.
I have another question:
In your book you use the "./configure " to building the qt libraries from source. But in top of this book you don't mention that I'm very new in linux and I'm getting confused
could you please clarified this
Thank you
Iman
Hi Iman, I just tried an installation of the qt4 tools under a new Debian Jessie image and it worked perfectly using the following:
molloyd@debianJessie:~$ sudo apt-get install qt4-dev-tools

[sudo] password for molloyd:

Reading package lists... Done

Building dependency tree

Reading state information... Done

...

The following NEW packages will be installed:

  libdrm-dev libgl1-mesa-dev libglu1-mesa-dev libpthread-stubs0-dev libqt4-declarative

  libqt4-designer libqt4-dev libqt4-dev-bin libqt4-help libqt4-network libqt4-opengl

  libqt4-opengl-dev libqt4-qt3support libqt4-script libqt4-scripttools libqt4-sql

  libqt4-sql-sqlite libqt4-svg libqt4-test libqt4-xmlpatterns libqtwebkit-dev

  libqtwebkit4 libx11-dev libx11-doc libx11-xcb-dev libxau-dev libxcb-dri2-0-dev

  libxcb-dri3-dev libxcb-glx0-dev libxcb-present-dev libxcb-randr0-dev

  libxcb-render0-dev libxcb-shape0-dev libxcb-sync-dev libxcb-xfixes0-dev libxcb1-dev

  libxdamage-dev libxdmcp-dev libxext-dev libxfixes-dev libxshmfence-dev libxxf86vm-dev

  mesa-common-dev qt4-designer qt4-dev-tools qt4-doc qt4-linguist-tools qt4-qmake

  x11proto-core-dev x11proto-damage-dev x11proto-dri2-dev x11proto-fixes-dev

  x11proto-gl-dev x11proto-input-dev x11proto-kb-dev x11proto-xext-dev

  x11proto-xf86vidmode-dev xorg-sgml-doctools xtrans-dev

0 upgraded, 59 newly installed, 0 to remove and 2 not upgraded.

Need to get 130 MB of archives.

After this operation, 239 MB of additional disk space will be used.

Do you want to continue? [Y/n] Y

...

Setting up libqt4-dev-bin (4:4.8.6+git64-g5dc8b2b+dfsg-3) ...

Setting up qt4-linguist-tools (4:4.8.6+git64-g5dc8b2b+dfsg-3) ...

Setting up qt4-qmake (4:4.8.6+git64-g5dc8b2b+dfsg-3) ...

Setting up libqt4-dev (4:4.8.6+git64-g5dc8b2b+dfsg-3) ...

Setting up libqt4-opengl-dev (4:4.8.6+git64-g5dc8b2b+dfsg-3) ...

Setting up libqtwebkit-dev (2.3.4.dfsg-3) ...

Setting up libx11-doc (2:1.6.2-3) ...

Setting up qt4-designer (4:4.8.6+git64-g5dc8b2b+dfsg-3) ...

Setting up qt4-dev-tools (4:4.8.6+git64-g5dc8b2b+dfsg-3) ...

Setting up qt4-doc (4:4.8.6+git64-g5dc8b2b+dfsg-3) ...

Processing triggers for libc-bin (2.19-18) ...
It looks like you are mixing Jessie and Wheezy repositories — that is never good! I think your easiest solution is to install a new Jessie VM and work from there. I don’t think you should try to build Qt if you are new to Linux — there is so much that can go wrong (I know!). Kind regards, Derek.
Hi Derek,
Thank you for your new tutorial video for installing cross compiling under jessie.
I follow your new youtube and this time “sudo apt-get install qt4-dev-tools” is working.
but now I have other problems:
1- when i follow your book structure to make and run SimpleQt program after i make it without any error and compile it when i run it i get this error: cannot connect to x server
2- when i try to run program with qtcreator on my desktop after i setup my IDE (I follow exactly section “Cross-Compiling Qt Applications”)
I get this error:i686-pc-mingw32-uic: command not found.
I search them both in google but i couldn’t solve my problem.
Please help me to solve my problem
Thank you
iman
Hi Iman, On point 1, please see Pg. 432 on VNC. On point 2, I haven’t seen that before and I’m not sure why you are working with Mingw (Minimalist GNU for Windows) as my guide is for installing Qt Creator under Linux. Something is awry there! Kind regards, Derek.
Hi Derek,
I finally can run the “simpleQT” file on my Beagle Bone Black.
I manipulated “uEnv.txt” by adding: “optargs=text”. for this reason I got this error :cannot connect to X server.
I think it’s look like you want to see GUI with form ssh and without VNC.
I’m still working on QT to get cross compiling working
Thank You
Iman
Hi Derek,
Thank you for your answer. Let me I explain All my setting and installing software.
Setting in BBB + LCD 4.3 (I don’t use LCD CAPE I used 480×272 LCD and connect it to LCD port on BBB and activate it by disabling HDMI and enabling LCD in /boot/uEnv.txt)
1-latest debian image from BBB website
2-qmake -version:
QMake version 2.01a
using Qt version 4.8.2 in
/usr/lib/arm-linux-gnueabihf
Setting in my Desktop
1-Debian(jessie) on VM on Mac
2-followed step 1 to 3 of top of this page
run simple project in QT Creator on desktop machine and it’s work fine.
for make cross compiling:
3-go to tools>option in Kit Tab push add(I follow these step by reading the “Cross compiling QT Application” of book)
4- I filled like this
name:BBB
File System name: “empty”
Device: BBB(default for Generic Linux) (I Also set the IP and other stuff and when I push test button it says device test n finished successfully)
Sysroot: /usr/lib/arm-linux-gnueabihf
Compiler:I go to manage and in Add I choose GCC(I was chose MinGW and Linux ICC but none of them working)
Compiler Path :/usr/bin/arm-linux-gnueabihf-g++-4.9(in ABI automatically “arm-linux-generic-elf-32bit” a p appears”
Debugger: (Not set yet)
QT Version:Qt 4.8.6 in PATH (System) (In My debian I couldn’t find the usr/local/qt4.8.6-armhf/bin/qmake and this was something to made me to follow the instruction in section”Building the QT Library from source” but you said it’s not easy.and I just install new fresh jessie and start over.
My questions are:
1- As I explain I don’t want to connect by VNC and I want to see my output on LCD. Is it possible with these setting (Debian) or This is the reason you chose angstrom instead debin in your video for running cross compiling under LCD cape?
2-Where can i find qt4.8.6-armhf/bin/qmake ? All I have is qt4 folder and noting else. Am I have to follow The section:”Building the QT Libraries from source” to make “qt4.8.6-armhf/bin/qmake” in my local directory?
Please guid me.
I’m very appreciated for all of your effort and informative blogs, videos and book
Thank you
Iman
Hi Iman, I used an LCD display with Qt in the book on Pg. 431/2 under Debian — the version under Angstrom is just an older video before there was a Debian distribution for the BBB. I understand what you are doing now, and yes you have no choice but to cross-build the Qt Library from source (unless you can find a built version). The qmake tool results from that build. If you are finding that the instructions on Pg. 470 are not working correctly for you, then there are a few other guides that may help — for example, https://chaitramohankumar.wordpress.com/2014/08/13/building-qt4-8-6-for-embedded-linux/ is very good. Kind regards, Derek.
Hi derek,
As you said I used this command for making libraries from sources:
./ configure -v -ope nsource -confirm-license -xplatform qws/ linux-arm-gnueabi-g + + -embedded arm -little-endian -host-little-endian -prefix /usr/ local/ qt4.8.6-armhf
after this when I run make, I get this errors:
make[1]: arm-none-linux-gnueabi-g++: Command not found
Makefile:7031: recipe for target ‘.obj/release-shared-emb-arm/qabstractanimation.o’ failed
make[1]: *** [.obj/release-shared-emb-arm/qabstractanimation.o] Error 127
make[1]: Leaving directory ‘/home/iman/qt-everywhere-opensource-src-4.8.6/src/corelib’
Makefile:200: recipe for target ‘sub-corelib-make_default-ordered’ failed
make: *** [sub-corelib-make_default-ordered] Error 2
The link you gave me in your comment use ubuntu which is incompatible with Debian. and for person like me who is newbie in linux is little hard.
my questions are :
1-why am I get these errors?
2-Is it something about conflicting in versions?
I wish you have a video for setting up qt cross compiling under Debian(jessie)
Thank you
Iman
Hi Iman, You need to read Chapter 7 in detail. Kind regards, Derek.
Hi Derek,
Another question i have is :according to your link It seems before excuting ./configure…, it needs to modifies qmake.conf.
Did you put that in your book or in this case we don’t need it?
Thank you
Iman
Hi Iman, I don’t know what that refers to. The makespecs file needs to be edited. Kind regards, Derek.
Hi Derek,
I successfully set up the cross compile tool-chain on my Lubuntu (Ubuntu 14.04 LTS), including QtCreator and qt-everywhere-opensource-src-4.8.6.
The console Qt example works without problems, including remote debugging.
If I try to run the Qt window example, I get an error.
If I try to run it from QtCreator (remote):
No protocol specified
QtTestARM: cannot connect to X server :0.0
Application finished with exit code 1.
If I start it on the BBB console:
./QtTestARM: symbol lookup error: ./QtTestARM: undefined symbol: _ZN7QWidget8qwsEventEP8QWSEvent
I installed the qt4 libraries on the BBB using apt-get. The version for arm-hf is 4.8.2.
“ldd ./QtTestARM” says:
libQtGui.so.4 => /usr/lib/arm-linux-gnueabihf/libQtGui.so.4 (0xb68e2000)
libQtCore.so.4 => /usr/lib/arm-linux-gnueabihf/libQtCore.so.4 (0xb66da000)
libstdc++.so.6 => /usr/lib/arm-linux-gnueabihf/libstdc++.so.6 (0xb662f000)
libgcc_s.so.1 => /lib/arm-linux-gnueabihf/libgcc_s.so.1 (0xb660b000)
libc.so.6 => /lib/arm-linux-gnueabihf/libc.so.6 (0xb6526000)
libfontconfig.so.1 => /usr/lib/arm-linux-gnueabihf/libfontconfig.so.1 (0xb64fa000)
libpthread.so.0 => /lib/arm-linux-gnueabihf/libpthread.so.0 (0xb64de000)
libaudio.so.2 => /usr/lib/arm-linux-gnueabihf/libaudio.so.2 (0xb64c6000)
libglib-2.0.so.0 => /lib/arm-linux-gnueabihf/libglib-2.0.so.0 (0xb6407000)
libpng12.so.0 => /lib/arm-linux-gnueabihf/libpng12.so.0 (0xb63e6000)
libz.so.1 => /lib/arm-linux-gnueabihf/libz.so.1 (0xb63cd000)
libfreetype.so.6 => /usr/lib/arm-linux-gnueabihf/libfreetype.so.6 (0xb6370000)
libgobject-2.0.so.0 => /usr/lib/arm-linux-gnueabihf/libgobject-2.0.so.0 (0xb6331000)
libSM.so.6 => /usr/lib/arm-linux-gnueabihf/libSM.so.6 (0xb6324000)
libICE.so.6 => /usr/lib/arm-linux-gnueabihf/libICE.so.6 (0xb630c000)
libXrender.so.1 => /usr/lib/arm-linux-gnueabihf/libXrender.so.1 (0xb62fe000)
libXext.so.6 => /usr/lib/arm-linux-gnueabihf/libXext.so.6 (0xb62eb000)
libX11.so.6 => /usr/lib/arm-linux-gnueabihf/libX11.so.6 (0xb6202000)
libm.so.6 => /lib/arm-linux-gnueabihf/libm.so.6 (0xb6197000)
/lib/ld-linux-armhf.so.3 (0xb6fc5000)
libdl.so.2 => /lib/arm-linux-gnueabihf/libdl.so.2 (0xb618c000)
librt.so.1 => /lib/arm-linux-gnueabihf/librt.so.1 (0xb617e000)
libexpat.so.1 => /lib/arm-linux-gnueabihf/libexpat.so.1 (0xb615c000)
libXt.so.6 => /usr/lib/arm-linux-gnueabihf/libXt.so.6 (0xb611a000)
libXau.so.6 => /usr/lib/arm-linux-gnueabihf/libXau.so.6 (0xb6110000)
libpcre.so.3 => /lib/arm-linux-gnueabihf/libpcre.so.3 (0xb60d7000)
libgthread-2.0.so.0 => /usr/lib/arm-linux-gnueabihf/libgthread-2.0.so.0 (0xb60cd000)
libffi.so.5 => /usr/lib/arm-linux-gnueabihf/libffi.so.5 (0xb60bb000)
libuuid.so.1 => /lib/arm-linux-gnueabihf/libuuid.so.1 (0xb60af000)
libxcb.so.1 => /usr/lib/arm-linux-gnueabihf/libxcb.so.1 (0xb6094000)
libXdmcp.so.6 => /usr/lib/arm-linux-gnueabihf/libXdmcp.so.6 (0xb6089000)
So, as far as I can tell, it is not a missing library.
Do you have any advice for me?
Thank you and best regards
Joerg
Hi Joerg, Please ensure that you have a setup as described on pg. 432 and that it is working correctly before executing the windowing example. Kind regards, Derek.
Hi Derek, Thank you for your reply.
Are you sure you mean page 432? In my copy that is about the LCD cape and VNC. Page 442 is about installing the Qt development tools on the BBB.
Do I need the complete development tools on the BBB, even if I only cross compile? The console based Qt application works fine with just installing the libraries needed (sudo apt-get install libqt4…).
Kind regards,
Joerg
Hi Joerg, apologies, yes the VNC section — it was not clear from your message how you are using the BBB (headless or headful). The message “QtTestARM: cannot connect to X server :0.0” usually means that you have not set up the permissions correctly for access to an X server. If you are using the BBB in a headless way and you have performed the steps from pg. 432 then you should be sure that this is not the issue. Kind regards, Derek.
BTW: I did install the dev-tools by now, but the situation stays the same.
Hi Derek,
First I want to know how can I get the page number. I have e-book version of your book and windows kindle app doesn’t show me the page number and just shows the location instead. I search it and find out the only e-book which has a hard copy, has a page number. But this is strange since I believe your book has a hard copy.
Second I want to clarify for myself about steps for installing qt in book and “chapter 11 webpage”(current page).
Am I have to complete steps in book in section “Cross-compiling Qt Application” and the steps above this webpage both? Or I have to follow only one of them.
In End of step 2 of this webpage you said:
“It is also possible to build Qt from source. You can do this by going to http://download.qt.io/archive/qt/ and downloading the exact version that you require”
Does it mean if I follow step 2 of your “chapter 11 webpage”, I don’t need to execute:
./ configure -v -ope nsource -confirm-license -xplatform qws/ linux-arm-gnueabi-g + + -embedded arm -little-endian -host-little-endian -prefix /usr/ local/ qt4.8.6-armhf
Or I need to execute these steps in your webpage first and after that execute your book steps?
Please give me an advice.
Thank you
Iman
Hi Iman, I don’t think that the Kindle version provides page numbers on any book. Please see my response on your other question. Kind regards, Derek.
Thank you so much
Hi Derek,
One more thing is in your book, in section: “Building the Qt Libraries from Source”
you said:
“The exact steps for building the Qt libraries from source are available on the chapter web page, but here is a summary of the steps involved:
the steps involved:
1.The Qt libraries can be downloaded from the http://www.qt‐project.org/ downloads web page.
2.Once extracted, the build needs to be configured. This can be performed by creating a new makespecs file (qws/ linux‐arm‐gnueabi‐g + +) that identifies the arm‐linux‐gnueabihf toolchain. The ./ configure script can then be called in the following form:
molloyd@ debian: ~/ qt-everywhere-opensource-src-4.8.6 $ ./ configure -v -ope nsource -confirm-license -xplatform qws/ linux-arm-gnueabi-g + + -embedded arm -little-endian -host-little-endian -prefix /usr/ local/ qt4.8.6-armhf
3.3.Then build the Qt library using the following: molloyd@ debian: ~/ qt-everywhere-opensource-src-4.8.6 $ make molloyd@ debian: ~/ qt-everywhere-opensource-src-4.8.6 $ make install
But where is these steps on your webpage?
I assume these steps must be execute to complete the Qt Version field on QT Creator.
Did you execute these steps on jessie ?
Thank you
Iman
Hi Iman, I have built Qt and added the guide to the web page. Kind regards, Derek.
Hi Derek,
Thank you so much. the new section you was added makes your book very solid rock.
Thank you
Iman
Derek,
Thank you for adding the section on building the QT libraries. I am a new Linux user and have been struggling with this for the last week or so. After reading your guide I was able to get QT to cross compile and remote debug.
Fantastic book! Thanks again.
Derek
Hi Derek
I just followed all the step above and everything working fine.
But when I try to do the cross compiling with QT creator with these settings:
Name: BBB
Device Type:Generic Linux Device
Device: I gave the BBB IP and when I push test it’s shows it’s working fine
Compiler :/usr/bin/arm-linux-gnueabihf-g++
Qt version: QT 4.8.2 (qt4.8.2-armhf)
When I execute the file in BBB I get this msg:
./TestQtCreator: symbol lookup error: ./TestQtCreator: undefined symbol: _ZN7QWidget8qwsEventEP8QWSEvent

I search in google but I couldn't find any good answer

I did  the ldd ./TestQtCreator but the output shows everything fine

	libQtGui.so.4 => /usr/lib/arm-linux-gnueabihf/libQtGui.so.4 (0xb68c0000)

	libQtNetwork.so.4 => /usr/lib/arm-linux-gnueabihf/libQtNetwork.so.4 (0xb67de000)

	libQtCore.so.4 => /usr/lib/arm-linux-gnueabihf/libQtCore.so.4 (0xb65d7000)

	...

	/lib/ld-linux-armhf.so.3 (0xb6fa6000)

	...

	libXdmcp.so.6 => /usr/lib/arm-linux-gnueabihf/libXdmcp.so.6 (0xb5f85000)
Please help me.
Thank you
Iman
It looks like there is a slight incompatibility between the library on the desktop and the BBB. Do a ldd on the desktop and check for differences and you could try backing up the libraries on the BBB and then copying the libraries to the BBB. You could try statically linking the project either. Kind regards, Derek.
Hi Derek
Thank you
Finally I fixed the problem by these steps
1 – Re image the BBB by latest debain image
2 – scp -r /usr/local/qt4.8.2-armhf/lib root@192.168.7.2:”/usr/local/qt4.8.2-armhf”
3 – appended “/usr/local/qt4.8.2-armhf/lib” in PATH in etec/profile Like This:
root@beaglebone:/etc# nano profile
…..
if [ “`id -u`” -eq 0 ]; then
PATH=”/usr/local/sbin:/usr/local/bin:/usr/sbin:/usr/bin:/sbin:/bin:/usr/local/qt4.8.2-armhf/lib” *****THIS IS THE PLACE I ADD
else
PATH=”/usr/local/sbin:/usr/local/bin:/usr/sbin:/usr/bin:/sbin:/bin:/usr/local/games:/usr/games”
……….
4 – reboot BBB
5 – in QTCreator in left side of QTCreator—> Project Tab —> Build & Run Tab—> Run Tab
under RUN checked “Use this command instead” in the field Alternate executable on device copy your path(copy from Executable on device)
in field Argument put”-qws”
and done
Thank you again for your informative book
Iman
Thanks Iman, that is great to know. Kind regards, Derek.
I just want to correct this post.
1- The correct format in step 2 is like this: 2 – scp -r /usr/local/qt4.8.2-armhf/lib root@192.168.7.2:”/usr/local/qt4.8.2-armhf/”
in the end of the line slash was missed.
2- Don’t copy and past command above. Just type it.
Thank you
Iman
Hi Derek,
Do you have tutorial on how to set Qt (Windows-based) for Beaglebone cross-compiler toolchain?
My host PC is using Windows 8.1
The Qt creator is 3.4.0 based on Qt 5.4.1
Toolchain I am using now is from Linaro, i.e. linaro-toolchain-binaries 14.11
I have followed your video on creating new kit on Qt.
It went OK when specifying the Compiler and Debugger.
But now I am stuck at specifying the Qt version and Qt mkspec.
I do not know from where I can get qmake.exe
Can you give me any guidance to solve this issue?
Thanks
Yudi
Hi Yudi, there is a guide on this web page on how to build Qt 4.8.2 under Linux. The steps are similar for Windows but I really don’t recommend setting up a cross-compilation environment under Windows as you will have problems with third party libraries should you ever need to use them. I use Windows (as I need it writing, video editing etc.) and I use VirtualBox (as described in Chapter 3) to host various Linux images. Kind regards, Derek.
Hi Derek,
I’m trying to make my touch screen working because when I run my qt application, the touch is working reverse like your second video on this page.
I did these steps:
export TSLIB_TSDEVICE=/dev/input/event1
export TSLIB_CONFFILE=/etc/ts.conf
run ts_calibrate
and after that run This
export QWS_MOUSE_PROTO=LinuxInput:/dev/input/event1
but when I run my application again, the curser is not moving anymore.
my BBB run on debian wheezy 7.8
Thank you
Iman
In addition When I run this command
cat /dev/input/event1 | hexdump
and touch screen I get output.
I’m wondering am I have to run
./configure -qt-mouse-tslib
?
or if I followed your tutorial in this page It’s already in my QT library?
Thank You
Iman
Hi Iman, No, I have not built Qt to include tslib. That was part of the Angstrom distribution build. You will have to search for a guide on how to modify the Qt build instructions to include tslib configuration. Kind regards, Derek.
Hi I finally make it work These websites is very useful for those who want to make touchscreen in qt application working in Debian. However this tutorial in angstrome but you can make it work by little modification.
I will put the full steps in Debian whenever I tested and make sure I don’t miss anythings.
http://www.ptrackapp.com/apclassys-notes/embedded-linux-multitouch/
https://groups.google.com/forum/#!msg/beagleboard/RYmfcZmIhbA/cLvSyxFTqZYJ
Thank you
iman
Great Work Iman.
Dear Derek,
Thanks for the book and website. I have spend the whole Sunday (7 AM – 12 PM) trying to find out how to run the first program “simpleQt”. Now I can run the program from Linux Desktop through SSH (window pops up and also the eyes followed by the Page 432-434), but when I try to run it natively (Ctrl+Alt+F1) from the BBB, it showed “cannot connect to X servrer 0.0”. Is this normal? If not, I wonder how this could solved. Thanks!
Hi Henry, that is a common issue. I’m not certain from your description if you are executing on the BBB (e.g., attached LCD screen or HDMI monitor). If you are using VNC then you have to use the -XC option on ssh — e.g., ssh -XC molloyd@192.168.7.2 to enable X pass through. If you are executing directly on the BBB with an attached display then you may need to execute export DISPLAY=:0.0 and sudo xhost + You could also try to execute the application with superuser permissions. Hope that helps, Derek.
Hi Derek,
I have been reading your book for the last couple of days and find it great, again like others, I have fallen into the trap of purchasing it for Kindle and therefore not having page numbers 🙁
Anyway, I have also got the dreaded “cannot connect to X server 0.0″ this is with a 4D systems 4.4” resistive cape attached, while trying to run a simple program from QT Creator, I also get a couple of other errors as well, as listed below
stdin: is not a tty
No protocol specified
Testgui: cannot connect to X server :0.0
Aplication finished with exit code 1.
or if I try to run it from a terminal within BBB (keyboard attached) I get “symbol lookup error: ./Testgui: undefined symbol: _ZN7Qwidget8qwsEventEP8QWSEvent”
The strange thing is that the window can be momentarily seen for a split second before the error comes up.
The simple programs on your Chapter 11 webpage compile and run fine from the terminal, I only get this when using QT creator.
I have apt-get install, apt-get update to the latest software on the BBB
I’m very new to Linux and am lost in this, any help would be appreciated
Thanks Steve
Hi Steve, I’m not too sure — it sounds like your Qt Creator version is not the same as the version on the BBB. Are you running the application with -qws set? The error is to do with the Qwidget QWSEvent class, which you appear to be building into your program, but is missing on the BBB. Unfortunately, Qt problems are quite specific for each person and are difficult to debug. Sorry that I can’t be of more help, Derek.
Hi Steve,
I had a same problem I fixed it by scp entire Qt library to BBB instead of downloading the Qt library directly on BBB.
If you see few comment above, You can see the steps which I implement for fixing the issue.
Thank you
Iman
Hi iman,
Thanks for the tip, I looked back on the comments section to your post and followed that, and it worked!!!
My only last barrier is that the touch screen is not calibrated to the pointer, (just like you had, and in Dereks video) however because I am running the lastest build on the BBB it doesnt seen to come with ts_calibrate, and I cannot for some reason apt-get install it??
You mentioned that you have fixed the problem, any chance of passing on the steps you did to achive this?? I have looked at the two weblinks you posted and just got confused……. do I have to rebuild QT with the ts_lib installed??
Hi iman,
Hi iman
Thanks for the tip, I looked back on the comments section to your post and followed that, and it worked!!!
My only last barrier is that the touch screen is not calibrated to the pointer, (just like you had, and in Dereks video) however because I am running the lastest build on the BBB it doesnt seen to come with ts_calibrate, and I cannot for some reason apt-get install it??
You mentioned that you have fixed the problem, any chance of passing on the steps you did to achive this?? I have looked at the two weblinks you posted and just got confused……. do I have to rebuild QT with the ts_lib installed??
Hi Steve
Your answer is yes.
You have to do configure again by adding -qt-mouse-tslib to the end of configure. Remember before that you have to run ConfClean:
make confclean
and after that add “-qt-mouse-tslib” to the end of derek configure .
because I did bunch of stuff on my host machine, I’m not really sure these steps work again or not and I don’t have time to do all the steps again in a virgin host.(the debian without anythings installed)
But I bring those steps here and if they will work please let me know. I get these information from this link and I modified them little bit:
on your host machine:
sudo apt-get install autoconf
sudo apt-get install libtool
cd ~
git clone https://github.com/kergoth/tslib.git
cd tslib
./autogen.sh
./configure –prefix=$HOME/tslib_beaglebone –host=arm-angstrom-linux-gnueabi
make
make install
Output files can be found in ~/tslib_beaglebone/
scp -r /usr/local/qt4.8.2-armhf/lib root@192.168.7.2:”/usr/local/qt4.8.2-armhf/lib”
nano /etc/profile and add this address to the end of the PATH “/usr/local/qt4.8.2-armhf/lib” like this:
⁃ PATH=”/usr/local/sbin:/usr/local/bin:/usr/sbin:/usr/bin:/sbin:/bin:/usr/local/qt4.8.2-armhf/lib”
scp -r ~/tslib_beaglebon/lib root@192.168.7.2:”/usr”
scp -r ~/tslib_beaglebon/bin root@192.168.7.2:”/usr”
scp -r etc/ts.conf root@192.168.7.2:”/etc”
in BBB do these:
export QWS_MOUSE_PROTO=LinuxInput:/dev/input/event1
export TSLIB_CALIBFILE=/etc/pointercal
export TSLIB_CONFFILE=/etc/ts.conf
export TSLIB_PLUGINDIR=/usr/lib/ts
Run Ts_calibrate and complete calibration.
call “cat /etc/pointercal” to make sure calibration was done successfully.
Run the qt Application with “-qws”
I put above steps for setup the environment in a sh file for more convenience.
these are my sh file content:
first make a file :I named it “QtRun.sh”
nano QtRun.sh
add these line to your file and save it and exit it.
*************************************************************************
export QWS_MOUSE_PROTO=LinuxInput:/dev/input/event1
export TSLIB_CALIBFILE=/etc/pointercal
export TSLIB_CONFFILE=/etc/ts.conf
export TSLIB_PLUGINDIR=/usr/lib/ts
read -p “Enter Qt file name : ” fileName
./$fileName -qws
*************************************************************************
I hope it’s work for you
Thank you
Iman
Hi Steve
I want to just correct something on my pervious post:
for configuring tslib:
In step :./configure –prefix=$HOME/tslib_beaglebone –host=arm-angstrom-linux-gnueabi
change it to this:
./configure –prefix=$HOME/tslib_beaglebone –host=arm-linux-gnueabihf
Hi iman
Strange but the post were you have gone through your setup of ts_lib, has not appeared in the comments section yet??
I have spent the last couple of days going through your two suggested websites, and managed to build and deploy tslib onto the beaglebone, however when I run “ts_calibrate” it runs through a lot of x and y cooridates and then states “Selected device is not a touchscreen (must support ABS and KEY event types)”
?????
Not sure what is causing this, at the moment spending some time googleing to try to find an answer.
Any help would be most appreciative.
Now it’s appear 🙂
Hi Steve I don’t know why my post is not appear here. Yesterday when I put it here there was a msg on top of my msg which said wating for confirm. If you like you can give me your email.
Thanks Iman
Hi iman,
Yes, I would like to give you my email. Not sure how to do this on this forum.
Derek is it posible to pass my email on to iman.
My email address is steove@hotmail.com
Once we have sorted out the final method I am happy to post the results on this forum for all to benifit from.
Thanks Steve
Hi iman / Derek
Ok, here is an update of where I am at the moment.
I’m sooooooooo….. close, it feels like I’m onto the last hurdle before getting this to run!!
Firstly a correction for your last set of directions.
Change – ./configure –prefix=$HOME/tslib_beaglebone –host=arm-linux-gnueabihf
To – ./configure –prefix=$HOME/tslib_beaglebone –host=arm-linux-gnueabihf (two seperate dashes before prefix and host)
I had to also perform the following:
Uncomment line 2 in ts.conf to run “module_raw input”
Add another export command to my script- export TSLIB_TSDEVICE=/dev/input/event1
I can now run the “export” script,
Then run “ts_test” and the display shows the test screen and the touch screen works perfectly, together with all the touch values streaming into my terminal.
If I then run a simple test program, again it appears on my LCD screed, but the touch does not work??
I still get the following error from the run command but it does’nt seem to stop the program from running.
Unable to load library icui18n “Cannot load library icui18n: (libicui18n.so.52: cannot open shared object file: No such file or directory)”
Currently still googling for posible answers, and pulling my hair out.
Steve.
Hi Steve
I had that same problem as well. One thing I remember and actually your problem remind me was, I had to do these steps sequence. That was a very important thing I forgot to mention.I think the steps must like this
1-install the tslib library
2- put these two lines
QMAKE_INCDIR += /home/bone/tslib/src
QMAKE_LIBDIR += /home/bone/tslib_beaglebone/lib
in
mkspecs/qws/linux-arm-gnueabihf-g++/qmake.conf :
3-do all the steps for making the libraries from source and run the configure(the steps that Derek put on top of this page)
I think if you didn’t follow these steps in the above order, tslib won’t configure on library and make that problem.
I hope I get a chance on this weekend to do all the steps on a virgin host machine and start over all steps and share it.
Please let me know if it’s work for you.
Thank You
Iman
Hello Derek,
For a really long time I am struggling with the problem that my Qt app doesnt see keyboard input if I run it through ssh or using startup script. The only way to make keyboard work is to directly run it on BeagleBone Black with sudo word. Have you maybe encountered this before? I think I tried everything possible with user rights for the device and qt executable file.
Hi Łukasz, I haven’t seen that before — very odd. Check the permissions on /dev/input/event1. You could also try strace on the program (when you don’t run it as root) to monitor the interactions between in an the kernel. I’m afraid that I’m at a loss as to what is wrong. Sorry, Derek.
Hello thank you for answer,
I was strugling with the problem for so long without solution (tried everything I think, checked persmissions etc) that I decided to watch the keyboard input manually, similar to the way you introduced with GPIO-KEYS. I am not proud of it, but at least it finally works.
Hi Derek/iman,
It’s been a good couple of days, as I have been successful in running my QT programs with calibrated touch support!!
Yes, you are correct. I did have to put QMAKE_INCDIR and QMAKE_LIBDIR statements into the qmake.conf file. which allowed me to make QT, but it still would not work, I then un-commented the tslib line 2 “module_raw input” on my host machine as well as the beaglebone copy, (I had at first transferred it over then un-commented it. which meant the original one on the host was still commented) once I did that, and again rebuilt QT/copied over the lib files, it worked.
I think with all the replies we have sent each other in this thread, we have got the whole process nailed down, although maybe not in the clearest way, One concise final guide with everything included in one post would certainly make it easier for others to follow on our tracks.
Thank you both for your help. Now to continue on with the rest of the excellent book.
Hi Steve
Tha’s a good news.
I hope I get a chance in this weekend to run a full step and when I find it work share it.
Thank you
Iman
Thanks Steve and Iman — great info for those that are trying the same thing. I’ll have to work through it again when I get some time, Derek.
QT crossbuild on PC: I’ve been stuck for many hours trying to get the crossbuild tools for QT working – I expect most people trying this in 2019 will have the same problem. Can’t use Angstrom as suggested in the video since I’m using the newer Beaglebone Black wireless, which I don’t think is supported by Angstrom distribution. Following “Building the Qt Libraries from Source” in Chapter 11 didn’t work (even though cross compilers are installed and working) – probably some things are not installed in the directories tacitly assumed in the book. Many links to solutions in comments above are broken. Bought 2nd edition of book, but it doesn’t discuss this topic. Is there an updated procedure for installing for crossbuilds on Debian in VirtualBox? Is there a list of tools that I need to understand to figure this out, or is it hopeless for someone fairly new to Linux and Beaglebone?
Other parts of the book are working well – thanks for the comprehensive guide! (I also salute you for the Raspberry Pi book that helped me in an earlier project..)
Hi Jerry,
Thanks for your feedback. Yes, I had to drop cross-building Qt from the Raspberry Pi and Second Revision of Exploring Beaglebone. The problem is that cross building Qt is overly onerous and the process changes too quickly to be captured by a text book. When I wrote the instructions for Qt in Revision 1 there was much more support for open source development with Qt. Today, Qt Group PLC are focused on their commercial offerings and professional services, and the support for open source development has wained.
The best description I am aware of is at: https://medium.com/@amirmann/how-to-cross-compile-qt-for-raspberry-pi-3-on-linux-ubuntu-for-beginners-75acf2a078c and the number of steps is daunting!
Unfortunately, the only way I could bring Qt into the book was to build the programs on the Beagle board itself.
Kind regards,
Derek.
Hello Derek:
Thanks for the link with instructions for installing QT. It looks like it would be very helpful (but require lots of time and luck). However, I took your comment regarding QT Group’s focus on the commercial aspects of their business to heart. When downloading QT, you are cautioned to carefully review the licensing requirements. This caution might be interpreted as either sound advice to obey the law, or as a veiled warning that you are about to enter a legal minefield.
My concern about the legal dimension is sharpened by Oracle’s 2018 court victory over Google, establishing Oracle’s copyright over the Java API and signaling Oracle’s intent to extract fees for its use. It seems like this ruling (if upheld on appeal) could have implications for QT. The folks at QT certainly need and deserve to get paid for their work, but many small exploratory projects can’t shoulder the monthly licensing fees (for the life of the product?) for the QT commercial version. Some sort of GUI seems to be needed on many projects, so some means of developing Beagebone projects with a GUI is crucial. So, I’ve been laboring to understand how use GTK instead.
Since developing on the Beagleboard itself is painfully slow and can run into memory limits (at least with QT) I need to crossbuild on my PC. However, my mind boggles at the complications of properly installing the arm GTK libraries and setting Eclipse to properly handle them. After several failed attempts to get this to work in Eclipse in the basic VirtualBox VM, I figured it might be better to use the Change Root approach described in the first edition of your book, making the PC appear to be an arm processor. However, I see that this section on Change Root does not appear in the 2nd edition. Are there problems with Change Root in Debian 9?
Possibly, I needn’t worry about licensing issues for the open source version QT. If this is the case, I noticed that the product VisualGDB claims to provide crossbuilding QT for the BeagleBone in a Windows environment at very reasonable cost. Are you aware of users that had success with this tool without lots of painful setup using the Debian Stretch build for the BeagleBone?
Thanks,
Jerry
Hi Jerry,
Fully agree with you on the need to support exploratory projects in the most helpful way possible. That is present for simple configurations, but cross-compilation appears to be their threshold for support.
The change root should work fine. It’s not as important for C/C++ (non Qt) development now thanks to the new Debian cross build support. Unfortunately, change roots are slow (and a little buggy) when using QEMU.
I haven’t used VisualGDB. I’ll add it to my list of things to try!
Derek.
Dear Derek! Are you planning to re-release QT’s configuration process in the near future? Because I found that you have removed the original information from the 13th chapter of the webpage!
Hi Lewis,
See the message above to Jerry Smith. No, I’m afraid that Qt development on the Beagle boards was the only way that I could support Qt for this edition.
Kind regards,
Derek.