
Introduction
This is the chapter web page to support the content in Chapter 2 of the book: Exploring BeagleBone – Tools and Techniques for Building with Embedded Linux. The summary introduction to the chapter is as follows:
In this chapter, you are introduced to the Linux operating system and software tools that can be used with the Beagle boards. This chapter aims to ensure that you can connect to your board and control it. By the end of this chapter you should be able to ‘blink’ a system LED having followed a step-by-step guide that demonstrates how you can use Linux shell commands in a Linux terminal window. In this chapter, you are also introduced to a library of software functions, called BoneScript, which can be used with Node.js and the Cloud9 integrated development environment to build code that flashes the same system LED.
Learning Outcomes
After completing this chapter, you should be able to:
- Communicate with the BBB from your desktop computer using network connections such as Internet‐over‐USB and regular Ethernet.
- Communicate with the BBB using fallback serial connections such as Serial‐over‐USB or by using a custom USB‐to‐TTL 3.3 V cable.
- Interact with and control the BBB using simple Linux commands.
- Perform basic file editing using a Linux terminal.
- Manage Linux packages and set the system time.
- Use Linux sysfs to affect the state of BBB hardware.
- Safely shut down and reboot the BBB.
- Use Node.js, Cloud9, and BoneScript to write basic applications and code that interacts with BBB hardware.
If you are installing the BeagleBone Black under recent images under Windows then you should not have problems with drivers. If you do, please ensure that you use the latest certified drivers, which are available from: Install the certified drivers directly from: https://github.com/beagleboard/beaglebone-getting-started/tree/master/Drivers/Windows
This book has been written and tested using the Debian 9.5 2018-10-7 release (See beagleboard.org/latest-images). It is recommended that you work through the book using this image and then update to the latest image once you have completed the book.
Changes to the U-boot Partitioning Layout
On page 26 of Edition 1 there is a note to warn you not to alter the MLO, u-boot.img and uEnv.txt files on the FAT partition. As of Linux 3.8.13-bone70 that is no longer an issue. These files were moved to create a more distribution friendly default bootloader. As alluded to in the note on page 26, you can now find these files in the /boot directory on the main Linux partition:
root@beaglebone:~# uname -a
Linux beaglebone 3.8.13-bone70 #1 SMP Fri Jan 23 02:15:42 UTC 2015 armv7l GNU/Linux
root@beaglebone:~# cd /boot
root@beaglebone:/boot# ls
SOC.sh dtbs uboot
System.map-3.8.13-bone70 initrd.img-3.8.13-bone70 vmlinuz-3.8.13-bone70
config-3.8.13-bone70 uEnv.txt
It is not necessary to use these files at this point in the book, but please note this fact for future reference, particularly when performing tasks such as disabling the HDMI overlay by editing the uEnv.txt file.
Digital Media Resources
Here the digital resources referred to in the chapter web page are provided. There are high-resolution versions of some of the important figures and links to videos, resources and websites that are described in the chapter.
Source Code
 All of the source code that is described in this book is available in a public GitHub repository: Derek Molloy Exploring BeagleBone repository.
You can clone this repository on a Linux desktop computer or your BeagleBone using the command:
git clone https://github.com/derekmolloy/exploringBB.git
You can also install a Windows GitHub desktop application or a Mac OS X GitHub desktop application. Alternatively, you can download a full ZIP archive of the code using the following link: Download Source Code (this is a live link that automatically provides you with the very latest files). The Source Code web page lists all recent updates to this repository.
There is only a small amount of code in this chapter that is related to Node.js using the Cloud9 IDE. The code can be accessed in the chp02 folder of the cloned repository. The formatted code is provided here for your convenience.
HelloWorld.js
console.log("Hello World!");
SimpleWebServer.js
// A Simple Example Node.js Webserver Running on Port 5050
// Written by Derek Molloy for the book "Exploring BeagleBone: Tools and
// Techniques for Building with Embedded Linux" by John Wiley & Sons, 2014
// ISBN 9781118935125. Please see the file README.md in the repository root
// directory for copyright and GNU GPLv3 license information.

var http = require('http');  // require the http module
var server = http.createServer(
    function (req, res) {
        res.writeHead(200, {'Content-Type': 'text/plain'});
        res.end('Hello from the BeagleBone Black!\n');
    });
server.listen(5050);
console.log('BBB Web Server running at http://192.168.7.2:5050/');
BlinkLED3.js
// Example application for flashing an LED using BoneScript
// Written by Derek Molloy for the book "Exploring BeagleBone: Tools and
// Techniques for Building with Embedded Linux" by John Wiley & Sons, 2014
// ISBN 9781118935125. Please see the file README.md in the repository root
// directory for copyright and GNU GPLv3 license information.

var b = require('bonescript'); //using BoneScript
var LED3Pin = "USR3";          //USR3 is D5 on the BBB

b.pinMode(LED3Pin, b.OUTPUT);  //set up LED3Pin as an output
var isOn = false;              //isOn will be a Boolean flag
setInterval(toggleLED, 500);   //each half second call toggleLED()

function toggleLED() {
    isOn = !isOn;              //invert the isOn state on each call
    if (isOn) b.digitalWrite(LED3Pin, 1);  //light the LED
    else b.digitalWrite(LED3Pin, 0);       //turn off the LED
    console.log('LED On is: ' + isOn);     //output the state
}
Related Video
Getting started with Internet-over-USB
The chapter web page includes a video on getting started with Internet‐over‐USB

External Resources
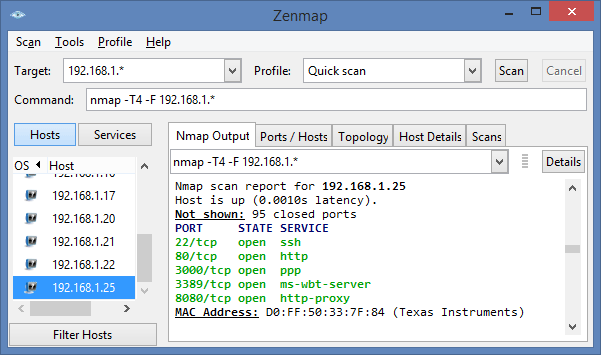
Zenmap is described in the chapter as a tool for scanning your network to find a network-attached BeagleBone. You are searching for an entry that has three to five open ports (e.g., 22 for SSH, 80 for the BBB guide, 8080 for the Apache web server, and 3000 for the Cloud 9 IDE). It may also identify itself with Texas Instruments. You can see the Zenmap application in action in the image to the left where 192.168.1.25 is the location of the BeagleBone on my network.
Important Documents
External Web Sites

The AM335x Technical Reference Manual (TRM)

The BeagleBone Black System Reference Manual (SRM)
The BeagleBoard.org website provides the main support for this platform, with software guides, community links, and downloads to support your development. An excellent “Getting Started” guide and blog is available at the website
- Node.js API documentation: nodejs.org/api/
- BoneScript library guide: tiny.cc/ebb205
Derek, in reading through chapter 2, I came across the example in the “Note” section ((Loc 1646) dealing with extundelete. Are you sure that example is correct? You haven’t deleted anything–and running your commands has no effect whatsoever. Running the commands doesn’t seem to have any sort of effect–as you’ve posted them in the chapter. In fact, your example doesn’t even create anything in the “undelete” directory…much less delete it.
I presume you are trying to undelete something to the microSD card (/dev/mmcblk0p2), but I can’t help but wonder if your example code is missing something–as it doesn’t appear as though you ever actually ever created something…much less deleted it.
Maybe I’m not understanding your example, so I apologize if that’s the case. But it seems “off”…
LOL
Hi Tom, You are correct — extundelete will not do anything at this point in the book, but is there for future reference should it be necessary to undelete a file at some point in the future. However, it cannot be relied upon to be successful. Derek.
Roger that…makes sense when you put it like that.
At Loc 1878, in the section where you are demonstrating the command to alter the display functionality of USR3 led, you have an error in the line:
!root@beaglebone:/sys/class/leds/beaglebone:green:usr3# …
There is an extra ‘!’ character there at the front of the line.
Not a big deal, but easy enough to fix in the Kindle version of the book.
Thanks for that. I’m not sure where that has come from as it is not in my electronic version. I’ll check the printed version for that error when it comes out.
Just checked in mine again this morning, with my iPad in both orientations (portrait, landscape) as sometimes that seems to change behavior. It is definitely still there–so I would be curious to know if others find that ‘!’ there.
Derek – I just flashed my BBB to the May 15 version. Your instructions above were very helpful. I was having a lot of trouble trying to follow the instructions on the referenced sites.
I meant to mention the whole process took me ten minutes, at which point it shut down the unit. At first I was worried that something went wrong, but then I connected it to my router and was able to boot, see the new version and set the password. (No time to do anything else right now.) 🙂
Thanks Mark, Derek.
Hi Derek – Another rookie question. In chapter 2 I’m going through the section on Package Management. I do plan to connect a wireless adapter in the near future, so I followed along the steps to “load” wavemon. (Which I did do successfully.) My simple question is this, where did waveman come from? Did the “apt-cache search wavemon” command cause the system to search for it on the Internet? I’m assuming that’s what it did, but I’d like to know for sure.
Hi Mark, For example, the APT package manager uses the repositories provided in /etc/apt/sources.list to get lists of available packages. When you perform an apt-get update command the package lists are downloaded from the repositories. It is important that you do this to ensure that the latest versions of the package and any dependencies are installed. You can actually find out the source location of a package in advance of installation by typing:
molloyd@beaglebone:~$ sudo apt-cache policy wavemon wavemon: Installed: (none) Candidate: 0.7.5-3 Version table: 0.7.5-3 0 500 http://ftp.us.debian.org/debian/ wheezy/main armhf PackagesHi Derek,
I have a problem with an example from the book.
When I try to execute SimpleWebServer.js, I get an error:
I’ve read somewhere that it is because the port is
already in use, however I have no idea how fix it.
Hi Michał, it is possible that you are running the same application twice. Does the page appear when you connect using the web browser. Alternatively, you could change the port number to another port, e.g., 5432 and try again, ensuring that you use the new port in the web browser address. See if that resolves the issue. If that works then try to kill the old process using pkill node. Kind regards, Derek.
Hi Derek, i have problems with my cloud9 IDE. My .js code run perfectly at 192.168.7.2 on that little screen, but when a put the same code on cloud9 nothing happens. I’m using the debian image that is recommended on the book (Debian 2014-05-14 release).
I do not know what is going on. :/
Hi Victor, there are a few peculiarities with Cloud9. It is vitally important that you save the file after you enter the code. Then press the Run button at the top center. You will get a message “debugger listening on port XXXXX”. Then press the “Resume” button on the top right (looks like a play button under the username – e.g.,”John Doe”). This gives you access to debugging functionality, but is not extremely intuitive. Hope that helps, Derek.
Greetings…could you help me understand and possibly fix the following situations. I have an older BBB (A5C). To avoid any Arngstrom v Debian confusion as I work thru the book, I created an SD image with the most recent debian BBB image so I can either boot w Angstrom off the eMMC or debian if I insert the card. I’ve noted that w the card the system boots debian automatically. In the following everything I refer to is with the debian boot.
(1) with my Win7 desktop / router. I connect just fine, USB or via ethernet (connected directly to router), can access w Putty, etc. The one question here is that after following the instructions on p.48 I connected with the internet OK after the nameserver line fix in resolv.conf . However, the next time I booted up I did not connect until I did the route add (but I didn’t have to do more than that). So it’s acting like it saved the one change but not the other. Does that make sense?
(2) with my Win7 laptop bigger problems. I can connect as a local network OK thru the usb but I can’t figure out how to access the internet with the laptop as an intermediary, thru the laptop’s wireless connection. Changing the connection parms similar to what worked for the desktop doesn’t seem to do it. And when attempting to run the BBB via an ethernet connect to the laptop I can’t access even as a local network.
Thanks, Dennis B
Hi Dennis, I believe that is correct. The route add does not persist across reboots unless you add the route -p flag. My concern with doing this is that if you wish to switch between Internet-over-USB and regular Ethernet this could be problematic. I haven’t tested a -p change properly, as I need to switch my BeagleBone between network connection types. The laptop problems seem strange. I have had Internet-over-USB working fine under Win7 laptops sharing both WiFi and regular Ethernet connections — so, I know it can be done. However, I have seen problems too — most problems I have seen are (somewhat ironically) caused by virus protection software and corporate lockdown tools. Check for any such tools and double check that you are using the WiFi adapter (many laptops have two for power management reasons) and not the Ethernet adapter. Apart from that, I’m not sure what could be happening. Kind regards, Derek.
Hi Derek,
Is connecting to BBB through Serial‐over‐USB possible?
Because according to section “BeagleBone Versions” in chapter 1, compared to BBW, USB serial connection functionality was
removed in BBB.
There is no /dev/ttyUSB0 device when connecting BBB with USB cable. USB-to-TTL works, though.
Hi Jesse, Yes, it is possible using the Linux Gadget Serial Driver — You have to install the drivers for your desktop machine and you should see COM port appear. On the BeagleBone side, the device appears in /dev (I don’t have the BBB to hand but I believe that the device is /dev/ttyGS0).
If I recall correctly, the USB serial communication that was removed, was a dedicated “real” USB-serial connection — the kind that you get when you use the USB-Serial-TTL cable that is described in Chapter 2. I hope that makes sense. Kind regards, Derek.
Hi Derek, thanks for your reply.
Now I managed to connect through /dev/ttyACM0 from my Ubuntu host.
After some google I learned that Linux Gadget Serial Driver runs in the BBB side and can talks to either a ACM driver or a generic USB serial driver running on a host PC.
The device appears in Linux host as /dev/ttyACM0 when the host is running ACM driver, and as /dev/ttyUSB0 when using generic USB serial driver.
Hopes someone may find this info useful.
Thanks Jesse, Derek.
Hi Derek, I have a problem when I try to write a new image for my rights . After create a SD card image I start to flashing my BBB , it after 25 minutes start to blink as a heartbeat (the four leds at the same time) and it never ends. Please, I need your help to solve this problem, because I can’t do nothing with my BBB.
Hi Carlos, it sounds like you are using a regular boot image rather than a flasher image. For the latest flasher image please use the link:
BBB-eMMC-flasher-debian-7.8-lxde-4gb-armhf-2015-03-01-4gb.img.xz You should see a knight-rider/cylon back-and-forth light pattern as the image is written to the board. Kind regards, Derek.
hi DEREK
i am trying to flasher image in bbb but it doen’t work
i use the image ”BBB-eMMC-flasher-debian-7.8-lxde-4gb-armhf-2015-03-01-4gb.img” , microSD (32G)
the LED Bright, like 1234 after 4321
after 10 min ,just the LED 2 Bright
it’s the problem of the microSD card ?
Best regards
Xinzhe
Hi Xinzhe, it sounds like you have a Rev.B board with a 2GB emmc. That image only works for Rev.C boards with a 4GB emmc. If it is a Rev.B board then you need to find the 2GB flasher image from the same page. Kind regards, Derek.
hi derek
thinks for you help
i have a Rev board a 4GB , yesterday evening i have try to flasher with the card SD in 8GB 16GB et 32GB
and with the card 8GB et 16GB the flasher is work , but with a card 32GB it doesn’t work . i don’t know whay .
i think maybe other people have the same problem like me
Best regards
Xinzhe
Hi Derek, Thanks for all the good info you’ve gathered. I encountered one of your videos on YouTube and it lead me to your website and now I’m looking forward to get your book.
I tried to upgrade my BBB’s packages and my upgrade returns with an error, I’ve copied the error below. How can I fix this? Should I burn an image on my BBB?
Errors were encountered while processing:
rsyslog
apache2.2-common
apache2-mpm-worker
apache2
dbus
dbus-x11
hostapd
openssh-server
ppp
sudo
E: Sub-process /usr/bin/dpkg returned an error code (1)
Regards
Amir
Hi Amir, it is not recommended that you use upgrade on the BeagleBone. The main issue is that bad things can happen if you run out of space on the eMMC during an upgrade. You should only update individual packages as you need them. Kind regards, Derek.
Hi Amir,
I have run into the same problem as yours, please let me know what you did to diagnose it.
Thank You
Hi Akhil, I don’t think that the apt-get upgrade can be fixed in the short term. You have probably run out of space on the eMMC. The BeagleBone Foundation does not recommend the use of upgrade and I don’t think anyone has any appetite to make it work any better. Even if you perform this on an SD card with plenty of spare capacity it can take 5-10 hours. It is much more straightforward to download the latest image and update packages individually as you have a specific need. Kind regards, Derek.
I literally discovered your book tonight, so I haven’t had a chance to read it yet. It looks like it is going to be very useful.
In advance of getting your book, I would like to get some clarification about the latest image (BBB-eMMC-flasher-debian-7.8-lxde-4gb-armhf-2015-03-01-4gb.img.xz). Is this only for the Revision C Beaglebone Black? The reason I ask is that I have a couple of BBB boards at are Revision A5A and would like to bring them to up to date with Debian. If the BBB A5A board can’t use the currently supported Debian, what can they use?
Thanks
Hi there, yes there is a 2GB eMMC flasher image also available from http://elinux.org/Beagleboard:BeagleBoneBlack_Debian. The direct link is currently: https://rcn-ee.com/rootfs/bb.org/release/2015-03-01/lxde/BBB-eMMC-flasher-debian-7.8-lxde-armhf-2015-03-01-2gb.img.xz. There is also a console image that frees up more space if you are using the BBB in headless form. Kind regards, Derek.
Derek,
Long time fan of your videos, and now thoroughly enjoying your book, which I just picked up a couple of days ago.
Several months ago I set up one of my BBB boards to connect to the Internet through the Serial over USB connection by following the instructions for one of your videos. I am having trouble recreating that success now following along with the instructions in Chapter 2, “Internet-over-USB” from the book, and it occurs to me the difference might be that I was running Windows 7 then but am now running Windows 8.1. The issue is that when I when I go to the Sharing tab of the Properties dialog for the LAN connection on my PC and check the “Allow other network users to…” option, no drop-down appears that would allow me to choose the BBB connection as described (and as I remember seeing under Windows 7).
Are the steps needed here different if running Windows 8 (or 8.1)?
Everything else seems to be working fine – I flashed the latest Debian image, I can connect through a browser or by using PuTTY to the BBB at 192.168.7.2, etc.
Thanks in advance for your help, and thanks especially for the superb book.
Mitchell
Thanks Mitchell! The procedure should be the same under Windows 8.1. If the sharing tab is visible but there is no drop-down tab that is usually because there is only one possible option. If the ping step fails, keeping going as it is possible that ping has been restricted on your network. There are two major steps to perform on the PC (sharing and resetting the DHCP settings for the BBB adapter — all on pg.28) and two steps on the BBB (in the boxes on pg.29 and pg.43). Hope that helps, Derek.
Thanks for the quick reply, Derek – everything works as you describe after all (not surprising! 🙂 )
As it turns out I was doing things in the wrong order or maybe not being patient enough. I went into the Windows Command Prompt netsh to check the status of the network adapters. After not finding anything out of sorts and exiting I saw that the Network and Sharing Center display had updated and when I checked the Sharing tab of the Properties dialog for the adapter connected to the internet the drop-down was there and the LAN connection to the BBB was shown and selected. I had to reboot the BBB and reenter the gateway and nameserver info but then the pings worked perfectly!
Thanks again,
Mitchell
Thanks Mitchell for letting me know. Kind regards, Derek.
Hi Derek,
Thanks for all the Videos,
I have run into the same problem as Amir and I’m new to Microcontrollers, what do I do now??
Thank You
I refreshed my Beagleboard Black with Debian 7.8 March 1 2015.
Now I cannot connect to the Beaglebone using the USB cable. I am running on Mac. If I open my network Preferences I no longer see the beagle bone as one of the connections.
I have tried to reinstall the drivers recommended on the Beaglebone site but this does not help. I am able to connect using the network cable.
Any idea how I can restore the ability to ssh to the beagle bone using the USB cable.
I am trying to set up the cross linking tools per the book and video and it would be more convenient to use the USB cable. But I am at a loss as to how to get the USB connection back.
Thanks
Correction the linux version as installed is Linux beaglebone 3.8.13-bone70 #1 SMP Fri Jan 23 02:15:42 UTC 2015 armv7l GNU/Linux
Hi Carl, I was away so I hope that you have solved your problem at this stage. I’m not sure how that has happened. You should be able to see the USB network adapter using ifconfig. In most cases like this I usually recommend that you re-flash as it could be symptomatic of another problem (e.g., incomplete flash). Kind regards, Derek.
Hi Derek,
I have successfully install beaglebone 3.8.13-bone70 on my board. Thanks for you good info.
Now i would like to updgrade the kernal version to 3.12.9. How to upgrade the kernal version what are the steps for that.
I am trying to do some basic things with the BBB. In Chapter 2, page 29 you describe how to enable network sharing. However, when I type ifconfig, I get eth0, lo, and usb0. eth1 does not show up. The inet addr for usb0 is 192.168.7.2 I am using Debian.
First question: why do I not have eth0?
I ran the various commands shown with usb0 instead of eth0.
However, when I tried to ping 8.8.8.8 as described on page 43, I get no response. I did the /sbin/route command so I am not getting the “Network is unreachable” error.
Thanks
Sorry. I posted a few errors.
My question should be: why do I not have eth1?
and I should have said: I ran the various commands shown with usb0 instead of eth1 as shown in your book.
Hello Derek.
In Chapter II of the book, on page 34 you say that “. You may get a security alert that warns about man-in-the-middle attacks, which may be a concern on insecure networks.” is precisely what happens BEAGLEBONE my plate black, your recommendation is that the fingerprint is accepted. I am using an ssh connection to a terminal of Ubuntu but when trying to connect via ssh root@192.168.7.2 not give me the possibility to accept the fingerprint and rejects the connection only me and tells me to put me in touch with the administrator.
What is the solution here.
Note: I have made many applications with white BEAGLEBONE and only has problems by BBB.
I hope you can help me, as you have done it several times.
Thank You
Hi there, that sounds like your BeagleBone drivers are not properly installed or there is an issue with your BBB booting properly. That is a stock message that comes when you try to connect to a device that does not exist. Kind regards, Derek.
Hi Derek
I am quite new in using BBB. I am trying to understand by going through to your books. I downdloaded image which you use througout the book( Debian Image 2014-05-14 ). Everything was okay until I noticed my 16 gb sd card turn into 100 mb. That created a problem when compiling to helloworldcpp example. The error was like this: Fatal error: No space left on device.
Could you please help me in solving this problem? Thanks in adavance
Kurtulus
Hi Kurtulus, Apologies for the delay in replying. You need to check the log files to see what is causing your file system usage as you should have the full space available to you (see pg.77). Also check the block sizes (see pg.78) to ensure that the card has been formatted correctly. Kind regards, Derek.
Hi Derek,
the BlinkLED3.js example does not work for me.
error: Unable to find LED: usr3
error: Unable to find gpio: /sys/class/leds/beaglebone::usr3/brightness
error: Unable to write to /sys/class/leds/beaglebone::usr3/brightness
I updated to the Debian 8.3 OS:
Linux beaglebone 4.1.15-ti-rt-r43 #1 SMP PREEMPT RT Thu Jan 21 20:13:58 UTC 2016 armv7l GNU/Linux
I’m new but recognized that in the error messages the path to the sysfs is missing the “green”.
Best regards
Chris
I’ve been away for the BBB for a bit and see there is a new version of the Debian flasher that I would like to install. However, when I get ready to use Win32 disk imager it only sees 98MB on my 8GB SD card. Hence, it won’t load the image. I’ve tried a few things to “see” the rest of the card, (I’m using Windows 10) but nothing has worked so far. Do you know the best way around this?
Hi Derek;
Thanks for writing this book. I am a HW architect/designer trying to move to the dark side (SW).
I have been going through chapter 2 and have run into a small issue that I am hoping you may have run across or may know how to resolve. I am doing the simple web server exercise. I am using the ethernet port so instead of the 192… address I find my BBB at 10.0.0.134. I modified the code to use that IP address. I have tried both IE and Chrome with the same result. I don’t see a test message on the web page, I get a small downloaded file with my text in it. I tried copying your code by cutting and pasting but can do that in the putty window I guess so I did manually type it in. I get no errors and the server seems to be running. In fact whenever I go to the server address I get another download of that text file with my message.
Thanks for any help you can provide.
Dan
Hello Derek: Recently bought your book and finally dusted off the BBB. I use Ubuntu 14.04 as my desktop. Trying to implement Network Sharing and have the following issues:
1. Even though the desktop has a network card (eth0), I connect to the internet using wi-fi. I suggest indicating that the main adapter should probably be wlan0 (page 29 number 3)
2. After following the steps given, I still don’t get connectivity. These are the commands issued from my terminal:
– sudo iptables –table nat –append POSTROUTING –out-interface wlan0 -j MASQUERADE
– sudo iptables –append FORWARD –in-interface eth1 -j ACCEPT
– sudo sh -c “echo 1 > /proc/sys/net/ipv4/ip_forward”
Am I missing something here? Thanks in advance if you can answer this or someone reading this page.
Luism
Hello Derek! I am very honored to buy this book, but I am very frustrated now, I don’t know if the debian version I downloaded is wrong or not, I saw many examples in the book, but in my system Without those files and folders, many of the paths seem to be different from the books. I hope to get the same system image as the example in the book. Can you help me, thank you!
Hi there. Are you using the second edition of the book? If so, it is Debian 2018-03-05. Kind regards, Derek.
Hello Derek! Nice to see your reply. I purchased the first version of the book, which corresponds to which version of the mirroring system, thank you!
Hi, it was Linux 3.8.13 under Debian Image 2014-05-14. Derek.
Great, I chose this system image (BeagleBone, BeagleBone Black-2GB SD)2014-05-14-More information-md5:35877ce21e8ed0eb1bdc6819ad71c317), so my project can continue, thank you.
Derek, I’m trying to use the Cloud9 debugger for a Python3 program that I am writing, but am having issues with getting the debugger to do anything. I’ve set breakpoints, and it never halts. I am struggling to see what I am doing wrong. I’m using an older, 2 GB Beagleboard black, but have installed the latest image on a 16 GB SD card, and disabled booting to the internal EMMC. I saw one comment mentioning that “You will get a message “debugger listening on port XXXXX”. Then press the “Resume” button on the top right” The buttons on the top right remain grayed out, and nothing seems to turn bring them active…. HELP!!!!!
Hi Derek,
The link to the SRM seems to be broken. Can you please re-check it ?
Thanks