
Introduction
This is the chapter web page to support the content in Chapter 6 of the book: Exploring BeagleBone – Tools and Techniques for Building with Embedded Linux. The summary introduction to the chapter is as follows:
This chapter integrates the Linux, programming, and electronics groundwork from earlier chapters to show you how to build circuits and write programs that interface to Beagle board single-wire inputs and outputs.
Learning about binary signals and programming can be difficult if you do it by yourself, you can check Get Educated Online’s Review of Datacamp to see the positive outcomes of it, and start learning about coding and programming, it will be much easier to have an expert with you every step of the way so you can give this chapter a more profound outlook and have a better understanding with no issues.
In this chapter, you will see practical examples that explain how to use a general-purpose input/output (GPIO) to output a binary signal to switch on an LED, or to read in a binary input from a push button. Optocoupler circuits are discussed so that you can safely interface to externally powered circuits. Also included are the steps required to read in an analog input and to send out a pulse-width modulated (PWM) output. GPIO interfacing is first performed using sysfs to ensure that you have skills that are transferrable to other embedded Linux devices. Next, BoneScript and memory-mapped approaches are investigated, which are largely specific to the AM335x SoC. Finally, there is a brief discussion on the impact of udev rules and Linux permissions on GPIO interfacing.
Learning Outcomes
After completing this chapter, you should be able to do the following:
- Use a Beagle board GPIO to output a binary signal to a digital circuit, or read in a binary input from a digital circuit.
- Write shell scripts and C++ code in order to control a Beagle board GPIO.
- Describe the use of internal pull-up and pull-down resistors.
- Describe the device tree model that is used to configure certain hardware on the Beagle boards and make minor modifications to the model.
- Use a PWM pin to output an analog voltage or as a control signal for motors and certain types of servos.
- Use an analog input to safely read in a value from an analog circuit, using an op-amp to protect the board from damage and/or invalid measurement.
- Write C++ code, which utilizes advanced functionality, to efficiently read in a digital input using a custom GPIO
- Use an advanced Linux configuration that allows for user-level control of the sysfs entries.
Digital Media Resources
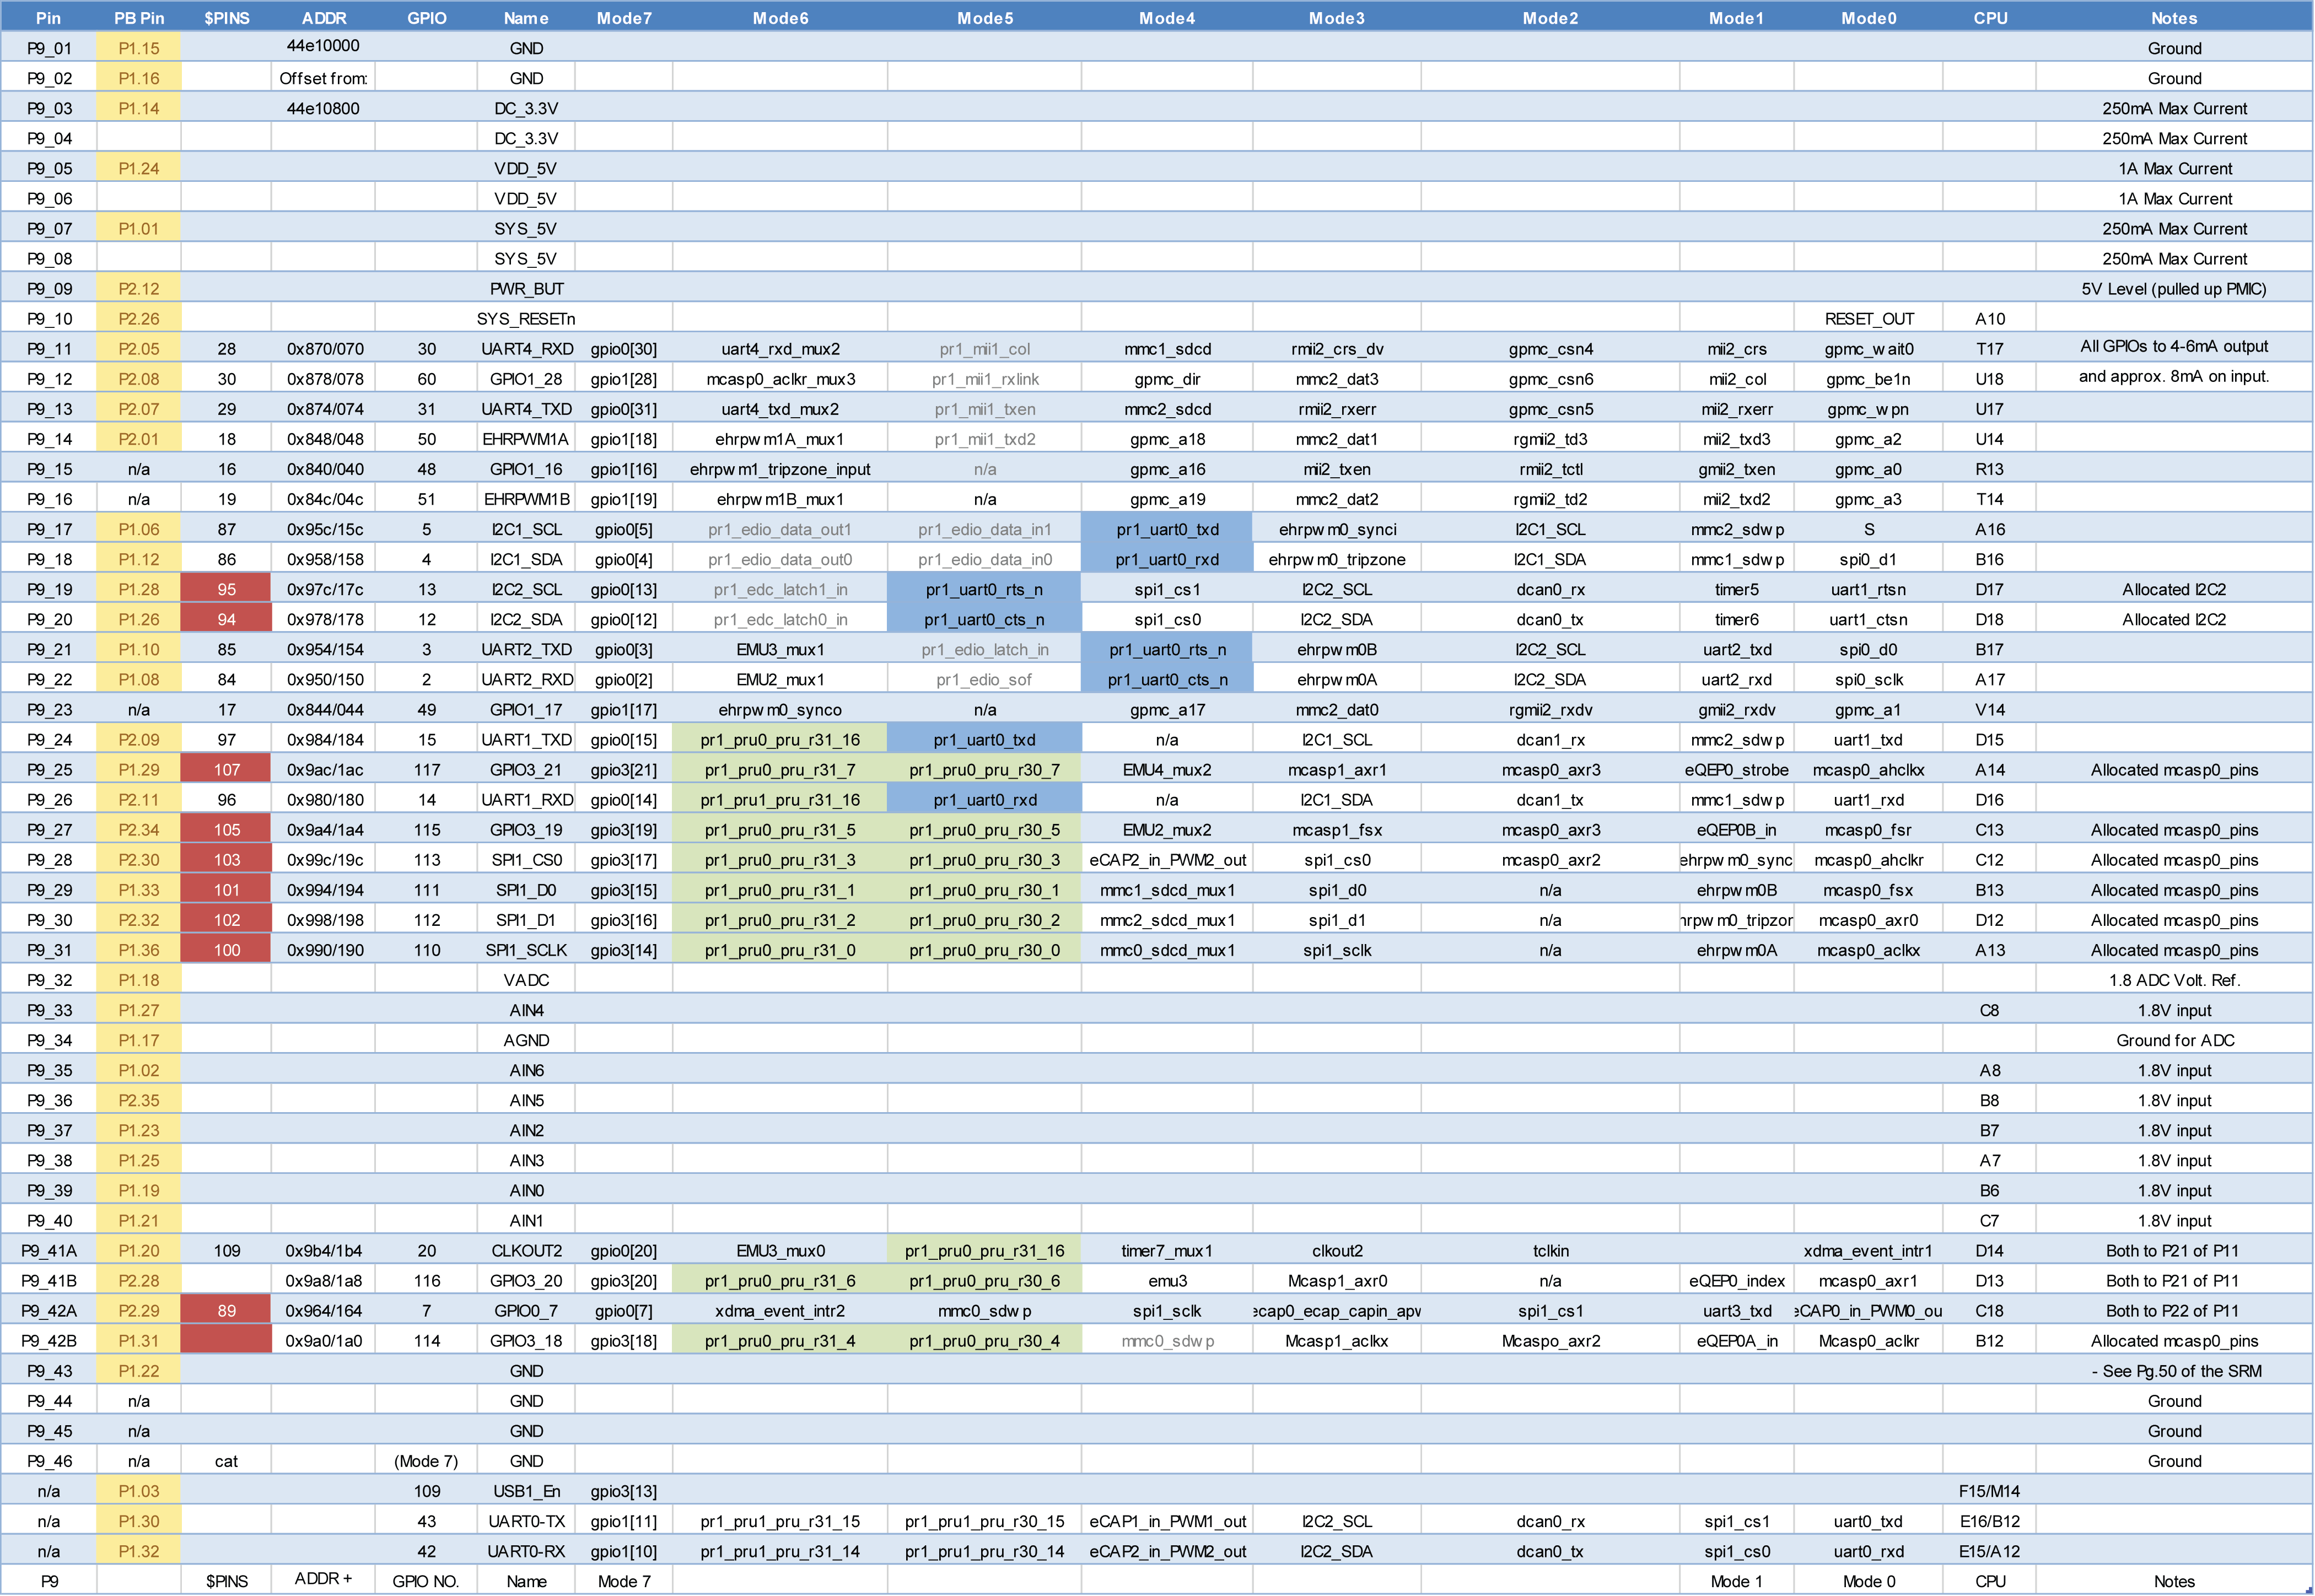
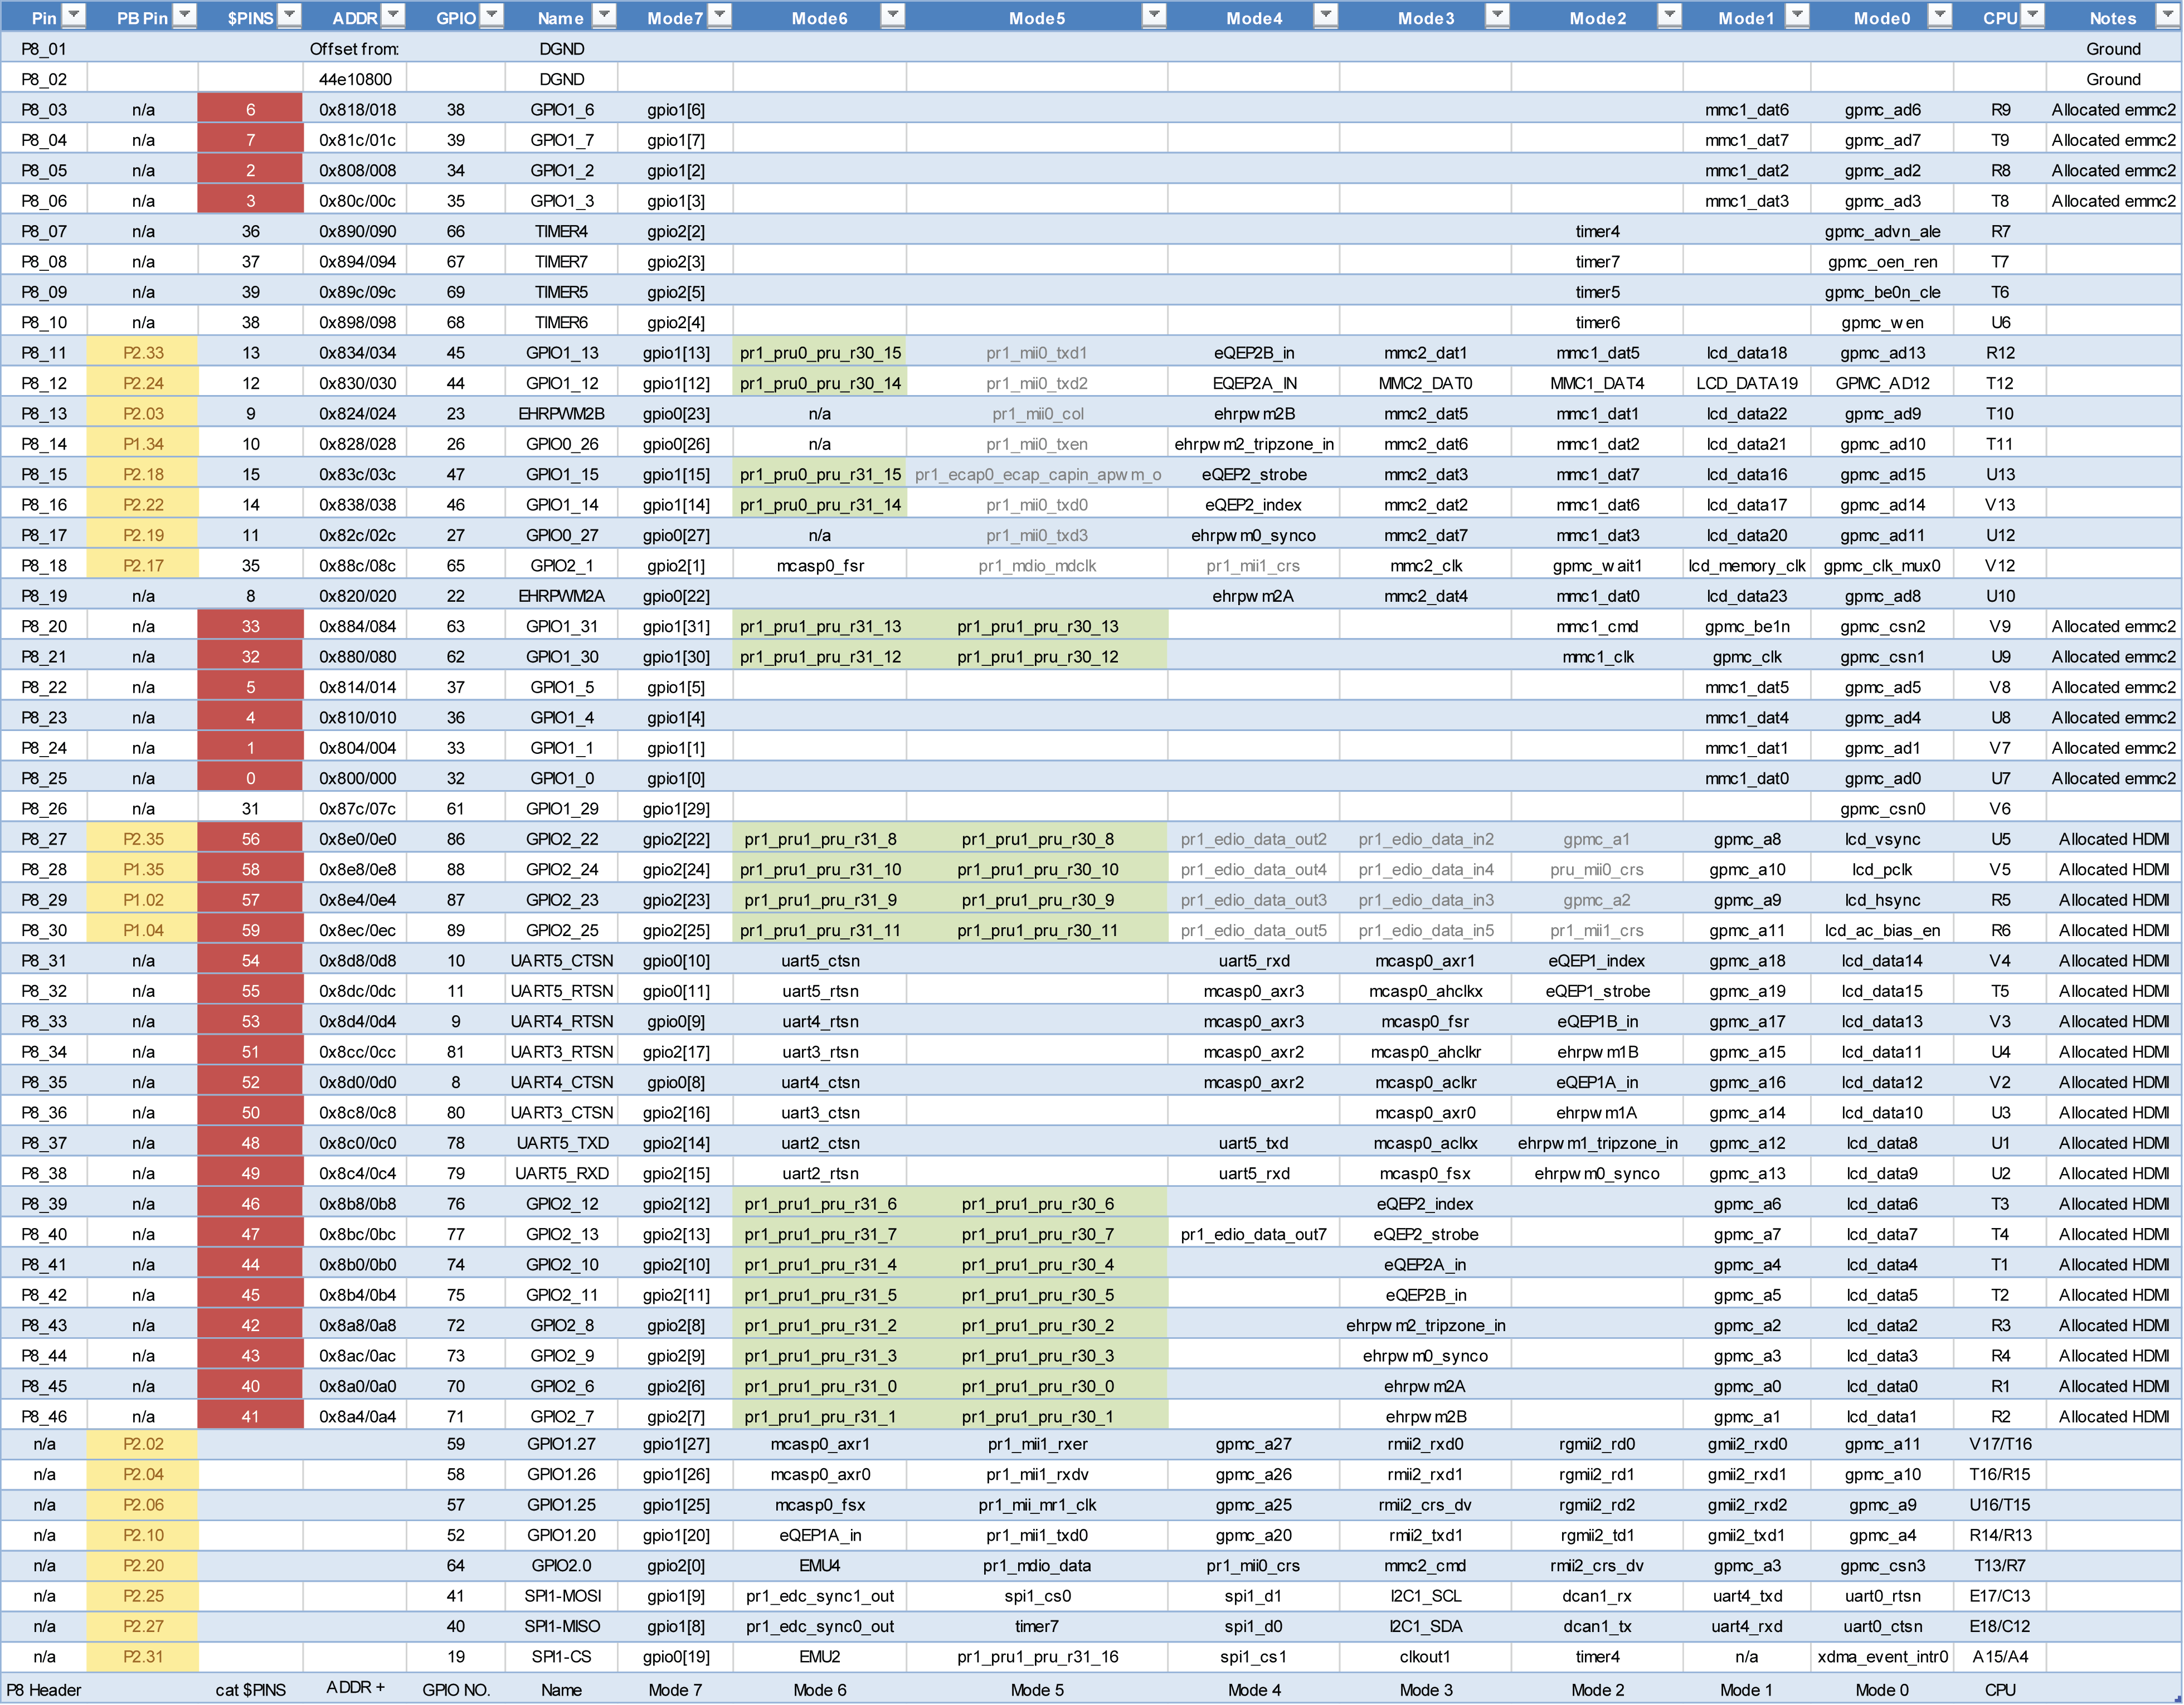
BeagleBone and PocketBeagle Header Charts
Figure 6-8 and Figure 6-9 from Chapter 6 are available for download as a high-resolution PNG raster format using the following links:
- BeagleBone P8 Header – PNG Format
- BeagleBone P9 Header – PNG Format
These are high-resolution images that can be displayed and/or printed in color.
Optocoupler Circuits
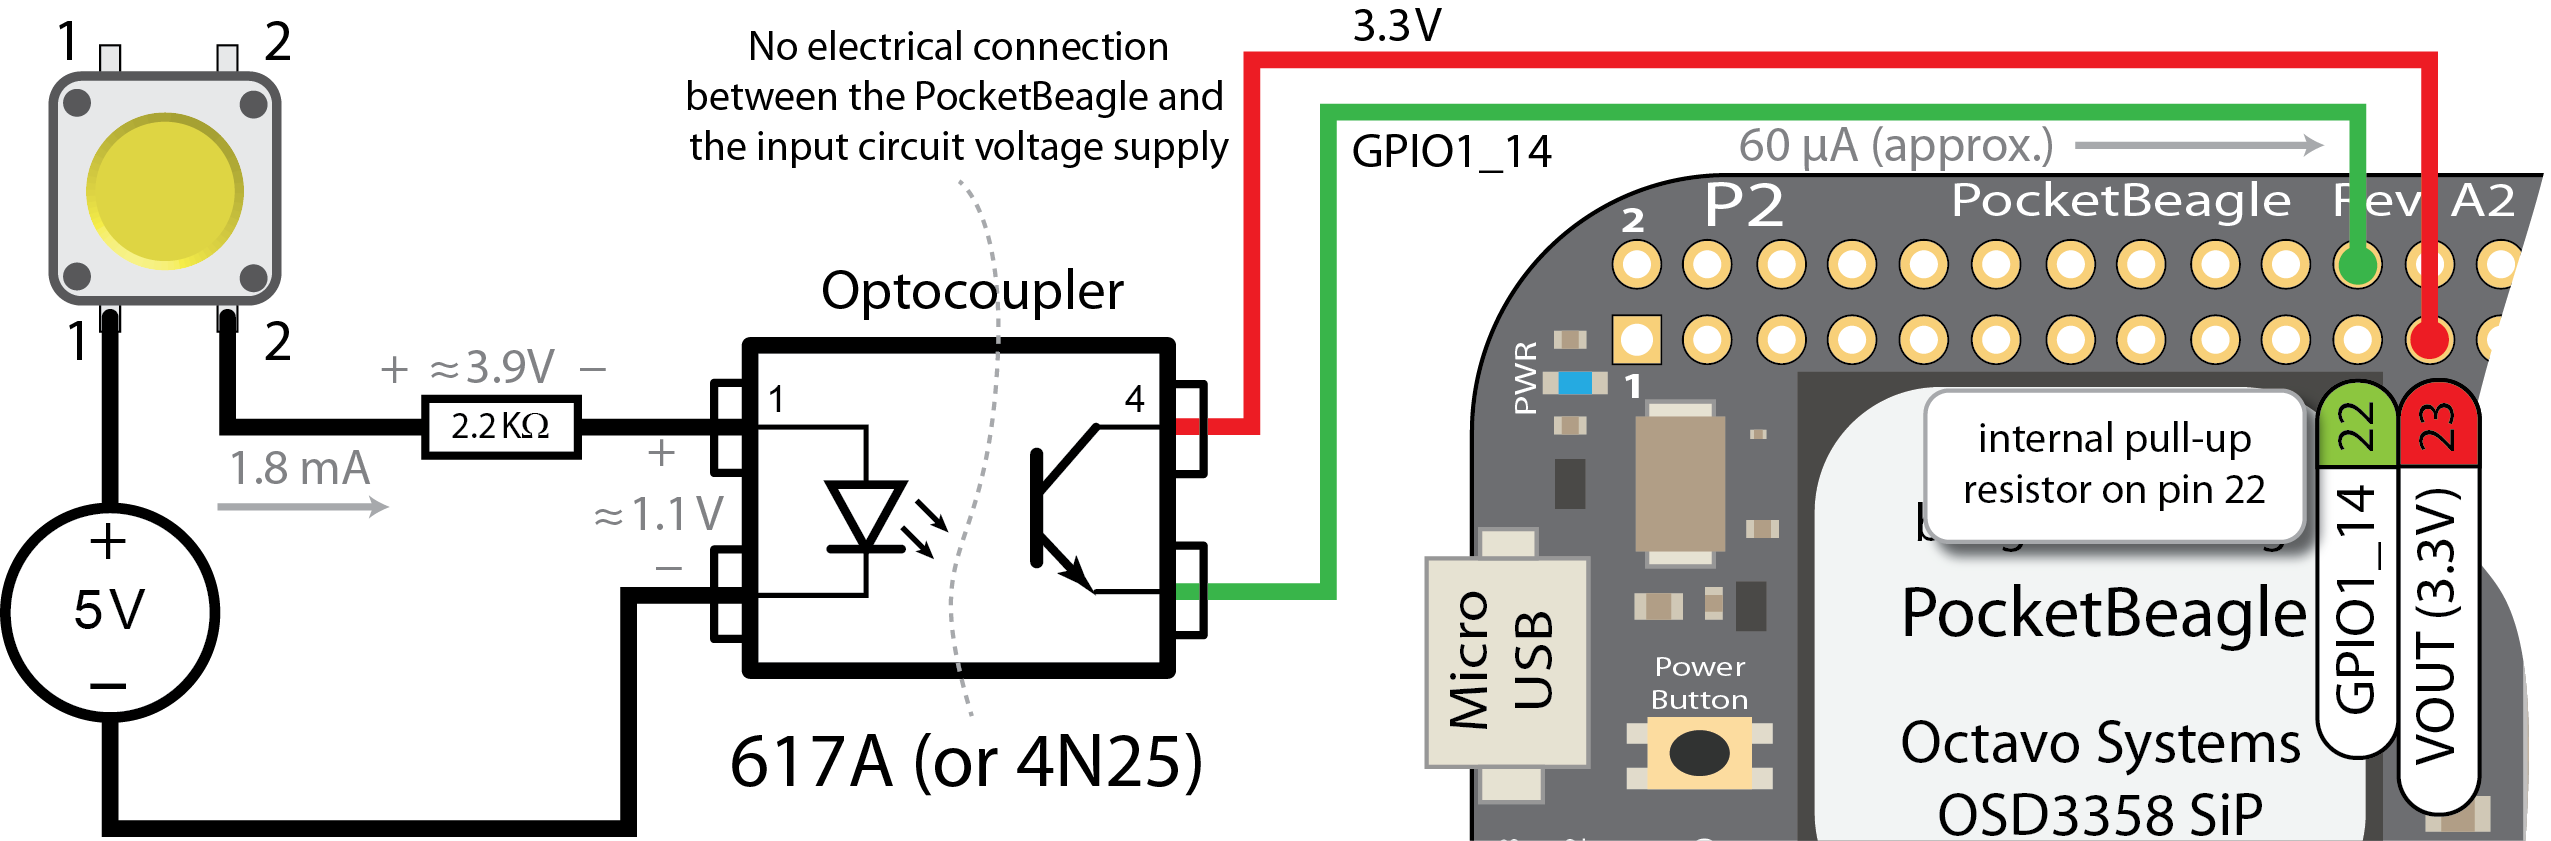
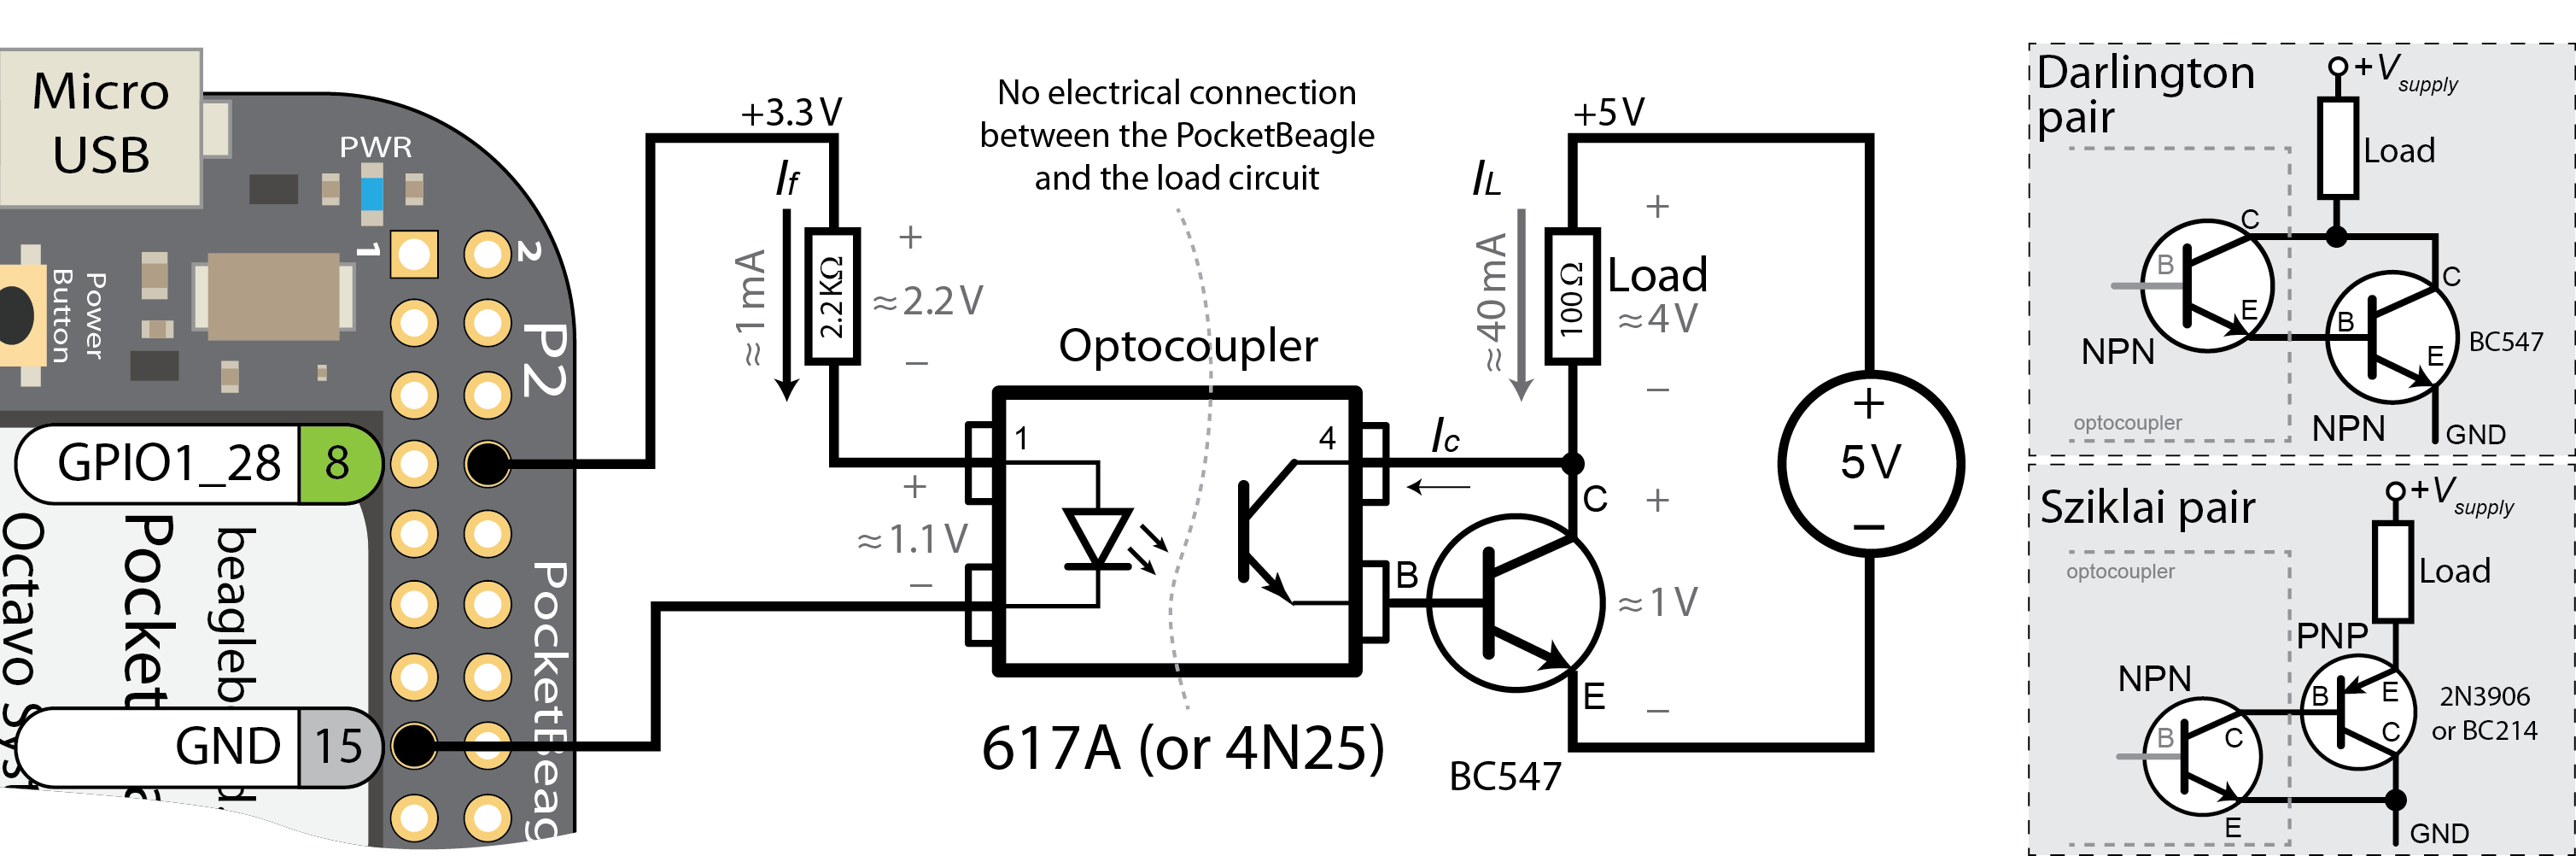
Figure color key:
- RED — pins are already allocated (e.g., to HDMI or eMMC). See Chapter 6 for information on how to re-allocate these pins. Do not use these pins without re-allocating them.
- GREEN — pin mode is for enhanced GPIOs for the PRU-ICSS (see later chapters)
- BLUE — pin mode is for UART functionality on the PRU-ICSS
Source Code
GPIO.h
/*
 * GPIO.h  Created on: 29 Apr 2014
 * Copyright (c) 2014 Derek Molloy (www.derekmolloy.ie)
 * Made available for the book "Exploring BeagleBone"
 * See: www.exploringbeaglebone.com
 * Licensed under the EUPL V.1.1
 *
 * This Software is provided to You under the terms of the European
 * Union Public License (the "EUPL") version 1.1 as published by the
 * European Union. Any use of this Software, other than as authorized
 * under this License is strictly prohibited (to the extent such use
 * is covered by a right of the copyright holder of this Software).
 *
 * This Software is provided under the License on an "AS IS" basis and
 * without warranties of any kind concerning the Software, including
 * without limitation merchantability, fitness for a particular purpose,
 * absence of defects or errors, accuracy, and non-infringement of
 * intellectual property rights other than copyright. This disclaimer
 * of warranty is an essential part of the License and a condition for
 * the grant of any rights to this Software.
 *
 * For more details, see http://www.derekmolloy.ie/
 */

#ifndef GPIO_H_
#define GPIO_H_
#include<string>
#include<fstream>
using std::string;
using std::ofstream;

#define GPIO_PATH "/sys/class/gpio/"

namespace exploringBB {

typedef int (*CallbackType)(int);
enum GPIO_DIRECTION{ INPUT, OUTPUT };
enum GPIO_VALUE{ LOW=0, HIGH=1 };
enum GPIO_EDGE{ NONE, RISING, FALLING, BOTH };

class GPIO {
private:
	int number, debounceTime;
	string name, path;

public:
	GPIO(int number); //constructor will export the pin
	virtual int getNumber() { return number; }

	// General Input and Output Settings
	virtual int setDirection(GPIO_DIRECTION);
	virtual GPIO_DIRECTION getDirection();
	virtual int setValue(GPIO_VALUE);
	virtual int toggleOutput();
	virtual GPIO_VALUE getValue();
	virtual int setActiveLow(bool isLow=true);  //low=1, high=0
	virtual int setActiveHigh(); //default
	//software debounce input (ms) - default 0
	virtual void setDebounceTime(int time) { this->debounceTime = time; }

	// Advanced OUTPUT: Faster write by keeping the stream alive (~20X)
	virtual int streamOpen();
	virtual int streamWrite(GPIO_VALUE);
	virtual int streamClose();

	virtual int toggleOutput(int time); //threaded invert output every X ms.
	virtual int toggleOutput(int numberOfTimes, int time);
	virtual void changeToggleTime(int time) { this->togglePeriod = time; }
	virtual void toggleCancel() { this->threadRunning = false; }

	// Advanced INPUT: Detect input edges; threaded and non-threaded
	virtual int setEdgeType(GPIO_EDGE);
	virtual GPIO_EDGE getEdgeType();
	virtual int waitForEdge(); // waits until button is pressed
	virtual int waitForEdge(CallbackType callback); // threaded with callback
	virtual void waitForEdgeCancel() { this->threadRunning = false; }

	virtual ~GPIO();  //destructor will unexport the pin

private:
	int write(string path, string filename, string value);
	int write(string path, string filename, int value);
	string read(string path, string filename);
	int exportGPIO();
	int unexportGPIO();
	ofstream stream;
	pthread_t thread;
	CallbackType callbackFunction;
	bool threadRunning;
	int togglePeriod;  //default 100ms
	int toggleNumber;  //default -1 (infinite)
	friend void* threadedPoll(void *value);
	friend void* threadedToggle(void *value);
};

void* threadedPoll(void *value);
void* threadedToggle(void *value);

} /* namespace exploringBB */

#endif /* GPIO_H_ */
GPIO.cpp
/*
 * GPIO.cpp  Created on: 29 Apr 2014
 * Copyright (c) 2014 Derek Molloy (www.derekmolloy.ie)
 * Made available for the book "Exploring BeagleBone"
 * If you use this code in your work please cite:
 *   Derek Molloy, "Exploring BeagleBone: Tools and Techniques for Building
 *   with Embedded Linux", Wiley, 2014, ISBN:9781118935125.
 * See: www.exploringbeaglebone.com
 * Licensed under the EUPL V.1.1
 *
 * This Software is provided to You under the terms of the European
 * Union Public License (the "EUPL") version 1.1 as published by the
 * European Union. Any use of this Software, other than as authorized
 * under this License is strictly prohibited (to the extent such use
 * is covered by a right of the copyright holder of this Software).
 *
 * This Software is provided under the License on an "AS IS" basis and
 * without warranties of any kind concerning the Software, including
 * without limitation merchantability, fitness for a particular purpose,
 * absence of defects or errors, accuracy, and non-infringement of
 * intellectual property rights other than copyright. This disclaimer
 * of warranty is an essential part of the License and a condition for
 * the grant of any rights to this Software.
 *
 * For more details, see http://www.derekmolloy.ie/
 */

#include "GPIO.h"
#include<iostream>
#include<fstream>
#include<string>
#include<sstream>
#include<cstdlib>
#include<cstdio>
#include<fcntl.h>
#include<unistd.h>
#include<sys/epoll.h>
#include<pthread.h>
using namespace std;

namespace exploringBB {

/**
 *
 * @param number The GPIO number for the BBB
 */
GPIO::GPIO(int number) {
	this->number = number;
	this->debounceTime = 0;
	this->togglePeriod=100;
	this->toggleNumber=-1; //infinite number
	this->callbackFunction = NULL;
	this->threadRunning = false;

	ostringstream s;
	s << "gpio" << number;
	this->name = string(s.str());
	this->path = GPIO_PATH + this->name + "/";
	this->exportGPIO();
	// need to give Linux time to set up the sysfs structure
	usleep(250000); // 250ms delay
}

int GPIO::write(string path, string filename, string value){
   ofstream fs;
   fs.open((path + filename).c_str());
   if (!fs.is_open()){
	   perror("GPIO: write failed to open file ");
	   return -1;
   }
   fs << value;
   fs.close();
   return 0;
}

string GPIO::read(string path, string filename){
   ifstream fs;
   fs.open((path + filename).c_str());
   if (!fs.is_open()){
	   perror("GPIO: read failed to open file ");
    }
   string input;
   getline(fs,input);
   fs.close();
   return input;
}

int GPIO::write(string path, string filename, int value){
   stringstream s;
   s << value;
   return this->write(path,filename,s.str());
}

int GPIO::exportGPIO(){
   return this->write(GPIO_PATH, "export", this->number);
}

int GPIO::unexportGPIO(){
   return this->write(GPIO_PATH, "unexport", this->number);
}

int GPIO::setDirection(GPIO_DIRECTION dir){
   switch(dir){
   case INPUT: return this->write(this->path, "direction", "in");
      break;
   case OUTPUT:return this->write(this->path, "direction", "out");
      break;
   }
   return -1;
}

int GPIO::setValue(GPIO_VALUE value){
   switch(value){
   case HIGH: return this->write(this->path, "value", "1");
      break;
   case LOW: return this->write(this->path, "value", "0");
      break;
   }
   return -1;
}

int GPIO::setEdgeType(GPIO_EDGE value){
   switch(value){
   case NONE: return this->write(this->path, "edge", "none");
      break;
   case RISING: return this->write(this->path, "edge", "rising");
      break;
   case FALLING: return this->write(this->path, "edge", "falling");
      break;
   case BOTH: return this->write(this->path, "edge", "both");
      break;
   }
   return -1;
}

int GPIO::setActiveLow(bool isLow){
   if(isLow) return this->write(this->path, "active_low", "1");
   else return this->write(this->path, "active_low", "0");
}

int GPIO::setActiveHigh(){
   return this->setActiveLow(false);
}

GPIO_VALUE GPIO::getValue(){
	string input = this->read(this->path, "value");
	if (input == "0") return LOW;
	else return HIGH;
}

GPIO_DIRECTION GPIO::getDirection(){
	string input = this->read(this->path, "direction");
	if (input == "in") return INPUT;
	else return OUTPUT;
}

GPIO_EDGE GPIO::getEdgeType(){
	string input = this->read(this->path, "edge");
	if (input == "rising") return RISING;
	else if (input == "falling") return FALLING;
	else if (input == "both") return BOTH;
	else return NONE;
}

int GPIO::streamOpen(){
	stream.open((path + "value").c_str());
	return 0;
}
int GPIO::streamWrite(GPIO_VALUE value){
	stream << value << std::flush;
	return 0;
}
int GPIO::streamClose(){
	stream.close();
	return 0;
}

int GPIO::toggleOutput(){
	this->setDirection(OUTPUT);
	if ((bool) this->getValue()) this->setValue(LOW);
	else this->setValue(HIGH);
    return 0;
}

int GPIO::toggleOutput(int time){ return this->toggleOutput(-1, time); }
int GPIO::toggleOutput(int numberOfTimes, int time){
	this->setDirection(OUTPUT);
	this->toggleNumber = numberOfTimes;
	this->togglePeriod = time;
	this->threadRunning = true;
    if(pthread_create(&this->thread, NULL, &threadedToggle, static_cast<void*>(this))){
    	perror("GPIO: Failed to create the toggle thread");
    	this->threadRunning = false;
    	return -1;
    }
    return 0;
}

// This thread function is a friend function of the class
void* threadedToggle(void *value){
	GPIO *gpio = static_cast<GPIO*>(value);
	bool isHigh = (bool) gpio->getValue(); //find current value
	while(gpio->threadRunning){
		if (isHigh)	gpio->setValue(HIGH);
		else gpio->setValue(LOW);
		usleep(gpio->togglePeriod * 500);
		isHigh=!isHigh;
		if(gpio->toggleNumber>0) gpio->toggleNumber--;
		if(gpio->toggleNumber==0) gpio->threadRunning=false;
	}
	return 0;
}

// Blocking Poll - based on the epoll socket code in the epoll man page
int GPIO::waitForEdge(){
	this->setDirection(INPUT); // must be an input pin to poll its value
	int fd, i, epollfd, count=0;
	struct epoll_event ev;
	epollfd = epoll_create(1);
    if (epollfd == -1) {
	   perror("GPIO: Failed to create epollfd");
	   return -1;
    }
    if ((fd = open((this->path + "value").c_str(), O_RDONLY | O_NONBLOCK)) == -1) {
       perror("GPIO: Failed to open file");
       return -1;
    }

    //ev.events = read operation | edge triggered | urgent data
    ev.events = EPOLLIN | EPOLLET | EPOLLPRI;
    ev.data.fd = fd;  // attach the file file descriptor

    //Register the file descriptor on the epoll instance, see: man epoll_ctl
    if (epoll_ctl(epollfd, EPOLL_CTL_ADD, fd, &ev) == -1) {
       perror("GPIO: Failed to add control interface");
       return -1;
    }
	while(count<=1){  // ignore the first trigger
		i = epoll_wait(epollfd, &ev, 1, -1);
		if (i==-1){
			perror("GPIO: Poll Wait fail");
			count=5; // terminate loop
		}
		else {
			count++; // count the triggers up
		}
	}
    close(fd);
    if (count==5) return -1;
	return 0;
}

// This thread function is a friend function of the class
void* threadedPoll(void *value){
	GPIO *gpio = static_cast<GPIO*>(value);
	while(gpio->threadRunning){
		gpio->callbackFunction(gpio->waitForEdge());
		usleep(gpio->debounceTime * 1000);
	}
	return 0;
}

int GPIO::waitForEdge(CallbackType callback){
	this->threadRunning = true;
	this->callbackFunction = callback;
    // create the thread, pass the reference, address of the function and data
    if(pthread_create(&this->thread, NULL, &threadedPoll, static_cast<void*>(this))){
    	perror("GPIO: Failed to create the poll thread");
    	this->threadRunning = false;
    	return -1;
    }
    return 0;
}

GPIO::~GPIO() {
	this->unexportGPIO();
}

} /* namespace exploringBB */
Read ADC
/** Simple LDR Reading Application
* Written by Derek Molloy for the book "Exploring BeagleBone: Tools and
* Techniques for Building with Embedded Linux" by John Wiley & Sons, 2014
* ISBN 9781118935125. Please see the file README.md in the repository root
* directory for copyright and GNU GPLv3 license information.            */

#include<iostream>
#include<fstream>
#include<string>
#include<sstream>
using namespace std;

#define LDR_PATH "/sys/bus/iio/devices/iio:device0/in_voltage"

int readAnalog(int number){
   stringstream ss;
   ss << LDR_PATH << number << "_raw";
   fstream fs;
   fs.open(ss.str().c_str(), fstream::in);
   fs >> number;
   fs.close();
   return number;
}

int main(int argc, char* argv[]){
   cout << "Starting the readLDR program" << endl;
   int value = readAnalog(0);
   cout << "The LDR value was " << value << " out of 4095." << endl;
   return 0;
}
Bone Keys (dts)
/dts-v1/;
/plugin/;

/{
    compatible = "ti,beaglebone", "ti,beaglebone-black";

    part-number = "BB-BONE-KEYS";
    version = "00A0";

    fragment@0 {
        target = <&am33xx_pinmux>;
        __overlay__ {
            pushbutton_pins: pinmux_pushbutton_pins{
                pinctrl-single,pins = <
                    0x040 0x37 // P9_15 pull-up mode 7 GPIO1_16
                >;
            };
        };
    };

    fragment@1 {
        target = <&ocp>;
        __overlay__ {
            /* avoid warnings */
            #address-cells = <1>;
            #size-cells = <1>;

            gpio_keys {
                compatible = "gpio-keys";
                pinctrl-names = "default";
                pinctrl-0 = <&pushbutton_pins>;
                #address-cells = <1>;
                #size-cells = <0>;

                button_P9_15 {
                    debounce_interval = <50>;
                    linux,code = <28>;
                    label = "button9_15";
                    gpios = <&gpio2 16 0x1>;
                    gpio-key,wakeup;
                    autorepeat;
                };
            };
        };
    };
};
Bone Keys (cpp)
/** BB-BONE-GPIO Test code to test the GPIO-KEYS interface.
* Written by Derek Molloy (www.derekmolloy.ie) for the book
* Exploring BeagleBone.
*
* This code is based on work in the document:
*    www.kernel.org/doc/Documentation/input/input.txt
*
* Written by Derek Molloy for the book "Exploring BeagleBone: Tools and
* Techniques for Building with Embedded Linux" by John Wiley & Sons, 2014
* ISBN 9781118935125. Please see the file README.md in the repository root
* directory for copyright and GNU GPLv3 license information.            */


#include<iostream>
#include<fcntl.h>
#include<stdio.h>
#include<stdlib.h>
#include<linux/input.h>
#include <unistd.h>
using namespace std;

#define KEY_PRESS 1
#define KEY_RELEASE 0

int main(){
   int fd, count=0;
   struct input_event event[64];
   if(getuid()!=0){
      cout << "You must run this program as root. Exiting." << endl;
      return -1;
   }
   cout << "Starting BB-BONE-GPIO Test (press 10 times to end):" << endl;
   if ((fd = open("/dev/input/event1", O_RDONLY)) < 0){
      perror("Failed to open event1 input device. Exiting.");
      return -1;
   }
   while(count < 20){  // Press and Release are one loop each
      int numbytes = (int)read(fd, event, sizeof(event));
      if (numbytes < (int)sizeof(struct input_event)){
         perror("The input read was invalid. Exiting.");
         return -1;
      }
      for (int i=0; i < numbytes/sizeof(struct input_event); i++){
         int type = event[i].type;
         int val  = event[i].value;
         int code = event[i].code;
         if (type == EV_KEY) {
            if (val == KEY_PRESS){
               cout << "Press  : Code "<< code <<" Value "<< val<< endl;
            }
            if (val == KEY_RELEASE){
               cout << "Release: Code "<< code <<" Value "<< val<< endl;
            }
         }
      }
      count++;
   }
   close(fd);
   return 0;
}
Errata
Second edition:
- None so far
First edition:
- Page 246. At the top of the page “P9_15(GPIO49)” should be “P9_15(GPIO48)”. It is correct in all other locations.
- Page 247(Loc 7296). There are three ‘-‘ characters when there should be two ‘-‘ characters in three locations, in front of ‘path’, ‘attribute’, and ‘action’ on the command calls to udevadm.
Loc 6533: In the paragraph on the Cape Manager (and loading a device tree overlay), you talk about putting those two lines in your .profile file so that you don’t have to re-export them after each boot. However I think one should first check to see if there is a .bash_profile file in their $HOME, because if there is…then I’ve always understood that the .profile file doesn’t get read. And when I cat my .profile file, I see these comments…
*********************************************************
# ~/.profile: executed by the command interpreter for login shells.
# This file is not read by bash(1), if ~/.bash_profile or ~/.bash_login
# exists.
etc…
*********************************************************
I’ve noticed this in the text before, and heard you mention the .profile file in your videos. But if there is a .bash_profile file in the same directory–then I would argue that these two lines should go there instead, for the reason mentioned. I’d like to hear your thoughts on it though.
Interesting point. I have worked with so many distributions and shells over the years that I had to run a test to confirm what would happen on the BeagleBone by adding an echo to the end of the .bashrc and .profile files. When you log in by starting a SSH session, the output from the echo is as follows:
As the .bashrc file is called from the .profile, both are executed. But if you su from a root session (non-login) to a user session then the .profile is not executed.
If we choose to use another shell then neither will be executed:
So, while adding the variables to the .profile works fine, I would agree with your view that environment variables should be set in the .bashrc when using a user account. However, I think it best that for the root account that the environment variables are set in .profile and that /etc/sudoers is used (using visudo) to set the environment variables that should be transferred from the user account to the root account environment.
If you have .bash_profile though, does .profile still get read? The .bashrc file is read whenever a user opens a non-login shell–but since the .bash_profile is read once when they log in, I would think that’s all you need. No reason to have it re-read each and every time they would open a new shell, I’d think.
So did you have a .bash_profile in your $HOME? If not, add one and put your echo statement in there and in .profile. Then we’ll see if the one excludes the other.
Just put an echo “debug” statement in both my .profile and .bash_profile files. When I login via SSH, I get this…
*********************************************
$ ssh tb@192.168.1.210
Debian GNU/Linux 7
BeagleBoard.org BeagleBone Debian Image 2014-05-14
Support/FAQ: http://elinux.org/Beagleboard:BeagleBoneBlack_Debian
Last login: Mon Dec 22 11:06:50 2014 from tb-g75vw
Here in .bash_profile
*********************************************
Nothing at all from the .profile file, so I do think that it’s never even getting read…as mentioned in the comments.
If you have a .bash_profile then the .profile will not be read with either a login or su call. Using that configuration would provide a very clear disambiguation between a login or non-login shell instance:
I’m not sure where to add the environment variables with this configuration. I suppose you could get the .bash_profile to call the .bashrc in the same way that .profile calls the .bashrc. You could then set the environment variable in .bashrc.
Right–that’s what I was saying. I install it ONLY in .bash_profile. Then they are loaded when I first boot into the system, since I’m not likely to be spawning new shells anyway. So I don’t typically use .bashrc much–I just put my stuff in .bash_profile. I *do* have a .profile though…just never really used it much.
Thanks Tom. For some reason your comment at 5:10pm was flagged by WordPress (not sure why, but fixed) and did not appear, so I was responding to your earlier message. I think that having the environment variables in bash_profile will work really well. Like you, I don’t see many reasons for su’ing into a user account to interface with capes or input/outputs, so the non-login option is not too important for the environment variables that are used in this book. Interesting issue.
On a similar subject, in Chapter 6 page 224, it states “As discussed in Chapter 3, environment variables do not transfer to the root user session”.
I’ve skimmed through Chapter 3 a couple of times, and I can’t find the discussion of environment variables.
I’m working through the problem of making a “virtual cape” (in my case the SPI overlay) automatically load at boot time.
Hi Greg, there is a discussion on environment variables throughout Chapter 3 but the topic is covered in Chapter 2 (I think page 40ish). The issue on being able to transfer variables to sudo is covered in more detail near the end of the section on Java in Chapter 5. To force the SPI cape to load on boot, you need to edit the uEnv.txt file on the vFAT partition of the current Debian image (see approx pg.226 where that exact overlay is loaded on boot). If it is a custom overlay that you have written yourself then there is a problem (see the note near the top of the Chapter 6 web page). Derek.
It works! So I modifed the .profile in a user account to include the SLOTS and PINS environment variable exports, and modified the uEnv.txt as shown on page 226 adding the optargs line.
Shutdown and rebooted into a user account– environment variables PINS and SLOTS are there and “virtual cape” for SPI is in the SLOTS!
Now, since the “virtual cape” can be added after boot by shell commands, is it not reasonable to simply add these commands to a preamble set-up routine in a C/C++ application? Thus leaving the BBB in its default state?
I’m getting the impression that this Device Tree Overlay scheme for setting up the hardware is a very good thing for BBB.
Loc 7003: In the pthreads example, you use this conditional code:
******************************************
if( pthread_create( &thread, NULL, &threadFunction, &x ) )
{
cout << "Failed to create the thread" << endl;
return 1;
}
******************************************
The man page for pthread_create() tells me this about its return value:
"On success, pthread_create() returns 0; on error, it returns an error number, and the contents of *thread are undefined."
So although I don't think it's at all incorrect, I do think your example is a bit confusing, as it's sort of "reverse logic" type of thing. Because the name of the function (pthread_create) almost implies that it is a predicate function to some degree, it seems as though we are testing for a successful pthread creation…but then giving an error message and exiting if the call doesn't succeed.
So I just thought it was worthy of mention, in terms of how the "pthread_create" name seems confusing given the historical C-related return value indicative of success (0). Certainly one could simply test for failure…
******************************************
if( pthread_create( &thread, NULL, &threadFunction, &x ) != 0 )
{ etc…
*****************************************
…and this would clarify the logic a bit. C is wacky that way, I guess.
Yes, C is wacky that way and I took a shortcut! I think your clarification is very good and I will add that to the source code example in the Git repository.
Loc 7296: In the “udevadmin” demonstration, your argument specifiers each have three ‘-‘ characters, when they should only have two.
**********************************************
$ udevadm info —path=/sys/class/gpio —attribute-walk
info: unrecognized option ‘—path=/sys/class/gpio’
**********************************************
To fix it, simply remove one ‘-‘ character:
@@@@@@@@@@@@@@@@@@
$ udevadm info –path=/sys/class/gpio –attribute-walk
Udevadm info starts with the device specified by the devpath and then
walks up the chain of parent devices. It prints for every device
found, all possible attributes in the udev rules key format.
A rule to match, can be composed by the attributes of the device
and the attributes from one single parent device.
looking at device ‘/class/gpio’:
KERNEL==”gpio”
SUBSYSTEM==”subsystem”
DRIVER==””
@@@@@@@@@@@@@@@@@@
I should add that while this may be another of those weird “apparent” differences we saw in the early chapters, I am now viewing the book inside Google Chrome using the Kindle Cloud Reader plugin. It seems to work good otherwise, and in this case it clearly seems to show three ‘-‘ characters preceding each argument. So I think there is indeed an issue.
There is also another instance later in the same Location: “—action=add /class/gpio”
Thanks Tom. Okay — now that is a weird one! You are correct, and it looks like it will appear in the printed text too. The double hyphen seems to have been converted to a triple hyphen by the layout processing and I never noticed it. I’ll add those points to the errata list.
Loc 7334: The very last line before the “Summary” section: Please check this link (tiny.cc/ebb604). It’s not marked as a link in the document, and I get a “Mystery Link” error when I key it in manually. So I’m not sure whether or not the link is valid. I try to check most links, and to this point they’ve all be valid as far as I can tell. But this one is a bit odd…
Thanks — that is now fixed. That’s the great thing about tiny.cc — the URLs can be altered even after the book has been published.
Yup…works for me here now too. Cool. Linux is awesome!
Hi Derek,
In the last line from the “Device Tree Overlays” tiny.cc/ebb605, please check this link, I get a mystery link error when i click on it and when i key it in manually. And i can’t find Jason Kridner’s guide via Google. On https://github.com/beagleboard/devicetree-source is stated that This tree is now depricated, Was this the tree where I had to look at?
Thanks Evert, I have fixed it. Derek.
Derek,
In the section “Analog Inputs” you read the raw ADC values directly from /sys/bus/iio/devices/iio:device0, but when you use the “BB-ADC” device tree overlay you get an iio helper and you can read than the AIN0 value with cat /sys/devices/ocp*/helper*/AIN0, you get than a value in millivolts. The advantage is dat you use then a input name wich is also used in your header pin tables which makes more sense. You can even change the values which you read by changing the vsense-scale in the BB-ADC-00A0.dts overlay. But maybe that is to much? What is the disadvantage of reading these values instead of reading the raw ADC values?
Hi Evert, interesting question. I can’t imagine that there is any issue in using either. Just for other readers, if you read the value from either input you will essentially achieve the same result. For example, with the TMP36 temperature sensor attached to AIN0:
The first value is a number between 0-4095 and the second value is the actual voltage in millivolts. They are the same as 1.8 x (1583/4095) ~= 696mV. I suppose it is more efficient to use the AIN0 millivolt value, however I think it is a good exercise to see the conversion value in the code. You could argue that the AIN0 millivolt value is not as accurate, but the main reason I used the raw in_voltage0_raw value in my code is a concern that the ocp and helper numbers would change (or be different for different users), breaking the code examples! Derek.
About Device Tree; in the last lines from section you write “There are many overlays on the BBB..” and you do a “ls BB-SPI*” with the result “BB-SPIDEV0-….”, when i do that, I get no result; nevertheless when i load the overlay with “echo BB-SPIDEV0 >$SLOTS he wil still be loaded:
0: 54:PF—
1: 55:PF—
2: 56:PF—
3: 57:PF—
4: ff:P-O-L Bone-LT-eMMC-2G,00A0,Texas Instrument,BB-BONE-EMMC-2G
5: ff:P-O-L Bone-Black-HDMI,00A0,Texas Instrument,BB-BONELT-HDMI
7: ff:P-O-L Override Board Name,00A0,Override Manuf,BB-ADC
8: ff:P-O-L Override Board Name,00A0,Override Manuf,BB-SPIDEV0
I don’t use the last image from beagleboard.org, but a testing image from http://elinux.org/Beagleboard:BeagleBoneBlack_Debian , BeagleBoard.org Debian Image 2014-12-31
I know, that’s asking for troubles, but i’m curious.
Aperently they have the overlays hidden somewhere in the kernel, because they all work.
Derek,
I am back to the official release debian from 2014-05-14, to many problems with the test releases without answers on the internet.
Hi Evert — I think that is a good decision. When it comes close to being official I will test everything in the book against it. Derek.
hello,
i have bought the book and im in chapter 6.is there somewhere a guide to follow how to install the gpio libraries, made from you, in the debian distribution?
thanks!
Hi there. In Chapter 9 I use the library with a few different projects. For example, have a look at the LCDcharacter display project. You can see the build script there that allows you to use the library. https://github.com/derekmolloy/exploringBB/tree/master/chp09/LCDcharacter/ Also, see page 376 on how to modify the library with your own changes and deploy it to the BBB for your own use. Derek.
the problem is i dont know how to install the library, i am not familiar with linux not even on desktop.shall i read another book first before using yours?
Hi there. Once you clone the GitHub repository, the library is effectively installed on your BeagleBone. A library is no more complicated than binary code that you can call and once you can see the binary .so file then you can say that it is “installed”. Make sure that you are comfortable with the content in Chapters 3 and 5 before trying to use the library at all — all of the source code is available so you never have to use it as a binary library, just use the source code version as described in Chapter 6. Kind regards, Derek.
Hi derek Ive got a problem trying to code a c program that controls a pwm output but I keep getting multiple main definitions error and I programmed it using your makeLED.c example this is my code:
#include
#include
#include
void pwm_Cal(char nombre[], char valor[]);
int main(void){
pwm_Cal(“/duty”,”5000″);
pwm_Cal(“/period”,”2000″);//es 2k porque se multiplica cada ms por 1000 necesitamos 2
pwm_Cal(“/run”,”1″);
return 0;
}
void pwm_Cal(char filename[], char value[]){
FILE* fp; // create a file pointer fp
char PATH[100]; // to store the path and filename
sprintf(PATH, “/sys/devices/ocp.3/pwm_test_P9_21.12” “%s”, filename); // write path and filename
fp = fopen(PATH, “w+”); // open file for writing
fprintf(fp, “%s”, value); // send the value to the file
fclose(fp); // close the file using the file pointer
}
Problem Solved I didnt notice I had another main on a different file. Thank you for this great book!
Thanks David, Derek.
Hi Derek, Sorry for being such a pain but I´m trying to do C libraries for me to use for a C based quadrotor and when I use this code I keep getting segmentation fault on the BBB I´m using hard floats and everything on the book but when I try to run my ESC calibration code i get the segfault error
void pwm_Cal(char nombre[], char valor[]);
int main(void){
pwm_Cal(“/duty”,”5000″);
pwm_Cal(“/period”,”2000″);//es 2k porque se multiplica cada ms por 1000 necesitamos 2
pwm_Cal(“/run”,”1″);
return 0;
}
void pwm_Cal(char filename[], char value[]){
FILE* fp; // create a file pointer fp
char PATH[100]; // to store the path and filename
sprintf(PATH, “/sys/devices/ocp.3/pwm_test_P9_21.12″ “%s”, filename); // write path and filename
fp = fopen(PATH, “w+”); // open file for writing
fprintf(fp, “%s”, value); // send the value to the file
fclose(fp); // close the file using the file pointer
}
Hi David, I just realised tonight that I hadn’t provided an example for PWM, so I have added one to the chp06/pwm/ directory, called pwm_test.cpp. I haven’t tested your code, but you have to make sure that you have loaded the bone_pwm_XXX and am33xx_pwm overlays (as on Page 231) and that you run your program as root. Could you test my code first to see if it works for you? Just do a git pull on the repository and it should appear in the /chp06 directory. Kind regards, Derek.
Hi Derek! I have been using two PWM outputs, rather than one, and when I do that, it is no longer possible to specify the period independently, for each output. I am forced to use a period of 500000, or 2KHz. I would like to drive two Hitec HS-422 servos, but they require a period of 2000000 or 50Hz. Do you know of an easy workaround, compared to a hack I found a link to:
https://randomlinuxhacks.wordpress.com/2014/09/16/changing-pwm-period-on-beaglebone-black/
I don’t feel up to recompiling the Linux kernel yet.
Thanks
Mike
Hi Mike, That’s an interesting point. I think that this is only a problem if you are using two PWM outputs that are on the same chip. For example bone_pwm_P9_42 is eCAP0 and P8_13 is ehrpwm2B, so I can set the period independently:
However, if for example, P8_13 (ehrpwm2B) and P8_19 (ehrpwm2A) are on the same chip then there are problems
If you are only using two servos then you should be able to find two PWM outputs that are not on the same chip, giving you access to five “period configurable” outputs: eCAP0, eCAP2, ehrpwm0, ehrpwm1, and ehrpwm2 (I have not tested this!). Granted, you may have to disable the HDMI output. See the tables on pages 211 and 212. Kind regards, Derek.
Derek, that will do it for me! Thank you.
Hi Derek, I got a problem here.
I’m following the first experiment in ch6 on page 204. Once I plug the “gate” into GPIO1_17, the BBB stops responding on SSH (It looks like the BBB suddenly goes super super slow). No matter what I type in the terminal (for example, I type “echo 1 > value”), the BBB doesn’t display anything for me. But as soon as I unplug the “gate” of the FET, the text I just typed (“echo 1 > value”) just “pops out”, I mean, appears in the terminal. The BBB starts responding again and everything goes back to normal. I replaced the FET with a transistor, same problem.
The reason why I said “It looks like the BBB suddenly goes super super slow” is, if I type “echo 1 > value” and wait, after maybe 30 secs or stuff like that, “echo 1 > value” appears in the terminal and the LED lights up.
Thank you very much!
Karl
Hi Karl, that is really strange! Have you definitely wired the circuit correctly? Double-check everything. I’m assuming you have rebooted, but also make sure that you don’t have any overlay loaded that might use that pin. Are you using the BBB Debian release? If not, then you may need an overlay to configure the P9_23 pin — see page 220. Regardless, try loading the overlay that I have written later in that chapter to see if it fixes the problem. If you find out what the problem was I would appreciate an update for my own information. Thanks, Derek.
Hi Derek,
Thanks for your help!
I…No, I didn’t reboot 🙁 I didn’t know what happened but the next day, after I turn the BBB back on, everything worked alright! So I guess I should had rebooted the BBB to try again.
Cheers,
Karl
Hi Dreek,
Attempted to compile makeLEDs.cpp and got this:
/usr/lib/gcc/arm-linux-gnueabihf/4.6/../../arm-linux-gnueabihf/crt1.o: Infunction ‘_start’:
(.text+0x30): undefined reference to ‘main’
/tmp/ccNIRkjz.o: In function ‘exploringBB::GPIO::toggleOutpot(int, int)’:
gpio.cpp:(.text+0x13ce): undefined reference to ‘pthread_create’
/tmp/ccNIRkjz.o: In function ‘exploringBB::GPIO::waitForEdge(int (*)(int))’:
gpio.cpp:(.text+0x16ae): undefined reference to ‘pthread_create’
collect2: ld returned 1 exit status
Appreciate your help.
Thanks,
Phil
Hi Phil, the toggleOutpot() function should be toggleOutput(). I searched the repository and it is not showing up — you may have accidentally introduced it into your code? Also, make sure that you build that code with the -pthread flag set (e.g., g++ -pthread X.cpp -o X). Kind regards, Derek.
Thank you Derek, and sorry for miss spelling your name.
LOVE the book; recommend it all the time
Thanks Phil — I appreciate that! Derek.
Hi,
I”m playing with the A/D. I tried running scanning in a loop through all 7 A/D channels. No problem. I then made a loop to do that 100 times. After the 8th loop it crashes with a
terminate called after throwing an instance of ‘std::ios_base::failure’
what(): basic_filebuf::underflow error reading the file
Aborted
If I read 1 channel 100 times no problem. Or 1000 time for that matter.
If I try 2 channels it crashes.
It crashes in the fs >> number line
{
stringstream ss;
double volts;
//number is the AD channel
ss << LDR_PATH << number <> number;
fs.close();
volts=(double)number*1.8/4095;
return volts;
}
int main(int args, char* argv[])
{
cout << "Starting the readLDR program" << endl;
int channel;
//clock_t start=clock();
int n;
for(n=0;n<1000;n++)
{
for(channel=0;channel<1;channel++)
{
double value=readAnalog(channel);
cout << "The LDR value for channel(" << channel <<") was " << value << " volts" << endl;
}
cout << "n="<<n<<endl;
}
//clock_t stop=clock();
//double diff=((double)(stop-start))*1000.0/CLOCKS_PER_SEC;
//cout<< "delt T=" << diff << " ms " << stop-start << endl;
return 0;
}
Thanks!!! great book!!!
Andy
I was able to stop the crashes by adding a try/catch around the code.
//number is the AD channel
stringstream ss;
ss << LDR_PATH << number <> number;
usleep(1);
fs.close();
}
catch(…) //
{
position(30,10);
count++;
cout << "crash " << count <<" number="<< number;
}
Andy
Hi Andrew, I’m at a loss to understand what is going wrong. In your example you are looping from 0 to <1 -- are you sure you meant to do that? I could understand if it crashed on the 8th loop if you were accidentally reading the AIN7, where there are only AIN0 to AIN6. Apart from that possibility, I can't see why you would need exception handling. Kind regards, Derek.
I had intended to loop higher but I was just changing parameters to see what happens. It’s behavior changed depending on how many channels I read. Sometimes it would crash after 14 cycles and sometimes it would go 300,000 than crash. The try catch fixes the problem for me. I don’t mind dropped data. I have a second BBB. Maybe I should try running it on that one.
Thanks
Hi Derek.
I bought your book and been reading it. I also jump from section to section for relevant info. Awesome work btw. – thank you.
I have a QT setup on ubuntu and i cross compile to the BBB running debian. I tried using your gpio class and/or SimpleGPIO under the QT application, and it only works when i have root logged in on the BBB and i have root as the Device on the BBB Kit. When i try to deploy it as user: debian, i get the error message that it can’t open the file. “GPIO: write failed to open file : Permission denied”
Is there a workaround this? I find it not safe (and no sense) to run as root just to flip some IO pins high or low.
Thanks much!
Hi Paul, thanks for your support! See the advanced section on page 247 that shows you how to use udev rules to avoid running your applications as root. Just be careful — there is a weird production typo in that section where the double minus signs were erroneously replaced with triple minus signs. Hope that helps, Derek.
Derek, I have no idea how i missed that section. Just went through it, applied my settings, and everything works like a charm !
only comment I can add is when i run sudo udevadm test –action=add….. i got the line above(prior) to “ACTION=add” the line” udev_device_read_db: no db file to read /run/udev/data/+subsystem:gpio: No such file or directory”
Was that normal / expected output?
Hi Derek. On page 249 further reading section you specify a link for the API documentation of the classes, but that link does not seem to work.
Thanks Jordi — that was on my todo list and I forgot about it. I will sort it out but it will take a few days. Thanks for letting me know, Derek.
Hi Derek,
I use the Debian latest software image (release date 2015-03-01) on my Beaglebone Black but I don’t understand an issue related to add a cape.
In this chapter of your book, you enable analog input typing the command echo BB-ADC > /sys/devices/bone_capemgr.*/slots
This command suppose that there is a Device Tree Overlay file called BB-ADC but in my version I try it in all eMMC without to find it (I use the command find / -name BB-ADC*)
In another web site, to enable ADC is being used command echo cape-bone-iio > /sys/devices/bone_capemgr.*/slots
I don’t know why but both commands enabled the ADC!
This is the file slots before to execute command:
0: 54:PF—
1: 55:PF—
2: 56:PF—
3: 57:PF—
4: ff:P-O-L Bone-LT-eMMC-2G,00A0,Texas Instrument,BB-BONE-EMMC-2G
5: ff:P-O-L Bone-Black-HDMI,00A0,Texas Instrument,BB-BONELT-HDMI
and this is the same file after executed command:
0: 54:PF—
1: 55:PF—
2: 56:PF—
3: 57:PF—
4: ff:P-O-L Bone-LT-eMMC-2G,00A0,Texas Instrument,BB-BONE-EMMC-2G
5: ff:P-O-L Bone-Black-HDMI,00A0,Texas Instrument,BB-BONELT-HDMI
8: ff:P-O-L Override Board Name,00A0,Override Manuf,cape-bone-iio
Then, should be a file named BB-ADC or cape-bone-iio but these file are not present on the Linux partition of the BBB filesystem, then how is possible to load them?
Why the ADC are correctly enabled?
Thanks.
Hi Paolo, in the bone 70 release the standard overlays have been “built in” to the kernel build and it is the same for later builds, such as 3.8.13. If you build the kernel yourself, the overlay binaries can be found in the bb-kernel/KERNEL/firmware directory. For example, the ADC overlay is available as:
The documentation is extremely sparse on what happens next, but I guess that all of these files are aggregated into built-in firmware as follows:
The name of the overlay is still preserved and that is why it is accessible using the cape manager. For example,
molloyd@DebianJessieVM:~/beaglebone/bb-kernel/KERNEL/firmware$ more BB-ADC-00A0.dtbo.gen.S
/* Generated by firmware/Makefile */
    .section .rodata
    .p2align 2
_fw_BB_ADC_00A0_dtbo_bin:
    .incbin "firmware/BB-ADC-00A0.dtbo"
_fw_end:
   .section .rodata.str,"aMS",%progbits,1
    .p2align 2
_fw_BB_ADC_00A0_dtbo_name:
    .string "BB-ADC-00A0.dtbo"
    .section .builtin_fw,"a",%progbits
    .p2align 2
    .long _fw_BB_ADC_00A0_dtbo_name
    .long _fw_BB_ADC_00A0_dtbo_bin
    .long _fw_end - _fw_BB_ADC_00A0_dtbo_bin
See the _dtbo_name section and the .string value “BB-ADC-00A0.dtbo”. Not an easy answer, but I hope that helps! Derek.
Hi Derek,
I am trying to download figures 6-6 and 6-7. I am getting Page Not Found errors for both the image and pdf files.
Is there something I need to do to access these figures?
Thanks,
Ken West
Thanks Ken, I have fixed those links. I was using a WordPress plugin that stopped working after an upgrade. Please let me know if you see any other links like this. Thanks, Derek.
I think you missed two of the links; clicking on the thumbnails for either of those two figures still gives me 404 not found.
Thanks J, that is fixed now. Kind regards, Derek.
Hey Derek,
Thanks again for all your work. I am continually impressed by the attention and feedback you give to all commenters.
This may be a really stupid question, but I am wondering why the read and write methods in the GPIO class are commented out in the version I clone from git? The code on this page shows them active. Are there any other diffs?
Thanks!
Hi Scott, not a stupid question at all… in fact, when I looked at the code I was stumped for a minute until I remembered! The read() and write() methods are common to the GPIO class and the PWM class, therefore I placed them in a file util.cpp with the header util.h. See: https://github.com/derekmolloy/exploringBB/tree/master/library/gpio
The reason that I left the references intact is so that I don’t have to separate the functionality out when I explain it in Chapter 6. Apologies for any confusion, Derek.
Derek,
Thank you for writing this book and your continued effort to keep this website up to date.
I have built my own cape and overlay which use a few of the PRU0 pins and some GPIO pins. I have also set up the capemgr so that the overlay is loaded on boot. This works fine when there are no other capes installed but if I install a 4D SYSTEMS LCD cape on my BBB the custom overlay I created will not load. I have verified that there are no pin conflicts and as a test created a blank overlay which also would not load. Do I need to take additional steps to load an overlay when a cape is installed?
Thanks!
Derek
Thanks Derek. I don’t have that cape but I haven’t seen that happen before. You should be getting some indication with dmesg about what is causing the problem. I’m not aware of any extra steps that are required when a cape is already present. Kind regards, Derek.
Thanks! I was able to track it down to an error in my .dts file where I had not updated my exclusive-use pins.
Hello Derek, all,
I have trouble using GPIOs without sudo.
My BBB is an A5A with Angstrom. I had to add the sudo package to it.
The first part “udevadm info –path=…” looks like on p. 247. So far so good.
When I list the folder I get this: (I added 99-gpio.rules)
root@bbb:/etc/udev/rules.d# ls
40-libgphoto2.rules 99-fuse.rules 99-gpio.rules modprobe.rules touchscreen.rules udhcpd.rules
When testing it I get an error, and I see no lines starting with “udev_device_”.
root@bbb:/etc/udev/rules.d# udevadm test –action=add /class/gpio
calling: test
version 196
…
error reading /etc/udev/hwdb.bin: No such file or directory
load module index
read rules file: /lib/udev/rules.d/10-dm.rules
read rules file: /lib/udev/rules.d/11-dm-lvm.rules
…
rules contain 196608 bytes tokens (16384 * 12 bytes), 24111 bytes strings
12699 strings (113425 bytes), 10742 de-duplicated (91272 bytes), 1958 trie nodes used
ACTION=add
DEVPATH=/class/gpio
SUBSYSTEM=subsystem
USEC_INITIALIZED=1769118825
unload module index
The GPIOs are still owned by root:root. Any ideas?
Regards,
Bjorn
Hi Bjorn, I have moved away from Angstrom so I’m not sure. It looks like the compiled hwdb database is missing. Check to see if it is somewhere else on the image (use find) such as /etc. Try running udevadm hwdb -update (double minus in front of update) to see if that helps either.
udevadm hwdb [options]
       Maintain the hardware database index in /lib/udev/hwdb.bin.

       --update
           Compile the hardware database information located in
           /lib/udev/hwdb.d/, /etc/udev/hwdb.d/ and store it in
           /lib/udev/hwdb.bin. This should be done after any update to the
           source files; it will not be called automatically. The running udev
           daemon will detect a new database on its own and does not need to
           be notified about it.
One other thing you could do is start udevd in debug mode using the –debug flag. Kind regards, Derek.
Hello Derek,
I have succesfully managed to use your GPIO-KEYS example to create one for my application. However, I have a question regarding one section in the dts:
“autorepeat;”
When I hold my button, it is not autorepeating. Does it work for you?
Hi Łukasz, if autorepeat; is added to each of the keys then it should cause the button press to continuously generate events. I haven’t tried it recently, but I’m almost certain that it did work. Maybe try adding the autorepeat; property inside each button (e.g., button_P9_15{}) and within gpio_keys {} also. Kind regards, Derek.
Hi Derek
Great book – but I’ve got stuck on changing ownership of GPIOs.
Apologies that my linux knowledge is very primitive at the moment – when things go well it’s growing fast but when they don’t it’s hard to know where to look.
The udevadm tool is throwing up an error as shown below – it is trying to read a missing file /run/udev/data/+subsystem:gpio. There does not seem to to be such a directory. And when I try echo 60 > export as you show I still get “Permission denied”.
I saw your note above about trying udevadm –update but can’t get this to work, and the man page doesn’t show this option. Also not clear about how to start udevd in debug mode as you mention.
Any more tips on this section would be great – I don’t want to run my development with admin privilege.
Best regards…
Mike
mike@beaglebone:/sys$ uname -a
Linux beaglebone 3.8.13-bone70 #1 SMP Fri Jan 23 02:15:42 UTC 2015 armv7l GNU/Linux
mike@beaglebone:/etc/udev/rules.d$ ls
50-hidraw.rules 60-omap-tty.rules 99-gpio.rules
50-spi.rules 70-persistent-net.rules
mike@beaglebone:/etc/udev/rules.d$ more 99-gpio.rules
KERNEL==”gpio*”, SUBSYSTEM==”gpio”, ACTION==”add”, PROGRAM=”/bin/sh -c ‘chown -R
mike:users /sys/class/gpio'”
KERNEL==”gpio*”, SUBSYSTEM==”gpio”, ACTION==”add”, PROGRAM=”/bin/sh -c ‘chown -R
mike:users /sys/devices/virtual/gpio'”
mike@beaglebone:/etc/udev/rules.d$ sudo udevadm test –action=add /class/gpio
…
parse_file: reading ‘/lib/udev/rules.d/97-bluetooth.rules’ as rules file
parse_file: reading ‘/etc/udev/rules.d/99-gpio.rules’ as rules file
parse_file: reading ‘/lib/udev/rules.d/99-systemd.rules’ as rules file
udev_rules_new: rules use 198432 bytes tokens (16536 * 12 bytes), 32917 bytes buffer
udev_rules_new: temporary index used 61040 bytes (3052 * 20 bytes)
udev_device_new_from_syspath: device 0x38748 has devpath ‘/class/gpio’
udev_device_new_from_syspath: device 0x389e8 has devpath ‘/class/gpio’
udev_device_read_db: no db file to read /run/udev/data/+subsystem:gpio: No such file or directory
ACTION=add
DEVPATH=/class/gpio
SUBSYSTEM=subsystem
UDEV_LOG=6
USEC_INITIALIZED=24365294582
mike@beaglebone:/etc/udev/rules.d$ sudo udevadm test –action=add /class/gpio
Hi Mike, interesting. I tried it there under bone70 and it works — however, after you put the rules file in place you seem to need a reboot! I’ll play with it again to see if the udevadm call can be coaxed to avoid the reboot (a call to sudo sh -c “echo 4 > export” also causes the rules to be applied but that is not ideal). Please let me know if the reboot solves it for you. Kind regards, Derek.
Hi Derek – yes rebooting has caused the ownership to change – I should have thought of that. I’m hoping I can apply the ownership change to the other control paths I need, e.g. to access SPI, uarts, etc. Best regards, Mike.
Hi Mike, Great. if your user is a member of the spi group, i2c group and the dialout(?) group then you should be fine for spi, i2c and uarts respectively. Kind regards, Derek.
hi! please help me to solve my problem about hardware desciption in kernel 3.8 for BBB.
I know to describe hardware, BBB use Device tree files instand board files. have BBB any board files support for device tree file? and relationship between them? (board-generic.c in /arch/arm/mach-omap2/board-generic.c)
thanks! sorry about my limited English!
Hi there. I cover that in the book in Chapter 6. Do you have a specific question about the content in the book? Kind regards, Derek.
Hi Derek. Great tutorials. In the PWM example, the output polarity appears to be opposite of that implied in “pwm_test.c”. In PWM.h (in class PWM), should polarity values in enum be swapped?
enum POLARITY{ ACTIVE_LOW=0, ACTIVE_HIGH=1 };
to
enum POLARITY{ ACTIVE_HIGH=0, ACTIVE_LOW=1 };
Frank
Hi Frank, I think you are correct. I have only vague recollection of this, but as stated on pg. 234 a value of 0 means that the duty represents the duration of the high pulse. Is it behaving correctly for you when you use your modification? If so, I will update the PWM.h file. Thanks for that, Derek.
Hi Derek,
I made the “enum POLARITY” change in PWM.h, tested it, and now the waveform polarity looks as it should for both ACTIVE_LOW and ACTIVE_HIGH.
Thanks for the quick follow-up.
FrankV
Thanks Frank, I have pushed that change to the repository. Kind regards, Derek.
Hi Derek,
I am using Eclipse environment to create my own programs, but I have a problem when I try to add GPIO.cpp and GPIO.h to my program. I know that I have to add -pthread flag to compile it, I tried to do it using this:
To use Pthreads in Eclipse, select Project
Properties ➢ C/C++ Build Settings ➢ GCC C++ Linker ➢ Miscellaneous ➢ Linker
Flags, and add ‐pthread.
I can’t find “GCC C++ Linker”, I find “Cross G++ Linker”. I try to add -pthread there, but It doesn’t work and shows me errors like this:
undefined reference to ‘pthread_create’
I need your help to fix this.
Thanks.
Hi there, it should be in Cross G++ Compiler -> Miscellaneous -> other flags -> add “-pthread”. Scroll down and click Apply. In Cross G++ Linker -> Libraries -> in the Libraries box, press the Add library button and enter “pthread” and click Apply. Then click OK. Hope that helps, Derek.
Thanks Derek! It works!
Hey Derek,
I’m working through the PWM sectionin Ch6 and I don’t seem to have to bone_pwm_* .dtbo files or the am33xx_pwm.dtbo in my /lib/firmware directory.
Hi Brendan, in the bone 70 release the standard overlays have been “built in” to the kernel build and it is the same for later builds, such as 3.8.13. If you build the kernel yourself, the overlay binaries can be found in the bb-kernel/KERNEL/firmware directory. For example, the ADC overlay is available as:
The documentation is extremely sparse on what happens next, but I guess that all of these files are aggregated into built-in firmware as follows:
The name of the overlay is still preserved and that is why it is accessible using the cape manager. For example,
molloyd@DebianJessieVM:~/beaglebone/bb-kernel/KERNEL/firmware$ more BB-ADC-00A0.dtbo.gen.S
/* Generated by firmware/Makefile */
    .section .rodata
    .p2align 2
_fw_BB_ADC_00A0_dtbo_bin:
    .incbin "firmware/BB-ADC-00A0.dtbo"
_fw_end:
   .section .rodata.str,"aMS",%progbits,1
    .p2align 2
_fw_BB_ADC_00A0_dtbo_name:
    .string "BB-ADC-00A0.dtbo"
    .section .builtin_fw,"a",%progbits
    .p2align 2
    .long _fw_BB_ADC_00A0_dtbo_name
    .long _fw_BB_ADC_00A0_dtbo_bin
    .long _fw_end - _fw_BB_ADC_00A0_dtbo_bin
See the _dtbo_name section and the .string value “BB-ADC-00A0.dtbo”. Not an easy answer, but I hope that helps! Derek.
Hey Derek,
I’m working through the PWM section in Ch6 and I don’t seem to have to bone_pwm_* .dtbo files or the am33xx_pwm.dtbo in my /lib/firmware directory.
Hi, I’m working through the PRU examples. For instance the PRU PWM runs fine. However if I run the ledButton Listing 13-5 I have a problem with the output. I load the dto and export the two pins. When I run the program, only the input works. If I go to the /sys/class/gpio/gpio30 and cat direction it tells me ‘in’. So it’s as if the overlay is not properly initialising the pin…. If I manually echo out > direction and then run the program it runs fine. I don’t have this problem with the PRU I/O, just when driving the GPIO30 from the PRU… I will go back to chapter 6 now and see if I can run the standard gpios with the overlays there. I am running on a BB white using Angstrom kernel 3.8.13.
Hi Will, I’m starting to forget some of the issues that arose when I was writing some examples, however if I remember correctly the overlay in Listing 13-1 was used to set up the regular GPIO pins. You should check dmesg to see that it is loading correctly. The HDMI overlay has to be disabled for this example too. Kind regards, Derek.
There may be documentation for this but I couldn’t find it. Now that the default overlays are built in in bone 70 and later there doesn’t seem to be any way to know what’s available and what their exact names are. This is not a problem when following the book (you tell us) but can be in other situations. I downloaded bb.org-overlays-master and made a list of the sources:
863 BB-ADC-00A0.dts
7,470 BB-BBBMINI-00A0.dts
2,605 BB-BONE-AUDI-02-00A0.dts
3,393 BB-BONE-BACONE-00A0.dts
1,863 BB-BONE-CRYPTO-00A0.dts
4,241 BB-BONE-DVID-01-00A3.dts
7,167 BB-BONE-LCD3-01-00A2.dts
7,310 BB-BONE-LCD4-01-00A1.dts
7,310 BB-BONE-LCD7-01-00A3.dts
10,775 BB-BONE-REPLICAP-00B1.dts
1,239 BB-BONE-SERL-03-00A1.dts
1,176 BB-CAN1-00A0.dts
1,524 BB-I2C1-00A0.dts
2,403 BB-I2C1-PCA9685-00A0.dts
1,948 BB-RELAY-4PORT-00A0.dts
2,010 BB-RTC-01-00A0.dts
1,555 BB-SPI0-MCP3008-00A0.dts
1,685 BB-SPIDEV0-00A0.dts
1,802 BB-SPIDEV1-00A0.dts
1,793 BB-SPIDEV1A1-00A0.dts
1,157 BB-UART1-00A0.dts
1,155 BB-UART2-00A0.dts
1,167 BB-UART4-00A0.dts
1,157 BB-UART5-00A0.dts
2,758 cape-CBB-Serial-r01.dts
76,611 cape-universal-00A0.dts
1,205 dev-USB-PWR-CTL-00A1.dts
These are all dated June 2015 so may not exactly match bone 70 but if, in fact, they aren’t listed anywhere else this might be useful to some.
Thanks Ron, that is very helpful, Derek.
Hi Derek,
I am trying to build an overlay for a simple cape that I am designing. It uses the GPIO, 4 Pru0 i/o’s, 6 Analog, I2C and SPI. I have previously created individual .dts file for these individual functions, but is it possible to have one .dts file with multiple sections or fragment. – Could you point me at an example?
PS – Is it possible to use any Pru i/o with HDMI enabled?
Thank in advance.
Hi Andy, There is an example in Chapter 13 sets up regular GPIOs and the PRU. Yes, there are a number of PRU pins that are not affected by HDMI — check the table in Chapter 6. Kind regards, Derek.
Errata
pg 246
“As illustrated in Figure 6-16(a), a push button is connected to the P9_15 (GPIO 49),”
should be GPIO 48
Thanks Al, you are correct — it should be GPIO 48. Thanks for that, I’ll add it to the list, Derek.
Hi Derek, what a really nice website thank you ! I’m actually working on rerouting a beaglebone to use 8 TOR I/O, 6 ANA I/O, RS232 ..
I’ve some trouble with my DTO, setting a pin to 0x07 (OUTPUT MODE0) at boot time with the /etc/default/capemgr, if I check pinmux the pin configuration is correct, but exporting this pin for the gpio and cat direction always return input mode. why ??
(DTO is correctly loaded in SLOTS)
Related article with the same trouble : http://hipstercircuits.com/beaglebone-black-gpio-mux-for-pru-with-device-tree-overlay/
Thanks.
(sorry for double post the 1st one was on the wrong chapter)
Hi Paco, there is a long standing issue with the direction bit in that circumstance. I’m not sure if it has ever been resolved. That would be a good question for the BeagleBoard forums as someone may have a patch/solution. Kind regards, Derek.
I just tried to directly write to DATAOUT register … and I get the same result : 300us .. ??? From where that delay comes ?
Ok thanks! I was looking at your article about kernel and GPIO, I need to be really faster than 300us and it seems that’s the maximum you achieve with the kernel module… what is the proper way to implement a write operation directly to the GPIO register in order to speed up the process and do atomic operation ? Why on your kernel code the IRQ doesn’t set the led instantly ? This is because of the sysfs use ? I read chap13 on your book but i can’t use the PRU.. I’m looking for a proper way to implement this ..
Hi Paco, the response I get in kernel space is about 18us. The IRQ still has to be handled and it has to trigger the LED transition — you aren’t going to get much faster than that using the GPIO headers within kernel space — perhaps with memory-mapped operations, but if you need to go that fast then you probably should be using a dedicated RTOS, the PRUs, QNX, or perhaps a bare-metal (non-OS) BeagleBone implementation. Good luck! Derek.
Hi Derek. First of all congratullations for your book.
I am working with the beaglebone designing a more or less complex digital system. I need to change pin mode on fly, in other words, start doing whatever the system needs to do with a specific pin mode, and then change its mode if it necessary to do other tasks.
I have used devmem2 as you recommend in your book on page 218, but instead for switching GPIO on/off purposes, for multiplexing pin modes. I am able to read control registers, which are used for this objective. However, unfortunately I am not able to write them… so the only way that I know to multiplex pins is through device tree and it requires to reboot the BBB, what is exactly what I am trying to avoid.
Is there any way to multiplex pins on fly?
Thank you,
Pablo
Hi Derek.
First of all, congratulations for this book. At least for me, it has been very helpful and everything is well structured, easy to read and understand. I have a query, I hope you could help me.
I am working in the design of a more or less complex digital system and I need to multiplex pin modes without the necessity of rebooting the BBB…so as far as I know, device trees are not the solution.
I have been analyzing ARM335 technical reference manual, and I have identified the register which are used for these purpose (it is explained in your book). So I tried to use devmem2 for changing the LSB value of the proper register of the desired pin… I am able to read its value, but not to change it.
I have been able to do it by modifying pinmux files of ocp.3 folder (/sys/devices/ocp.3) , executing sudo su previously because otherwise I am not able to access to this folder.
Is there any other easier way to do it?
Thank you very much.
Pablo
Thanks Pablo, It should be possible to load and unload Device tree overlays without rebooting the system (there are minor problems with this, but they are being resolved). If you need to do this at speed then you may have to modify the register values directly. The downside of the latter approach is that the solution is purely tied to the BBB and not transferable to other platforms. However, yes using the approach that is described on pg.218 to switch the pin mux mode instead of the pin mode is a valid approach. Kind regards, Derek.
Hi Derek! your tutorials were awesome. In the GPIO interfacing you mentioned
0x37 –> (0110111) Fast, Input, Pull‐Up, Enabled, Mux Mode 7, but actually it was 0x67.
Derek,
Thanks for a super book. In chapter 6 you show how to configure gpio pins using /sys/class/gpio and also how to read the pin configuration using devmem2. My question is this: when I set P8_12 to output using “echo 44 > /sys/class/gpio/export” and “echo out > /sys/class/gpio/gpio44/direction” why does “devmem2 0x44e10830” continue to return the pin’s configuration as 0x27, both before and after.
The file space manipulation has successfully put the pin in output mode (I can toggle an LED on and off). Yet a direct peek at the configuration memory address still shows 0x27, which is input mode.
What am I not understanding? Thanks,
Igor
Hello
In chapter 6 of the book at activating the PWM GPIO pins in my /lib/firmware folder there are no dtbo-files that are named like bone_pwm_P*_*-*.dtbo
why?
Error in P8 figure: in the lower left corner it says “P9 Header”.
Afternoon All, question regarding the move away from $SLOTS file to “custom overlays” and the effect on PWM. Any help is appreciated.
Question: Now that $SLOTS are removed, is there a defined method for configuring the pwm pins to allow them to output a pwm signal from ssh cmds or c++ code?
Reason: I’ve attempted to use the PWM.h and util.h headers provided by the “exploringBB” library and the ssh method of “config-pin” and exporting “pwmchip”, with no success. I’m new to linux and am hesitant to modify the internal files without knowing exactly what I’m changing.
Attempted methods…
Libraries: When I tried running the “pwm_test.cpp” executable from the chp06 examples, the system told me I have a “GPIO: write failed to open file : No such file or directory” error.
ssh: I am able to configure the pins, query, and export from the correct pwmchip, but when I set “enable” to “1” with proper “period” and “duty_cycle”, there is no pwm output. “enable” becomes “1” but my oscilloscope is left blank.
Hi John, Apologies, I haven’t rewritten the PWM C++ code to support config-pin, which is why you are having problems. However, the steps to use the new directory structure with code are reasonably straightfoward in code as config-pin is doing the heavy lifting. Essentially it involves writing to the file handles as outlined in the steps in Chapter 6. I didn’t remove the old code from the repo as I felt it could act as a basis for a rewrite. I will add a warning to other readers. Kind regards, Derek.
Thanx for the excellent books. I would love a PDF of Issue 2, I find Kindle a bit difficult to use in the reference book context.
That aside, this post is about what seems to be a bug in the gpio export operation in my BeagleBone Black (4.14.71-ti-r80), which is that if you write to the export folder at /sys/class/gpio/export for a gpio that has already been exported, the gpio disappears (after giving an error).
There is some detail here:
https://stackoverflow.com/questions/52125581/the-gpio-folder-is-deleted-when-the-same-gpio-is-exported-again
I ‘fixed’ it by putting a test for the gpio# directory existence, before writing the gpio number to the export sysfs file.
I.e. I checked for the existence of ‘/sys/class/gpio/gpio7’
Before writing 7 to ‘/sys/class/gpio/export’
I changed the existing exportGPIO function in your GPIO.cpp from:
int GPIO::exportGPIO(){
return write(GPIO_PATH, “export”, this->number);
}
to:
int GPIO::exportGPIO(){
// APM – 2019-05-27 – export twice kills it
if (checkDirectoryExists(GPIO_PATH + this->name)) {
cout <name + ” already exists” <number);
}
The checkDirectoryExists function I wrote based on a stat() call.
I hope this helps someone, it wasted a lot of time for me, bringing some old code up to the new system.
I note that I do not use config-pin, and we use a custom dts; that may make this redundant.
Thanks Andrew, that is very helpful. Derek.
Hi Derek
I am using your GPIO library to count pulses coming in on a gpio pin @about 13 pulses per second it works very well and in fact have used it to prove that a python script doing the same job was losing pulses. My problem is that when I get to just over a 1000 pulses I get an error saying that there are too many files open:
GPIO: Failed to create epollfd: Too many open files
In my appplication I am using :
total= pulse1.waitForEdge(&callbackFunction)
int callbackFunction(int var) {
cout << "Pulse detected!" << pulse_count << endl;
pulse_count++;
return pulse_count;
}
So its pretty simple and any input would be greatly appreciated.
Thanks
Hello,
config-pin tool doesn’t work
debian@beaglebone:~$ config-pin -l p2.08
ERROR: open() for /sys/firmware/devicetree/base/ocp/P2_08_pinmux/pinctrl-names failed, No such file or directory
debian@beaglebone:~$
Any comments ?
Thanks.
@Pavel Do you have a BeagleBoneBlack or PocketBeagle. The command you used was for the PocketBeagle.
Some commands in the book do not work with the current version of config-pin. For example,
debian@beaglebone:~$ config-pin p8.16 in+
ERROR: write() to /sys/devices/platform/ocp/ocp:P8_16_pinmux/state failed, No such device
debian@beaglebone:~$ config-pin P8_16 gpio_pu
Current mode for P8_16 is: gpio_pu
Derek, I purchased your second book, “Exploring BeagleBone” a couple of months ago. I am working in Chapter 6 under the heading, “The Linix Device Tree”. I am specifically working the example under the subheading “Modifying a Board Device Tree”.
Device: BeagleBone Black Rev. C
Linux Version: Linux ebb 4.14.108-ti-r137 #lstretch SMP PREEMPT Tue Aug 25 01:48:39 UTC 2020 armv71 GNU/Linux
I followed the example line by line and it would not flash the “heartbeat” on LED5 on the beaglebone board.
I repeated this example 5 times total and was unable to get it to work. ANY HELP WOULD BE GREATLY APPRECIATED.