
Introduction
This is the chapter web page to support the content in Chapter 9 of the book: Exploring BeagleBone – Tools and Techniques for Building with Embedded Linux. The summary introduction to the chapter is as follows:
In this chapter you can learn how to build on your knowledge of GPIO and bus interfacing. In particular, you can combine hardware and software in order to provide the Beagle boards with the ability to interact with their physical environments in the following three ways: First, by controlling actuators such as motors, the board can affect its environment, which is very important for applications such as robotics and home automation. Second, the board can gather information about its physical environment by communicating with sensors. Third, by interfacing to display modules, the board can present information. This chapter explains how each of these interactions can be performed. Physical interaction hardware and software provides you with the capability to build advanced projects; for example, to build a robotic platform that can sense and interact with its environment. The chapter finishes with a discussion on how a reader can build their own C/C++ code libraries and how they can interact with them in order to build highly-scalable projects
Learning Outcomes
After completing this chapter, you should be able to:
- Interface to actuators, such as DC motors, stepper motors, and relays.
- Protect the AM335x ADC from damage using op-amp clamping.
- Condition a sensor signal so that it can be interfaced to the Beagle board ADCs, regardless of the output voltage levels.
- Interface analog sensors such as distance sensors and accelerometers to the Beagle boards.
- Interface to low-cost display modules such as seven-segment displays and character LCD displays.
- Build C/C++ code as a dynamic library to be used on a Linux SBC.

Figure 9-A1: Chapter 9 all on one breadboard! (First Edition)
Additional Content (for First Edition)
The exploringBB Library
There are several examples in this chapter that leverage the code that is available in Chapter 6 and Chapter 8 of the book. One way that I could have written these examples is to copy the library code into each project directory; however, it would be incredibly difficult to make future corrections and keep the source-code examples up to date. Instead, the code from Chapters 6 and 8 is packaged as a library in the exploringBB/library/ directory.
For an example of how this is utilized, the LCDcharacter example in Chapter 9 consists of a single C++ program, LCDApp.cpp, which begins by including the LCDCharacterDisplay.h header and the exploringBB namespace:
#include < iostream >
#include < sstream >
#include "display/LCDCharacterDisplay.h"
using namespace std;
using namespace exploringBB;

int main(){
   cout << "Starting EBB LCD Character Display Example" << endl;
...
There is no display sub-directory in this project, rather display is a sub-directory of the directory exploringBB/library/. Therefore, to build this code the following compilation instruction is used:
g++ LCDApp.cpp ../../library/libEBBLibrary.so -o LCDApp -I "../../library"
This instruction explicitly includes the libEBBLibrary.so shared library and also states that the exploringBB/library/ directory should be added to the include path (using -I), thus bringing the library include directory into the project. The advantages of this approach are:
- The library code only exists in a single location, and any corrections are therefore applied to all of the examples in the repository — that is a very significant advantage!
- The library executable code only exists in a single location on the BeagleBone, reducing its storage overhead.
- The library executable code is compiled code that need not be compiled again. You have access to the text-format header files, but these are not “compiled” into your project. Therefore, compilation times are much faster.
The downside is complexity, but once you have the project structure in place then changes are reasonably straightforward. I would suggest that if you are planning to write a significant amount of code that you use this library directory as a template for your project. To ensure that the process is as seamless as possible, I modified the library in April 2015 to provide support for CMake.
CMake and the exploringBB Library
The make utility and Makefiles provide a build system that can be used to manage the compilation and re-compilation of programs that are written in any programming language. I use Makefiles quite often in my projects to automate the build process; however, there are times when Makefiles become overly complex for the task — particularly when building projects that have multiple sub directories, or projects that are to be deployed to multiple platforms.
The use of Makefiles is described in Chapter 11 (Pg. 439) in order to build Gtk applications. In that context, this discussion is somewhat premature but Chapter 9 is the natural home for this material, so please treat this as a placeholder to which you can revisit after you have completed the later chapters.
The article on my blog site: Introduction to CMake by Example describes how to use CMake in your projects, describing how you can build a simple project, build shared/static libraries, and to use a shared/static library in your application code.

An Introduction to CMake by Example (click to view the article)
The current directory structure of the exploringBB library is visible below:
molloyd@beaglebone:~/exploringBB/library$ tree
.
|-- CMakeLists.txt
|-- ExploringBB.Doxyfile
|-- README
|-- build
|-- bus
|   |-- BusDevice.cpp
|   |-- BusDevice.h
|   |-- I2CDevice.cpp
|   |-- I2CDevice.h
|   |-- SPIDevice.cpp
|   `-- SPIDevice.h
|-- display
|   |-- LCDCharacterDisplay.cpp
|   |-- LCDCharacterDisplay.h
|   |-- SevenSegmentDisplay.cpp
|   `-- SevenSegmentDisplay.h
|-- example
|   `-- TestCode.cxx
|-- gpio
|   |-- GPIO.cpp
|   |-- GPIO.h
|   |-- PWM.cpp
|   |-- PWM.h
|   |-- util.cpp
|   `-- util.h
|-- libEBBLibrary.a
|-- libEBBLibrary.so
|-- motor
|   |-- DCMotor.cpp
|   |-- DCMotor.h
|   |-- Servo.cpp
|   |-- Servo.h
|   |-- StepperMotor.cpp
|   `-- StepperMotor.h
|-- network
|   |-- SocketClient.cpp
|   |-- SocketClient.h
|   |-- SocketServer.cpp
|   `-- SocketServer.h
`-- sensor
    |-- ADXL345.cpp
    |-- ADXL345.h
    |-- BMA180.cxx
    |-- BMA180.hxx
    |-- ITG3200.cpp
    `-- ITG3200.h
8 directories, 38 files
You can modify the library code to suit your application, for example by adding additional C++ classes. Then, when you are ready you can rebuild the library using the following steps:
molloyd@beaglebone:~/exploringBB/library$ sudo apt-get install cmake
...
molloyd@beaglebone:~/exploringBB/library$ cd build
molloyd@beaglebone:~/exploringBB/library/build$ cmake ..
-- The C compiler identification is GNU 4.6.3
-- The CXX compiler identification is GNU 4.6.3
-- Check for working C compiler: /usr/bin/gcc
-- Check for working C compiler: /usr/bin/gcc -- works
-- Detecting C compiler ABI info
-- Detecting C compiler ABI info - done
-- Check for working CXX compiler: /usr/bin/c++
-- Check for working CXX compiler: /usr/bin/c++ -- works
-- Detecting CXX compiler ABI info
-- Detecting CXX compiler ABI info - done
-- Looking for include file pthread.h
-- Looking for include file pthread.h - found
-- Looking for pthread_create
-- Looking for pthread_create - not found.
-- Looking for pthread_create in pthreads
-- Looking for pthread_create in pthreads - not found
-- Looking for pthread_create in pthread
-- Looking for pthread_create in pthread - found
-- Found Threads: TRUE
-- Configuring done
-- Generating done
-- Build files have been written to: /home/molloyd/exploringBB/library/build
molloyd@beaglebone:~/exploringBB/library/build$ make
Scanning dependencies of target EBBLibrary
[  6%] Building CXX object CMakeFiles/EBBLibrary.dir/display/SevenSegmentDisplay.cpp.o
...
[100%] Building CXX object CMakeFiles/EBBLibrary.dir/motor/Servo.cpp.o
Linking CXX shared library libEBBLibrary.so
[100%] Built target EBBLibrary
molloyd@beaglebone:~/exploringBB/library/build$ ls -l libEBBLibrary.so
-rwxr-xr-x 1 molloyd molloyd 93856 Apr  2 23:39 libEBBLibrary.so
molloyd@beaglebone:~/exploringBB/library/build$ cp libEBBLibrary.so ..
This process builds the shared library libEBBLibrary.so in the build directory. You can then place it in the parent directory for archival and then install it on your BeagleBone using a call to make install — this essentially places the library in the /usr/lib directory and therefore must be executed with superuser privileges:
molloyd@beaglebone:~/exploringBB/library/build$ sudo make install
[100%] Built target EBBLibrary
Install the project...
-- Install configuration: "Release"
-- Installing: /usr/lib/libEBBLibrary.so

molloyd@beaglebone:~/exploringBB/library/build$ ls -l /usr/lib/libEBBLibrary.so
-rw-r--r-- 1 root root 93856 Apr  3 14:15 /usr/lib/libEBBLibrary.so
If you so wish, you can delete the contents in the build directory after you have built the library.
If you add a new C++ class/file to the project, it is very important that you perform the cmake step again, as the generated Makefiles will not include the new class/file.
Digital Media Resources
This video examines how we can drive stepper motors using C++ within Embedded Linux using the open source hardware EasyDriver board. The video begins by describing stepper motors and the effects of micro-stepping. It then discusses the EasyDriver Board (V4.4) and all of the available inputs and outputs. The board uses the Allegro A3967 which allows for full, half-, quarter and one eight micro-stepping. The video then explains C++ code that uses the GPIOs on the BeagleBoard to wrap the EasyDriver with a C++ class that is easy to use by creating an object of the class for each stepper motor that is connected.

Source Code
DCMotor.h
/*
 * DCMotor.h  Created on: 12 Jun 2014
 * Copyright (c) 2014 Derek Molloy (www.derekmolloy.ie)
 * Made available for the book "Exploring BeagleBone"
 * See: www.exploringbeaglebone.com
 * Licensed under the EUPL V.1.1
 *
 * This Software is provided to You under the terms of the European
 * Union Public License (the "EUPL") version 1.1 as published by the
 * European Union. Any use of this Software, other than as authorized
 * under this License is strictly prohibited (to the extent such use
 * is covered by a right of the copyright holder of this Software).
 *
 * This Software is provided under the License on an "AS IS" basis and
 * without warranties of any kind concerning the Software, including
 * without limitation merchantability, fitness for a particular purpose,
 * absence of defects or errors, accuracy, and non-infringement of
 * intellectual property rights other than copyright. This disclaimer
 * of warranty is an essential part of the License and a condition for
 * the grant of any rights to this Software.
 *
 * For more details, see http://www.derekmolloy.ie/
 */

#ifndef DCMOTOR_H_
#define DCMOTOR_H_
#include "../gpio/GPIO.h"
#include "../gpio/PWM.h"

#define DEFAULT_DCMOTOR_PWM_PERIOD 4000
#define DEFAULT_DCMOTOR_SPEED      50.0f

namespace exploringBB {

/**
 * @class DCMotor
 * @brief A generic DC motor class that controls a motor driver board using a
 * PWM signal,and a GPIO state to control the motor direction.
 */
class DCMotor {
public:
	enum DIRECTION{ CLOCKWISE, ANTICLOCKWISE };
private:
	GPIO *gpio;
	PWM *pwm;
	float speedPercent;
	DIRECTION direction;
	void init(PWM *pwm, GPIO *gpio, DCMotor::DIRECTION direction, float speedPercent);
public:
	DCMotor(PWM *pwm, GPIO *gpio);
	DCMotor(PWM *pwm, int gpioNumber);
	DCMotor(PWM *pwm, GPIO *gpio, DCMotor::DIRECTION direction);
	DCMotor(PWM *pwm, int gpioNumber, DCMotor::DIRECTION direction);
	DCMotor(PWM *pwm, GPIO *gpio, DCMotor::DIRECTION direction, float speedPercent);
	DCMotor(PWM *pwm, int gpioNumber, DCMotor::DIRECTION direction, float speedPercent);
	virtual void go();
	virtual void setSpeedPercent(float speedPercent);
	virtual float getSpeedPercent() { return this->speedPercent; }
	virtual void setDirection(DIRECTION direction);
	virtual DIRECTION getDirection() { return this->direction; }
	virtual void reverseDirection();
	virtual void stop();
	virtual void setDutyCyclePeriod(unsigned int period_ns);
	virtual ~DCMotor();
};

} /* namespace exploringBB */

#endif /* DCMOTOR_H_ */
StepperMotor.h
/*
 * StepperMotor.h  Created on: 13 Jun 2014
 * Copyright (c) 2014 Derek Molloy (www.derekmolloy.ie)
 * Made available for the book "Exploring BeagleBone"
 * See: www.exploringbeaglebone.com
 * Licensed under the EUPL V.1.1
 *
 * This Software is provided to You under the terms of the European
 * Union Public License (the "EUPL") version 1.1 as published by the
 * European Union. Any use of this Software, other than as authorized
 * under this License is strictly prohibited (to the extent such use
 * is covered by a right of the copyright holder of this Software).
 *
 * This Software is provided under the License on an "AS IS" basis and
 * without warranties of any kind concerning the Software, including
 * without limitation merchantability, fitness for a particular purpose,
 * absence of defects or errors, accuracy, and non-infringement of
 * intellectual property rights other than copyright. This disclaimer
 * of warranty is an essential part of the License and a condition for
 * the grant of any rights to this Software.
 *
 * For more details, see http://www.derekmolloy.ie/
 */

#ifndef STEPPERMOTOR_H_
#define STEPPERMOTOR_H_
#include "../gpio/GPIO.h"

namespace exploringBB {

/**
 * @class StepperMotor
 * @brief A class to control a stepper motor using a motor driver board, such as the
 * Easy Driver board, or compatible. The class uses five GPIOs to control each motor.
 */
class StepperMotor {

public:
	enum STEP_MODE { STEP_FULL, STEP_HALF, STEP_QUARTER, STEP_EIGHT };
	enum DIRECTION { CLOCKWISE, ANTICLOCKWISE };

private:
	// The GPIO pins MS1, MS2 (Microstepping options), STEP (The low->high step)
	// SLP (Sleep - active low) and DIR (Direction)
   GPIO *gpio_MS1, *gpio_MS2, *gpio_STEP, *gpio_SLP, *gpio_DIR;
   unsigned int uSecDelay;
   DIRECTION direction;
   int delayFactor;      // keep constant rpm even with microstepping
   STEP_MODE stepMode;
   float speed;
   int stepsPerRevolution;
   bool asleep;
   void init(int speedRPM, int stepsPerRevolution);

public:
   StepperMotor(GPIO *gpio_MS1, GPIO *gpio_MS2, GPIO *gpio_STEP, GPIO *gpio_SLP,
    			GPIO *gpio_DIR, int speedRPM = 60, int stepsPerRevolution = 200);
   StepperMotor(int gpio_MS1, int gpio_MS2, int gpio_STEP, int gpio_SLP,
    			int gpio_DIR, int speedRPM = 60, int stepsPerRevolution = 200);

   virtual void  step();
   virtual void  step(int numberOfSteps);
   virtual int   threadedStepForDuration(int numberOfSteps, int duration_ms);
   virtual void  threadedStepCancel() { this->threadRunning = false; }
   virtual void  rotate(float degrees);
   virtual void  setDirection(DIRECTION direction);
   virtual DIRECTION getDirection() { return this->direction; }
   virtual void  reverseDirection();
   virtual void  setStepMode(STEP_MODE mode);
   virtual STEP_MODE getStepMode() { return stepMode; }
   virtual void  setSpeed(float rpm);
   virtual float getSpeed() { return speed; }
   virtual void  setStepsPerRevolution(int steps) { stepsPerRevolution = steps; }
   virtual int   getStepsPerRevolution() { return stepsPerRevolution; }
   virtual void  sleep();
   virtual void  wake();
   virtual bool  isAsleep() { return asleep; }
   virtual ~StepperMotor();

private:
   bool threadRunning;
   pthread_t thread;
   CallbackType callbackFunction;
   int threadedStepPeriod, threadedStepNumber;
   friend void* threadedStep(void *value);
};

void* threadedStep(void *value);

} /* namespace exploringBB */

#endif /* STEPPERMOTOR_H_ */
testADC.cpp
/* A Test ADC Application
* Written by Derek Molloy for the book "Exploring BeagleBone: Tools and
* Techniques for Building with Embedded Linux" by John Wiley & Sons, 2014
* ISBN 9781118935125. Please see the file README.md in the repository root
* directory for copyright and GNU GPLv3 license information.            */

#include<iostream>
#include<fstream>
#include<string>
#include<sstream>
#include<cmath>
using namespace std;

#define LDR_PATH "/sys/bus/iio/devices/iio:device0/in_voltage"

int readAnalog(int number){
   stringstream ss;
   ss << LDR_PATH << number << "_raw";
   fstream fs;
   fs.open(ss.str().c_str(), fstream::in);
   fs >> number;
   fs.close();
   return number;
}

int main(int argc, char* argv[]){
   cout << "The value on the ADC is:" << endl;
   for(int i=0; i<1000; i++){
      int value = readAnalog(0);
      cout << "  = " << readAnalog(0) << "/4095    " << '\r' << flush;
      usleep(50000);
   }
   return 0;
}
SevenSegmentDisplay.h
/*
 * SevenSegmentDisplay.h  Created on: 6 Jun 2014
 * Copyright (c) 2014 Derek Molloy (www.derekmolloy.ie)
 * Made available for the book "Exploring BeagleBone"
 * See: www.exploringbeaglebone.com
 * Licensed under the EUPL V.1.1
 *
 * This Software is provided to You under the terms of the European
 * Union Public License (the "EUPL") version 1.1 as published by the
 * European Union. Any use of this Software, other than as authorized
 * under this License is strictly prohibited (to the extent such use
 * is covered by a right of the copyright holder of this Software).
 *
 * This Software is provided under the License on an "AS IS" basis and
 * without warranties of any kind concerning the Software, including
 * without limitation merchantability, fitness for a particular purpose,
 * absence of defects or errors, accuracy, and non-infringement of
 * intellectual property rights other than copyright. This disclaimer
 * of warranty is an essential part of the License and a condition for
 * the grant of any rights to this Software.
 *
 * For more details, see http://www.derekmolloy.ie/
 */

#ifndef SEVENSEGMENTDISPLAY_H_
#define SEVENSEGMENTDISPLAY_H_
#include "../bus/SPIDevice.h"

namespace exploringBB {

/**
 * @class SevenSegmentDisplay
 * @brief A class that allows you to drive an array of 7 segment displays using an array of 74XX595 ICs
 */
class SevenSegmentDisplay {
private:
	SPIDevice *spidevice; //!< The SPI bus device
	int numberSegments;   //!< The number of segments connected
	int numberBase;       //!< Base can be between 2 (binary) and 16 (hexadecimal). Default is decimal (base 10)
	bool isCommonAnode;   //!< Is a common anode display -- false by default

public:
	SevenSegmentDisplay(SPIDevice *device, int numberSegments);
	virtual int write(int number);                // writes an integer
	virtual int write(float number, int places);  // uses the "decimal" point
	virtual int setNumberBase(int base);
	virtual int getNumberBase() { return this->numberBase; }
	virtual int getNumberSegments() { return this->numberSegments; }
	virtual void setCommonAnode(bool isCommonAnode) { this->isCommonAnode = isCommonAnode; }
	virtual ~SevenSegmentDisplay();       // closes the SPI device

private:
	const static unsigned char symbols[]; //!< The array of symbols (i.e., characters to LED segments)
};

} /* namespace exploringBB */

#endif /* SEVENSEGMENTDISPLAY_H_ */
LCDCharacterDisplay.h
/*
 * LCDCharacterDisplay.h  Created on: 24 May 2014
 * Copyright (c) 2014 Derek Molloy (www.derekmolloy.ie)
 * Made available for the book "Exploring BeagleBone"
 * See: www.exploringbeaglebone.com
 * Licensed under the EUPL V.1.1
 *
 * This Software is provided to You under the terms of the European
 * Union Public License (the "EUPL") version 1.1 as published by the
 * European Union. Any use of this Software, other than as authorized
 * under this License is strictly prohibited (to the extent such use
 * is covered by a right of the copyright holder of this Software).
 *
 * This Software is provided under the License on an "AS IS" basis and
 * without warranties of any kind concerning the Software, including
 * without limitation merchantability, fitness for a particular purpose,
 * absence of defects or errors, accuracy, and non-infringement of
 * intellectual property rights other than copyright. This disclaimer
 * of warranty is an essential part of the License and a condition for
 * the grant of any rights to this Software.
 *
 * For more details, see http://www.derekmolloy.ie/
 */

#ifndef LCDCHARACTERDISPLAY_H_
#define LCDCHARACTERDISPLAY_H_
#include "../bus/SPIDevice.h"
#include <string>

namespace exploringBB {

/**
 * @class LCDCharacterDisplay
 * @brief A class that provides an interface to an LCD character module. It provices support
 * for multiple rows and columns and provides methods for formatting and printing text. You
 * should use a 4 wire interface and a 74XX595 to communicate with the display module.
 */

class LCDCharacterDisplay {

private:
	SPIDevice *device;          //!< a pointer to the SPI device
	int width, height;          //!< the width and height of the module in characters
	void command(char i);
	void setup4bit();
	unsigned char cursorState;
	unsigned char displayState;
	unsigned char entryState;
	void writeCursorState();
	void writeDisplayState();
	void writeEntryState();

public:
	LCDCharacterDisplay(SPIDevice *device, int width, int height);

	virtual void write(char c);
	virtual void print(std::string message);

	virtual void clear();
	virtual void home();
	virtual int  setCursorPosition(int row, int column);
	virtual void setDisplayOff(bool displayOff);
	virtual void setCursorOff(bool cursorOff);
	virtual void setCursorBlink(bool isBlink);
	virtual void setCursorMoveOff(bool cursorMoveOff);
	virtual void setCursorMoveLeft(bool cursorMoveLeft);
	virtual void setAutoscroll(bool isAutoscroll);
	virtual void setScrollDisplayLeft(bool scrollLeft);

	virtual ~LCDCharacterDisplay();
};

} /* namespace exploringBB */

#endif /* LCDCHARACTERDISPLAY_H_ */
Some High-Resolution Figures from this Chapter


External Resources
Important Documents
External Web Sites
The AM335x Technical Reference Manual (TRM)
The BeagleBone Black System Reference Manual (SRM)
- The Hitachi HD44780 datasheet: tiny.cc/ebb908
- There is an excellent guide on using Bluetooth with Linux at tiny.cc/ebb909
Errata
Second Edition
- None so far
First Edition
- Page 335, typo in figure 9-5 — the PDF input should be PFD input.
- Page 336, Listing 9-3 refers to StepperMotor.h, not StepperMotor.cpp.
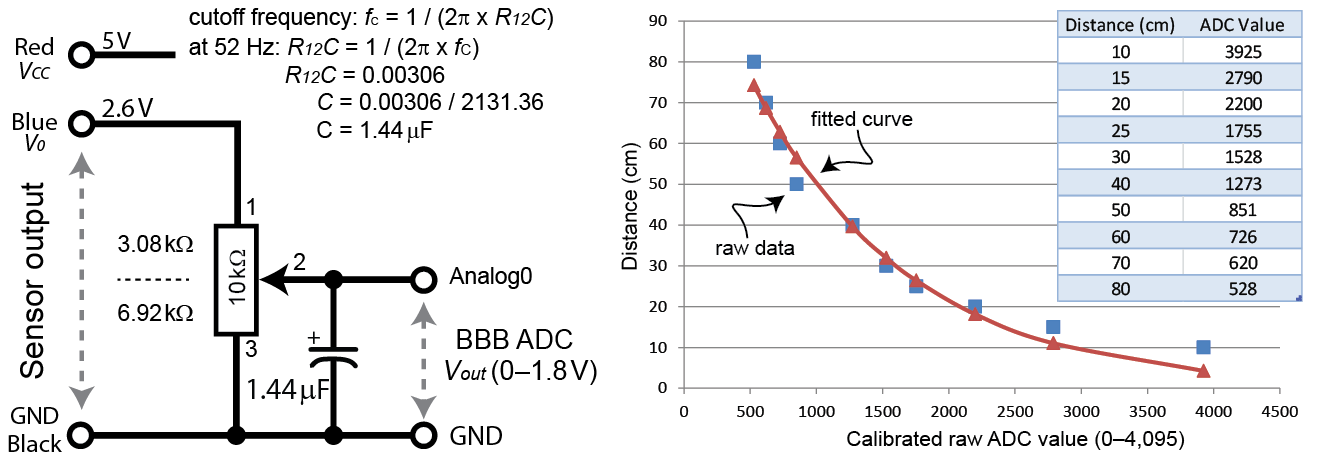
- Page 346. There is a mistake in the calculation of the cutoff frequency (fc) that is carried forward to Figure 9-15. The equation should be R12C1 = 1/(2π x fc), where R12 = R1||R2 (i.e., R1 in parallel with R2). The top-left of Figure 9-11 should also read: fc = 1/(2π x R12C1). The calculation in Figure 9-15 should therefore read: R12C1 = 1/(2π x fc) = 1/(2π x 52Hz) = 0.00306. Since R12 = R1||R2 = 3080||6920 = 2131 Ω, C1 = 0.00306 / 2131 = 1.44 µF instead of 0.994 µF. Here is an update of Figure 9-15 that includes corrected calculations.
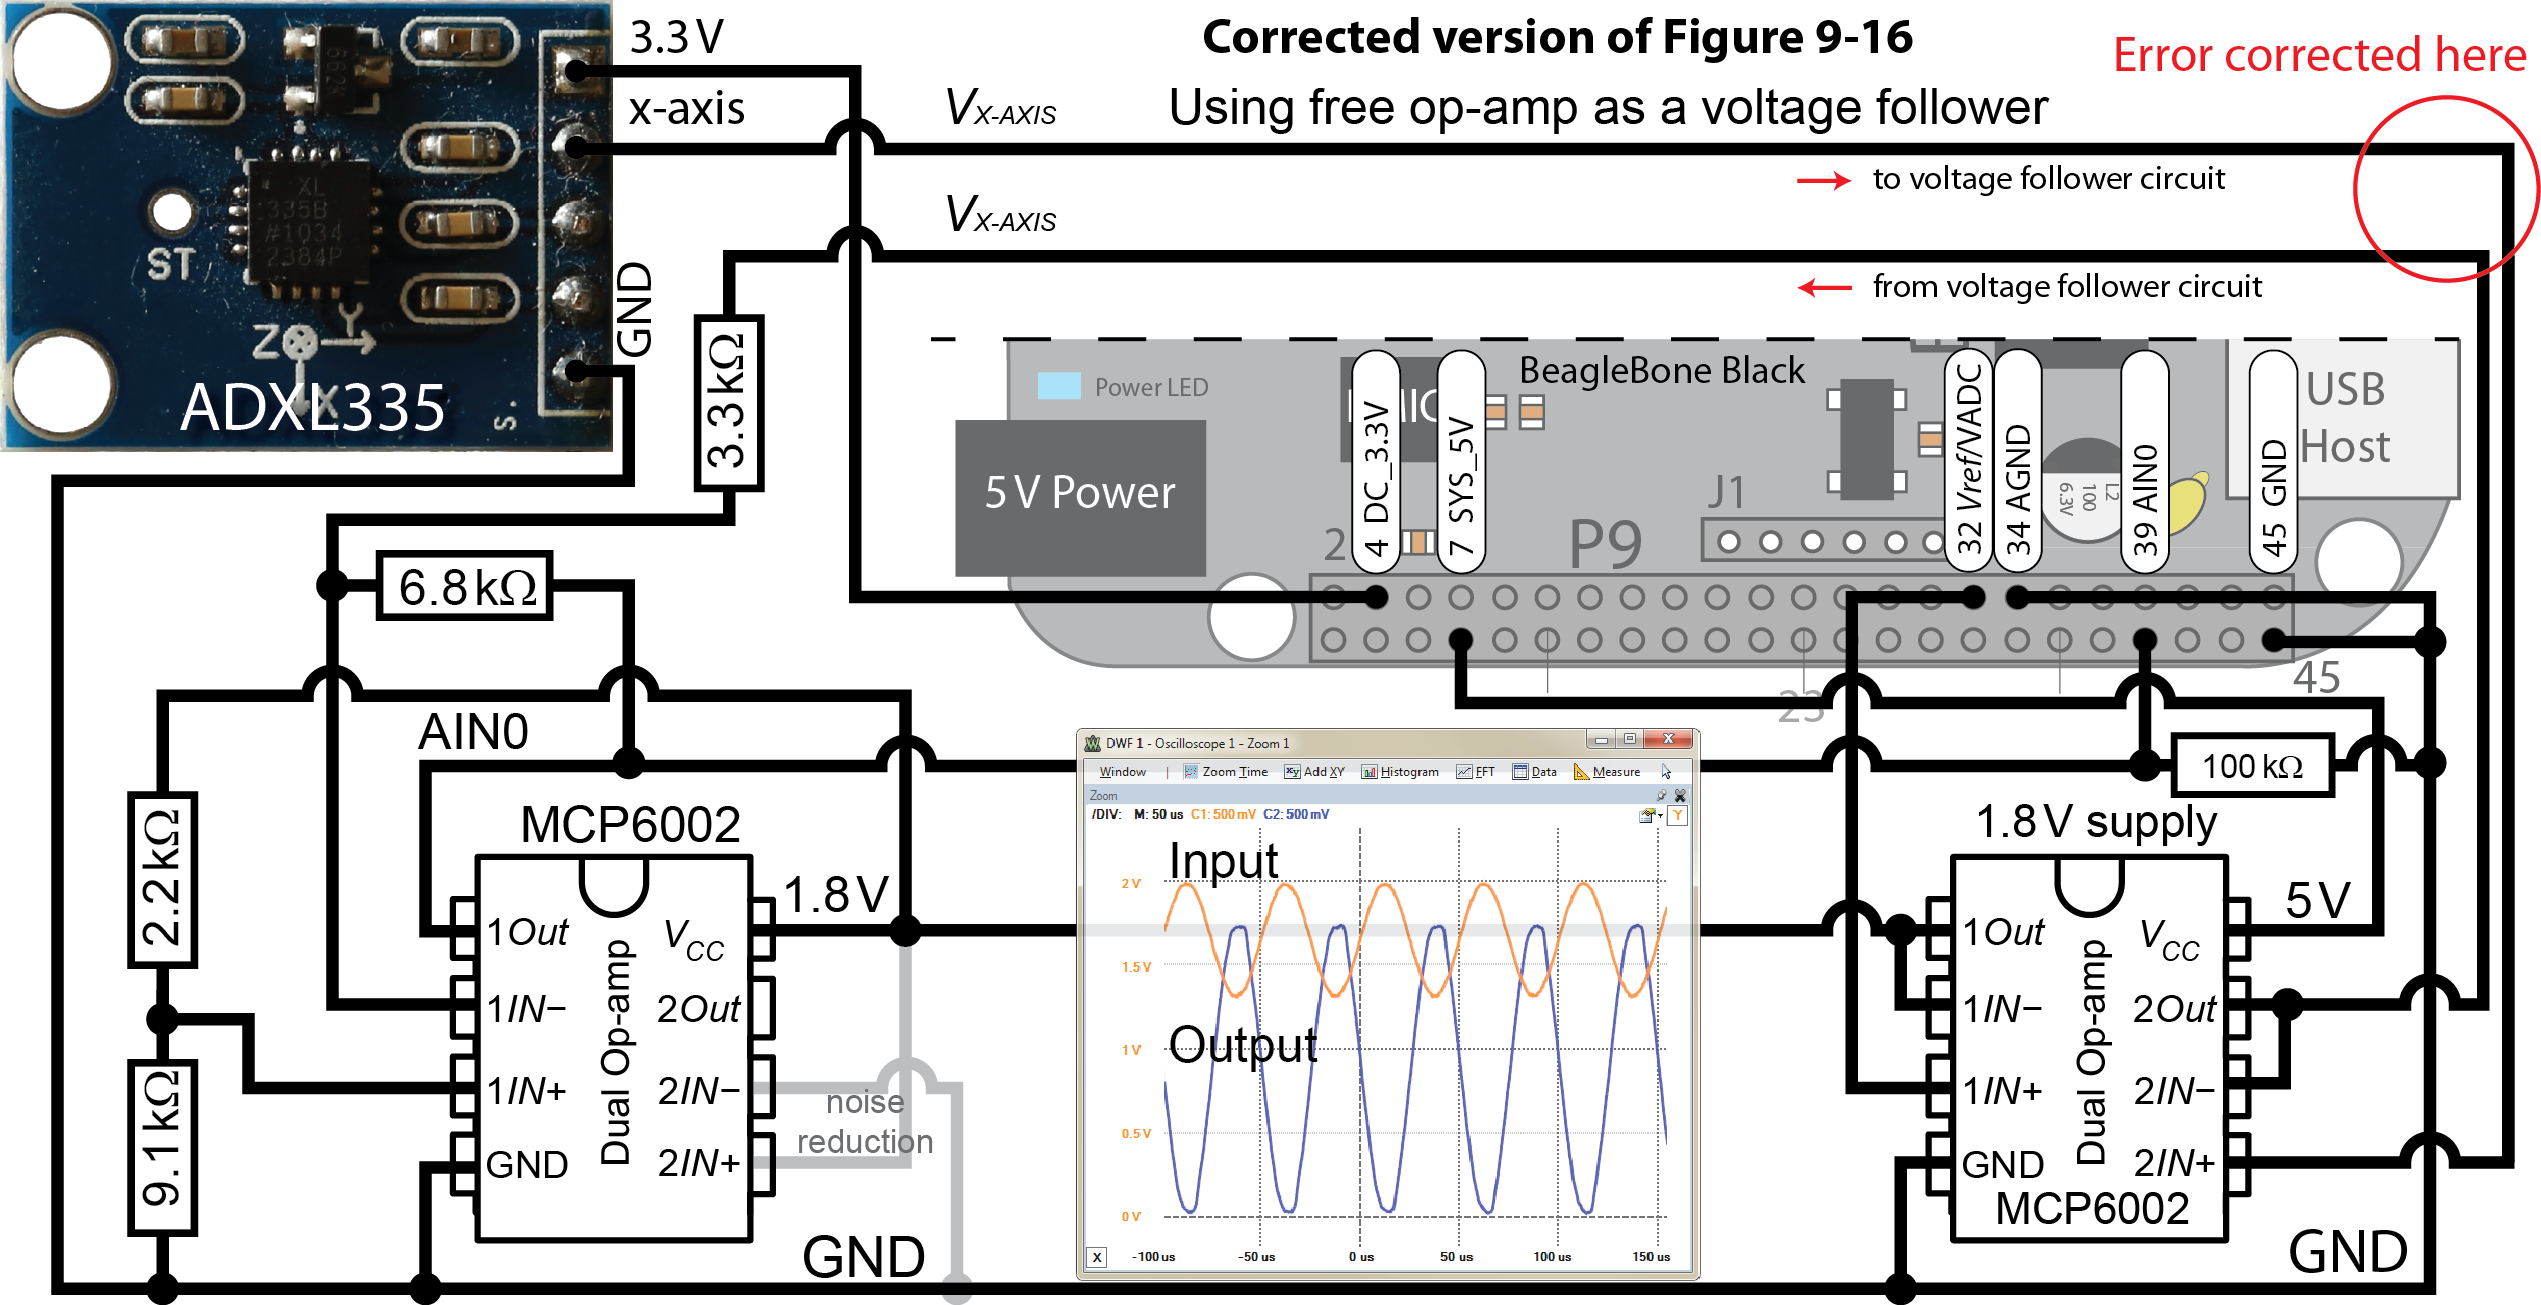
- Page 353, Figure 9-16 contains an error. The two lines on the right-hand side of the figure have accidentally been reversed. The x-axis output from the ADXL335 should be connected to the 2IN+ input of the MCP6002 and the 2Out/2IN- output from the MCP6002 should be connected to the 3.3KΩ resistor. An updated figure is available in the image carousel above and can be downloaded and printed using this link: Figure 9-16
Loc 9437: In the source code you have listed in “Listing 9-3,” you’ve listed the name as “/library/motor/StepperMotor.cpp.” However as this is the class definition, it should be “/library/motor/StepperMotor.h.”
Also, in the version of the header file you have in the git repository, you’ve listed the declaration of the “threadedStep” function twice: Once (correctly) inside the class as a friend of the class, and the other time in the same namespace but right outside the class.
Ah, I see what you’re doing with the two functions–you’re basically doing a poor-man’s overload of the friend function, with the one outside the class but in the exploringBB namespace. I am just reviewing the GPIO.h/GPIO.cpp files, and see that you’re doing it there as well. Interesting. I didn’t see your client code use that, so I thought it might have been a mistake. But now I see how you’ve laid that out.
This is a little bit messy, but it is a whole lot better than any alternative I can think of. It is based on the code in Listing 6-5, but the friend function is needed because the pthread_create() function cannot easily be called in an OOP form (for example, in the threadedStepForDuration() function). When the friend keyword is used in the StepperMotor class definition, it declares that the external friend function exists, not that there will be an implementation in the .cpp file. The resulting threadedStep() function is not “a part of” the StepperMotor class. It is complex, but it is worth it as you can used it to leave a stepper motor stepping while you do something else at the same time. Derek.
Oh, I have no problem with it being a friend function–that seems to be used quite a bit in C++, especially in those cases where the left operand would have to be a member of the class, but you cannot make it so. Like when you overload operator<>, for instance. So the friend function didn’t bother me a bit. I just didn’t know why you needed the friend version AND the non-friend version, when you aren’t calling it anywhere that I can tell.
Also, did you get the comment about the StepperMotor.cpp naming, when it should have been StepperMotor.h?
Oops. Missed that. Yes, it should be StepperMotor.h. Thanks.
Yeah, a minimal error at most. As I move along through the book I’ve been noticing that there are fewer errata…at least that I’ve caught. Hard-core electronics is not my strong suit so there might be something in those circuit diagrams that I’ve missed–but I am guessing that since you’ve forgotten more about electronics than I’ll probably ever know, you would have almost certainly picked them up by now.
(Congrats on the “#1 Best Seller” status in Amazon.com, by the way!)
Thanks. Hopefully it lasts!
I keep forgetting to ask this, but is there something special we have to do to enable the Kindle version of the book for searching? It tells me this:
***********************************************
Search Not Available
Sorry, this book is not yet enabled for searching. Please try again at a later time.
***********************************************
I get that message on both the version on my iPad, and in the Kindle Cloud viewer. I know that searching is support in the Kindle Cloud viewer though, as it works well for Simon Monk’s BBB book. Maybe you have to talk to the guy?
LOL…
I’m not sure — I have added this to the list of questions to the publisher.
Hi Derek,
Thanks for writing such a wonderful book!
Quick question about the circuit shown for the ADXL335: There are two independent nets that share the name “Vx-axis”. One goes from the ADXL335 eval board to the output (?) of the MCP6002 op-amp. The other goes from the 2IN+ input of that same amp to the 1IN- input of the other amp. It seems that there should be two separate net names, and that the output of the accelerometer (net name x-axis) should be connected to the 2IN+ input while the 2IN-/2OUT junction (Vx-axis) should go to the other amp.
Can you confirm?
Hi John. Thanks for your kind words. Yes, I made a mistake there. It looks like I reversed the input and output lines on the right-hand side while I was drawing the diagram. I will issue a new figure on the website. Thanks for spotting that, Derek. (Update — see the errata list)
Hello Derek,
congratulations on your long-awaited and very helpful book !
I feel a little bit uncomfortable about the way you calculated the cutoff-frequency of the ADC input low-pass filter on top of p. 346. According to Thévenin’s theorem, the equivalent serial resistance of the voltage divider is R1||R2. Hence, C1 should be 1/(2 * pi * fc * R1||R2) instead of 1/(2 * pi * fc * R1). The issue appears again on p. 351 where the cutoff frequency of the circuit shown in fig. 9-15 is actually 75 Hz rather than 52 Hz. For 52 Hz, C should be 1.4 µF.
Independently, the text above the circuit in fig. 9-15 states RC = 0.003 and C = 0.006 / 3080. Here, ‘0.006’ seems to be a typo and should remain ‘0.003’.
Perhaps there is a good explanation for everything and I’m wrong … So, please let me know what you think.
Hi Thomas, Thanks for the feedback. Yes, unfortunately it looks like I made a mistake in both calculations. I will sit down with a pen and paper to check it and then reissue figures. Thanks, Derek.
Hi Derek,
Just a minor bug that probably does not affecting many..
When running the SevenSegmentApp program on p357, on annode displays, the decimal point doesn’t show on the floats… I edited SevenSegmentDisplay.cpp in the write (float) module by moving the following line
if(i==places) output[i] = output[i] | 0b10000000; // turn on “decimal point”
to above
if(this->isCommonAnode) output[i]=~output[i]; //invert the bits for common anode
ie.
for(int i=0; inumberSegments; i++){
output[i] = this->symbols[intNumber%this->numberBase];
if(i==places) output[i] = output[i] | 0b10000000; // turn on “decimal point”
if(this->isCommonAnode) output[i]=~output[i]; //invert the bits for common anode
intNumber = intNumber/this->numberBase;
}
& the DP displays ok.
Great book I’ve really learnt a lot thanks.
Thanks Rod, I’ll integrate your code later today. I developed it for common cathode displays and tested it on common anode displays but I must have forgotten to test the decimal point. Thanks for that, Derek.
Hi Derek,
I’m using the setup on page 348 figure 9-13 to protect the ADC pins. The only issue I have is that when the power is removed from the op amp, and if there is still an analogue signal, there is still a voltage at the ADC pin. Is there a simple fix to avoid back powering the BBB when it is off?
Thanks
Angus
Hi Angus, Unfortunately I don’t know of a simple solution. One more complex solution is to use an analog CMOS switch in series with the ADC. I did a quick search and I think that the http://www.analog.com/media/en/technical-documentation/data-sheets/ADG419-EP.pdf will do the job, but it is running at €3.50+ for a one-off purchase. I would be interested it you find a better solution. Kind regards, Derek.
Hi Derek,
Figure 9-5 description:
There is : %Fast Decay PDF input
That should be : %Fast Decay PFD input
Thanks Jerzy, well spotted! I’m too used to typing PDF — I’ll add that to the list of errata. Thanks Derek.
Hi Derek,
Figure 9-19 is showing connection of the LCD module to the BBB. The LCD module (5V logic level) is connected to the 74HC595 IC (5V logic level). But the 74HC595 IC (5V logic level) is connected to the BBB (3,3V logic level). Is it correct?
Hi Jerzy, Yes, it is fine once you don’t connect Pin 9 back to the BeagleBone. Strictly speaking, 3.3V is slightly below the CMOS gate level of 3.5V (i.e., 30% below 5V) and it is not perfectly correct, but it should not cause difficulty. To fix this you could use a 74LS595 which has a lower-level high input threshold of 2V, or you could employ logic-level translation. Hope that helps, Derek.
Thanks for your clarification.
Wouldn’t it be simpler and safer to use rather of the 74LVC595 IC powered from 3,3V in this case? Unfortunately, LVC series does not occur in DIP version.
Hi Derek,
Thanks for your clarification.
What do you think about the use in this case of the 74LVC595 IC powered from 3,3V?
Hi there, That is a nice IC. Yes, powering that with 3.3V would appear to solve any problems. Is it available in a DIP form? Thanks, Derek.
Hi Derek,
Thanks for your clarification.
Wouldn’t it be simpler and safer to use rather of the 74LVC595 IC powered from 3,3V in this case?
Hi Jerzy, Apologies, I may be missing your point, but that is what I suggested in the response. I searched and cannot find a 74LVC595 in a DIP package, so it will not be practical for prototyping on a breadboard unless you solder the SOIC onto a suitable adapter board. I think the 74HC595 is preferable in that case, and although it is slightly outside of the specification, there will be no damage to the BeagleBone unless you were to connect an output line from the 74HC595 into the BeagleBone, which does not happen in Figure 9-19. Hope that helps, Derek.
Ok, you are right.
Thanks again.
Hi Jerzy, Apologies, there was a caching problem on the website which I resolved last night — you may not have seen my replies correctly. Kind regards, Derek.
Hi Derek (or anyone else),
I’ve been going around in circles because my dc motor won’t!
I can’t get it to reverse direction (except by manually switching the Aout1 & Aout2 wires to the motor).
On page 330 p9_41 can be used to change direction, although on page 331
“The direction of rotation ….using the gpio116 sysfs..” is that a typo??
Nevertheless manually changing the value of gpio114 or gpio116 had no effect, on the direction. Nor did the DCMotorApp on p332 change direction. And the motor didn’t stop after running the program.
Am I missing something or just check my wiring!, maybe the BOB is faulty? Any ideas?? .. any info much appreciated.
And just curious do you know what the .12 on the pwm_test_P9_42.12 directory is as I get .15 ?
Regards
Hi Rod, I feel like that some days too! Have you disabled the HDMI overlay to get P9_42 to work correctly? I don’t think there is a typo on the gpio116 sentence — the sysfs directory is /sys/class/gpio/gpio116 and the PWM output on P9_42 controls the speed but GPIO 116 on P9_41 controls the direction. Can you measure the voltages on P9_41 and P9_42? The voltage on P9_41 should measure 0V and 3.3V as the direction changes and P9_42 should measure 1.65V at 50% speed — at least that way you can rule out a software problem and maybe it will clarify if you have a faulty driver board. On the .12 versus .15 — frustratingly those numbers change quite often! Hope that helps, Derek.
Clearly I got confused with P9_42 & gpio116 somewhere! However, I did realised I was using sudo su ~ instead off sudo su – & that seem to fixed things I was able to work thru p331 & run DCApp. ok.
Regards
Just a note on the use of the SHARP infrared distance measurement sensor: I think the geometry of the way the sensor works is such that beyond a critical distance (typically 10 cm) the output voltage drops like 1/x, rather than exp(-ax). I’ve had my classes using (and calibrating) this device and the 1/x fit is extremely good. One fun use of this device with the BBB is a sort of Theremin where, instead of capacitively coupling to a pair of antennae, you can use distances from a pair of these sensors to control pitch and volume. It’s mostly a programming exercise (constant pwm frequency, and time-dependent duty cycle) but it’s still a fun use of this sensor.
Thanks Brett, that is very interesting! Yes, it looks like a 1/x fit, but I wanted to provide a generalized public approach using Wolfram Alpha and I could not find a nice way to do that. The Theremin is a really nice exercise idea! If you have a blog or public instruction description I will gladly link to it from this page. Kind regards, Derek.
I don’t know how to directly fit to 1/x on Wolfram Alpha, but you could do a linear fit of ln(y) vs ln(x), but extracting the desired coefficients from the fitted ones is obviously messier than for the exponential fit that you did. For my classes, memory was not critical so I just installed gnuplot (freely available for all platforms) on the classes’ Beaglebones. Fitting was then a snap. I hope to put my music software on GitHub sometime this summer. When I do, I’ll let you know. The Theremin is a small part of a much larger project, but it was entertaining. Perhaps I’ll post the Theremin part separately — it does have a few useful tricks in it. Regards, Brett
Thanks Brett, I had no idea you could perform curve fitting with gnuplot… that’s great to know — I even used it for the additional web materials for Chapter 8 and 13. I’ll have to play with it now! Thanks, Derek.
It’s a 2-liner: Let’s assume your x, y data are in a file called calibrate.dat. Then, from within gnuplot type:
f(x) = A + B/x
fit f(x) “calibrate.dat” u 1:2 via A, B
you can then plot the data & the fit with:
plot “calibrate.dat” u 1:2, f(x)
You can choose the fitting range by inserting [lowx: highx] before the filename. (lowx & highx are numbers that define the region over which you wish to fit.
Thanks Brett — very useful!
2nd Edition, Page 412, Apparent typo (missing “l” in a directory name): “The build script assumes that the example application source is in /expor-ingbb/chp09/dcmotor/” where the directory should be /explor-ingbb/chp09/dcmotor/.
2nd Edition pp. 404-405 (Unneeded/unintentional duplication of text) Compare the paragraph beginning “One solution is to place a Zener diode…” on page 404 with the the paragraph beginning “An alternative to this configuration is to place a Zener diode…” on page 405. Apart from the beginning of the paragraph, these paragraphs are the same, so you might want to strike one in subsequent printings/editions.
Thanks Stewart, I appreciate you flagging those issues. Derek.
Hi Derek,
I can cross compile the stepper example, I move it to the beaglebone black with the shared object from the libraries and I get a bunch of these errors:
GPIO: write failed to open file : No such file or directory
I run it again and get fewer errors and the motor steps but direction and changing steps do not do anything.
Any thoughts?
Thanks,
John
StepperMotor::~StepperMotor() {
delete(this->gpio_MS1);
delete(this->gpio_MS2);
delete(this->gpio_STEP);
delete(this->gpio_SLP);
delete(this->gpio_DIR);
}
Thank you so much for the book and the site. Your dedication to teach others, your methodology and detail is wonderful. As a hobby I’m learning BB, I’m old, use to developed in C in the (87-96) , after that i went to administration in databases and i have been doing that since. In the steeper motor class and application , I’m getting “No such file or Directory” i started debugging the issue, to me is related to new versions of the kernel or library. Others are also reporting the same issue. I did the debug manually, I will get more detail as soon i finish the eclipse setup. Any recommendation?
exploringBB::write (path=”/sys/class/gpio/cd /”, filename=”value”, value=”0″) at /home/debian/C++/exploringBB/library/gpio/util.cpp:43
43 if (!fs.is_open()){
(gdb) s
44 perror(“GPIO: write failed to open file “);
(gdb) s
__GI_perror (s=0xb6fc28f4 “GPIO: write failed to open file “) at perror.c:49
49 perror.c: No such file or directory.
(gdb) s
58 in perror.c
(gdb) s
__GI___fileno (fp=0xb6e02d10 ) at fileno.c:35
35 fileno.c: No such file or directory.
(gdb) s
dup () at ../sysdeps/unix/syscall-template.S:78
78 ../sysdeps/unix/syscall-template.S: No such file or directory.
(gdb) s
79 in ../sysdeps/unix/syscall-template.S
(gdb) s
_IO_new_fdopen (fd=fd@entry=3, mode=0xb6de4094 “w+”) at iofdopen.c:53
53 iofdopen.c: No such file or directory.
(gdb) s
68 in iofdopen.c
(gdb) s
70 in iofdopen.c
(gdb) s
75 in iofdopen.c
(gdb) s
76 in iofdopen.c
(gdb)
88 in iofdopen.c
(gdb)
__GI___libc_fcntl (fd=fd@entry=3, cmd=3) at ../sysdeps/unix/sysv/linux/fcntl.c:42
42 ../sysdeps/unix/sysv/linux/fcntl.c: No such file or directory.